No edit summary |
|||
| Line 1: | Line 1: | ||
{{Copyedit}} | {{Copyedit}} | ||
By user [[User:Stef Breukel|Stef]] | |||
[[Image:3rd world arm lamp 2007.PNG|thumb|right|150px]] | |||
[[Image: | |||
On the [[3rd world arm lamp advantages]]link you have some information wat kind of tools an material you need to make the arm-stand. | On the [[3rd world arm lamp advantages]]link you have some information wat kind of tools an material you need to make the arm-stand. | ||
[[Image:3rd world arm lamp animation.gif]] | [[Image:3rd world arm lamp animation.gif]] | ||
[[Image: | [[Image:Outer arm 1 2007.PNG|thumb|right|300px]] | ||
=== Outer-arm part 1 === | === Outer-arm part 1 === | ||
You can use less quality wood for this part. | You can use less quality wood for this part. | ||
''' Outer arm part 1''' | '''Outer arm part 1''' | ||
! Part | {| cellspacing="0" cellpadding="5" border="1" | ||
! Measure | |- | ||
! Part | |||
! Measure | |||
! Shape | |||
! Size in mm | |||
middle | |||
! Size in mm | |||
large | |||
! Size in mm | |||
large | |||
|- | |- | ||
| P251 | |||
| P251 | | 04 | ||
| L | |||
| 25 | |||
| 25 | |||
|- | |- | ||
| P251 | | P251 | ||
| 06 | |||
| L | |||
| 450 | |||
| 670 | |||
|- | |- | ||
| P251 | |||
| P251 | | 30 | ||
| L | |||
| 20 | |||
| 20 | |||
|- | |- | ||
| P251 | | P251 | ||
| 32 | |||
| L | |||
| 20 | |||
| 20 | |||
|- | |- | ||
| P240 | | P240 | ||
| 36 | |||
| Ø | |||
| 21 | |||
| 21 | |||
|- | |- | ||
| P251 | | P251 | ||
| 41 | |||
| L | |||
| 20 | |||
| 20 | |||
|- | |- | ||
| P251 | | P251 | ||
| 42 | |||
| L | |||
| 20 | |||
| 25 | |||
|- | |- | ||
| P251 | | P251 | ||
| 43 | |||
| L | |||
| 30 | |||
| 30 | |||
|- | |- | ||
| P251 | | P251 | ||
| 44 | |||
| Ø | |||
| 5 | |||
| 5 | |||
|- | |- | ||
| P251 | |||
| P251 | | 46 | ||
| Ø | |||
| 5 | |||
| 5 | |||
|} | |} | ||
[[Image:Outer arm 2.PNG|thumb|right | [[Image:Outer arm 2.PNG|thumb|right|300px]] | ||
=== Outer-arm part 2 === | === Outer-arm part 2 === | ||
Use beech-wood-quality for this part. | Use beech-wood-quality for this part. | ||
''' Outer arm | '''Outer arm part 2 ''' | ||
! Part | {| cellspacing="0" cellpadding="5" border="1" | ||
! Measure | |- | ||
! Part | |||
! Measure | |||
! Shape | |||
! Size in mm | |||
middle | |||
! | ! Size in mm | ||
large | |||
|- | |- | ||
|P250 | | P250 | ||
| 02 | |||
| L | |||
| 10 | |||
| 10 | |||
|- | |- | ||
|P250 | | P250 | ||
| 05 | |||
| L | |||
| 30 | |||
| 30 | |||
|- | |- | ||
|P250 | | P250 | ||
| 06 | |||
| L | |||
| 30 | |||
| 35 | |||
|- | |- | ||
|P250 | | P250 | ||
| 07 | |||
| L | |||
| 15 | |||
| 15 | |||
|- | |- | ||
|P250 | | P250 | ||
| 08 | |||
| L | |||
| 30 | |||
| 45 | |||
|- | |- | ||
|P250 | | P250 | ||
| 09 | |||
| L | |||
| 15 | |||
| 15 | |||
|- | |- | ||
|P250 | | P250 | ||
| 13 | |||
| Ø | |||
| 5 | |||
| 5 | |||
|- | |- | ||
|P250 | | P250 | ||
| 32 | |||
| L | |||
| 20 | |||
| 20 | |||
|- | |- | ||
|P250 | | P250 | ||
| 41 | |||
| L | |||
| 20 | |||
| 20 | |||
|- | |- | ||
|P250 | | P250 | ||
| 42 | |||
| L | |||
| 20 | |||
| 25 | |||
|- | |- | ||
|P250 | | P250 | ||
| 43 | |||
| L | |||
| 20 | |||
| 30 | |||
|- | |- | ||
|P250 | | P250 | ||
| 44 | |||
| Ø | |||
| 5 | |||
| 5 | |||
|- | |- | ||
|P250 | | P250 | ||
| 46 | |||
| Ø | |||
| 5 | |||
| 5 | |||
|- | |- | ||
|P250 | | P250 | ||
| 50 | |||
| Ø | |||
| 6 | |||
| 6 | |||
|- | |- | ||
| P250 | | P250 | ||
| 52 | |||
| Ø | |||
| 14 | |||
| 14 | |||
|- | |- | ||
| P250 | | P250 | ||
| 54 | |||
| L | |||
| 2 | |||
| 2 | |||
|- | |- | ||
| P250 | | P250 | ||
| 60 | |||
| Ø | |||
| 6 | |||
| 6 | |||
|- | |- | ||
| P250 | | P250 | ||
| 62 | |||
| Ø | |||
| 14 | |||
| 14 | |||
|- | |- | ||
| P250 | | P250 | ||
| 64 | |||
| L | |||
| 2 | |||
| 2 | |||
|} | |} | ||
[[Image:Small arm parts.PNG|thumb|right | [[Image:Small arm parts.PNG|thumb|right|300px]] | ||
=== Small arm parts === | === Small arm parts === | ||
You can use a eye-screw or hook-screw | You can use a eye-screw or hook-screw | ||
Use beech-wood-quality for the three cylindrical pens. | Use beech-wood-quality for the three cylindrical pens. | ||
The rubber part can be made out of car-tire. | The rubber part can be made out of car-tire. | ||
''' small arm parts ''' | '''small arm parts ''' | ||
! Part | {| cellspacing="0" cellpadding="5" border="1" | ||
! Measure | |- | ||
! Part | |||
! Measure | |||
! Shape | |||
! Size in mm | |||
middle,large | |||
! material | ! material | ||
|- | |- | ||
| P230 | |||
| P230 | | 01 | ||
| Ø | |||
| 10-15 | |||
| metal | |||
|- | |- | ||
| P230 | |||
| P230 | | 02 | ||
| L | |||
| 20-25 | |||
| metal | |||
|- | |- | ||
| P252 | |||
| P252 | | 01 | ||
| L | |||
| 30 | |||
| wood | |||
|- | |- | ||
| P252 | |||
| P252 | | 13 | ||
| L | |||
| 5 | |||
| wood | |||
|- | |- | ||
| P254 | | P254 | ||
| 03 | |||
| L | |||
| 10 | |||
| Rubber | |||
|- | |- | ||
| P254 | |||
| P254 | | 04 | ||
| L | |||
| 8 | |||
| Rubber | |||
|- | |- | ||
| P254 | | P254 | ||
| 13 | |||
| Ø | |||
| 5 | |||
| Rubber | |||
|- | |- | ||
| P256 | | P256 | ||
| 11 | |||
| L | |||
| 40 | |||
| wood | |||
|- | |- | ||
| P256 | | P256 | ||
| 15 | |||
| Ø | |||
| 5 | |||
| wood | |||
|} | |} | ||
[[Image:Outer arm assemble 2007.PNG|thumb|right | [[Image:Outer arm assemble 2007.PNG|thumb|right|600px]] | ||
=== Outer arm assemble === | === Outer arm assemble === | ||
Glue the parts and the 3 pen together. | Glue the parts and the 3 pen together. | ||
Put the rubber part around one pen end. | Put the rubber part around one pen end. | ||
Dimensions of part P220 is on the [[3rd world CCFL lamp (2007 model)]] page. | Dimensions of part P220 is on the [[3rd world CCFL lamp (2007 model)]] page. | ||
You can make the two big parts of the outer-arm, out of one peice of quality wood-multiplex. | You can make the two big parts of the outer-arm, out of one peice of quality wood-multiplex. | ||
''' Outer_arm_assembled ''' | '''Outer_arm_assembled ''' | ||
! Part | {| cellspacing="0" cellpadding="5" border="1" | ||
|- | |||
! Part | |||
! Shape | |||
! Size in mm | |||
middle | |||
! | ! Size in mm | ||
large | |||
|- | |- | ||
| D1 | | D1 | ||
| L | |||
| 20mm | |||
| 20mm | |||
|- | |- | ||
| D2 | |||
| D2 | | L | ||
| 580mm | |||
| 900mm | |||
|} | |} | ||
<br> [[Image:Shortest arm.PNG|thumb|right|300px]] | |||
== Shortest-arm == | |||
Use beech-wood-quality for this part. | |||
'''Shortest-arm ''' | |||
{| cellspacing="0" cellpadding="5" border="1" | |||
{| | |- | ||
! Part | ! Part | ||
! Measure | ! Measure | ||
! Shape | |||
! Size in mm | |||
middle | |||
! | ! Size in mm | ||
large | |||
|- | |- | ||
|P240 | | P240 | ||
| 02 | |||
| L | |||
| 20 | |||
| 20 | |||
|- | |- | ||
|P240 | | P240 | ||
| 05 | |||
| L | |||
| 32 | |||
| 40 | |||
|- | |- | ||
|P240 | | P240 | ||
| 06 | |||
| L | |||
| 32 | |||
| 40 | |||
|- | |- | ||
|P240 | | P240 | ||
| 07 | |||
| L | |||
| 15 | |||
| 15 | |||
|- | |- | ||
|P240 | | P240 | ||
| 08 | |||
| L | |||
| 35 | |||
| 52 | |||
|- | |- | ||
|P240 | | P240 | ||
| 09 | |||
| L | |||
| 15 | |||
| 15 | |||
|- | |- | ||
|P240 | | P240 | ||
| 70 | |||
| Ø | |||
| 8 | |||
| 8 | |||
|- | |- | ||
|P240 | | P240 | ||
| 72 | |||
| Ø | |||
| 14 | |||
| 14 | |||
|- | |- | ||
|P240 | | P240 | ||
| 74 | |||
| L | |||
| 6 | |||
| 6 | |||
|- | |- | ||
|P240 | | P240 | ||
| 80 | |||
| Ø | |||
| 6 | |||
| 6 | |||
|- | |- | ||
|P240 | | P240 | ||
| 82 | |||
| Ø | |||
| 14 | |||
| 14 | |||
|- | |- | ||
|P240 | | P240 | ||
| 84 | |||
| L | |||
| 2 | |||
| 2 | |||
|} | |} | ||
[[Image:Medium arm.PNG|thumb|right | [[Image:Medium arm.PNG|thumb|right|300px]] | ||
== Medium-arm == | == Medium-arm == | ||
You can use less quality wood for this part. | You can use less quality wood for this part. | ||
''' Medium-arm ''' | '''Medium-arm ''' | ||
{| | {| cellspacing="0" cellpadding="5" border="1" | ||
|- | |||
! Part | |||
! Measure | |||
<br> | |||
! | ! Shape | ||
! | ! Size in mm | ||
middle | |||
! Size in mm | |||
large | |||
|- | |- | ||
|P260 | | P260 | ||
| 02 | |||
| L | |||
| 15 | |||
| 15 | |||
|- | |- | ||
|P260 | | P260 | ||
| 04 | |||
| L | |||
| 520 | |||
| 780 | |||
|- | |- | ||
|P260 | | P260 | ||
| 06 | |||
| L | |||
| 20 | |||
| 30 | |||
|- | |- | ||
|P260 | | P260 | ||
| 08 | |||
| L | |||
| 20 | |||
| 20 | |||
|- | |- | ||
|P260 | | P260 | ||
| 09 | |||
| L | |||
| 20 | |||
| 20 | |||
|- | |- | ||
| P260 | | P260 | ||
| 50 | |||
| Ø | |||
| 6 | |||
| 6 | |||
|- | |- | ||
| P260 | | P260 | ||
| 70 | |||
| Ø | |||
| 8 | |||
| 8 | |||
|} | |} | ||
[[Image:Large arm.PNG|thumb|right | [[Image:Large arm.PNG|thumb|right|300px]] | ||
== Large Arm == | == Large Arm == | ||
''' Large-Arm ''' | You can use less quality wood for this part. | ||
'''Large-Arm ''' | |||
{| cellspacing="0" cellpadding="5" border="1" | |||
|- | |- | ||
! Part | |||
! Measure | |||
! Shape | |||
! Size in mm | |||
middle | |||
! Size in mm | |||
large | |||
|- | |- | ||
|P280| | | P280 | ||
| 02 | |||
| L | |||
| 15 | |||
| 15 | |||
|- | |- | ||
|P280||04 | | P280 | ||
| 03 | |||
| L | |||
| 520 | |||
| 780 | |||
|- | |||
| P280 | |||
| 04 | |||
| L | |||
| 100 | |||
| 150 | |||
|- | |- | ||
|P280 | | P280 | ||
| 06 | |||
| L | |||
| 25 | |||
| 25 | |||
|- | |- | ||
|P280 | | P280 | ||
| 08 | |||
| L | |||
| 20 | |||
| 20 | |||
|- | |- | ||
|P280 | | P280 | ||
| 09 | |||
| L | |||
| 20 | |||
| 20 | |||
|- | |- | ||
|P280 | | P280 | ||
| 10 | |||
| Ø | |||
| 6 | |||
| 6 | |||
|- | |- | ||
|P280 | | P280 | ||
| 10 | |||
| Ø | |||
| 5 | |||
| 5 | |||
|- | |- | ||
|P280 | | P280 | ||
| 60 | |||
| Ø | |||
| 6 | |||
| 6 | |||
|- | |- | ||
|P280 | | P280 | ||
| 80 | |||
| Ø | |||
| 6 | |||
| 6 | |||
|} | |} | ||
[[Image:Arms assemble parts.PNG|thumb|right | [[Image:Arms assemble parts.PNG|thumb|right|300px]] | ||
=== Arms assemble small parts === | === Arms assemble small parts === | ||
Use smooth steel metal bar for this part. | Use smooth steel metal bar for this part. please, do not use screw thread. So the holes does not wear out. | ||
please, do not use screw thread. | |||
So the holes does not wear out. | |||
''' Arms assemble parts ''' | '''Arms assemble parts ''' | ||
! Part | {| cellspacing="0" cellpadding="5" border="1" | ||
! Measure | |- | ||
! Part | |||
! Shape | ! Measure | ||
! Size in mm | ! Shape | ||
middle,large | ! Size in mm | ||
middle,large | |||
|- | |- | ||
| P290 | | P290 | ||
| 01 | |||
| Ø | |||
| 12 | |||
|- | |- | ||
| P290 | | P290 | ||
| 01 | |||
| L | |||
| 40 | |||
|- | |- | ||
| P290 | | P290 | ||
| 03 | |||
| Ø | |||
| 6 | |||
|- | |- | ||
| P292 | | P292 | ||
| 01 | |||
| Ø | |||
| 12 | |||
|- | |- | ||
| P292 | | P292 | ||
| 03 | |||
| Ø | |||
| - | |||
|} | |} | ||
[[Image:Arms assemble.PNG|thumb|right | [[Image:Arms assemble.PNG|thumb|right|300px]] | ||
=== Arms assemble === | === Arms assemble === | ||
[[Image:Hamer bar.PNG|thumb|right | [[Image:Hamer bar.PNG|thumb|right|300px]] | ||
Put the wood and the ring around the bar and hammer the out ends of the bar thick. | Put the wood and the ring around the bar and hammer the out ends of the bar thick. | ||
Keep one (1) mm space between the wooden parts so they can rotate easy. | Keep one (1) mm space between the wooden parts so they can rotate easy. | ||
[[Image:Body.PNG|thumb|right | [[Image:Body.PNG|thumb|right|300px]] | ||
== | == Body-Part == | ||
You can use less quality wood for this part. | You can use less quality wood for this part. | ||
''' Body-Part ''' | '''Body-Part ''' | ||
! Part | {| cellspacing="0" cellpadding="5" border="1" | ||
! Measure | |- | ||
! Part | |||
! Measure | |||
! Shape | |||
! Size in mm | |||
middle | |||
! | ! Size in mm | ||
large | |||
|- | |- | ||
| P314 | | P314 | ||
| 02 | |||
| L | |||
| 20 | |||
| 20 | |||
|- | |- | ||
| P314 | | P314 | ||
| 03 | |||
| L | |||
| 20 | |||
| 20 | |||
|- | |- | ||
| P314 | | P314 | ||
| 04 | |||
| L | |||
| 370 | |||
| 620 | |||
|- | |- | ||
| P314 | | P314 | ||
| 05 | |||
| L | |||
| 10 | |||
| 10 | |||
|- | |- | ||
| P314 | | P314 | ||
| 06 | |||
| L | |||
| 90 | |||
| 90 | |||
|- | |- | ||
| P314 | | P314 | ||
| 07 | |||
| L | |||
| 10 | |||
| 10 | |||
|- | |- | ||
| P314 | | P314 | ||
| 08 | |||
| L | |||
| 16 | |||
| 16 | |||
|- | |- | ||
| P314 | | P314 | ||
| 09 | |||
| L | |||
| 16 | |||
| 16 | |||
|- | |- | ||
| P314 | | P314 | ||
| 70 | |||
| Ø | |||
| 8 | |||
| 8 | |||
|- | |- | ||
| P314 | | P314 | ||
| 90 | |||
| L | |||
| 16 | |||
| 16 | |||
|- | |- | ||
| P314 | | P314 | ||
| 90 | |||
| L | |||
| 16 | |||
| 16 | |||
|} | |} | ||
[[Image:P315.PNG|thumb|right | [[Image:P315.PNG|thumb|right|300px]] | ||
=== | === Small Wooden Body Part === | ||
''Wood'' | |||
''Wood'' | |||
You can use less quality wood for this part. | You can use less quality wood for this part. | ||
''' P315''' | '''P315''' | ||
{| | |||
! Part | {| cellspacing="0" cellpadding="5" border="1" | ||
! Measure | |- | ||
! Part | |||
! Measure | |||
! Shape | |||
! Size in mm | |||
middle,large | |||
|- | |- | ||
| P315 | | P315 | ||
| 02 | |||
| L | |||
| 110 | |||
|- | |- | ||
| P315 | | P315 | ||
| 04 | |||
| L | |||
| 16 | |||
|- | |- | ||
| P315 | | P315 | ||
| 90 | |||
| L | |||
| 16 | |||
|} | |} | ||
[[Image:Plywood.PNG|thumb|right | [[Image:Plywood.PNG|thumb|right|300px]] | ||
=== Body Plywood Part === | === Body Plywood Part === | ||
| Line 431: | Line 758: | ||
You can use less quality plywood for this part. | You can use less quality plywood for this part. | ||
''' 2x playwood plank ''' | '''2x playwood plank ''' | ||
{| cellspacing="0" cellpadding="5" border="1" | |||
|- | |- | ||
! Part | |||
! Measure | |||
! Shape | |||
! Size in mm | |||
middle,large | |||
|- | |- | ||
| P316| | | P316 | ||
| 02 | |||
| L | |||
| 110 | |||
|- | |- | ||
| P316| | | P316 | ||
| 03 | |||
| L | |||
| 8 | |||
|- | |- | ||
| P316| | | P316 | ||
| 04 | |||
| L | |||
| 16 | |||
|- | |- | ||
| P316| | | P316 | ||
| 08 | |||
| L | |||
| 16 | |||
|- | |- | ||
| P316| | | P316 | ||
| 09 | |||
| L | |||
| 16 | |||
|- | |- | ||
| P316 | | P316 | ||
| 90 | |||
| L | |||
| 16 | |||
|- | |- | ||
| P316 | |||
| 90 | |||
| L | |||
| 16 | |||
|} | |} | ||
[[Image:Body assemble parts.PNG|thumb|right | [[Image:Body assemble parts.PNG|thumb|right|300px]] | ||
=== Body Assemble Parts === | |||
Use thin nails. | |||
<br> '''P318''' | |||
{| cellspacing="0" cellpadding="5" border="1" | |||
|- | |||
! Part | |||
! Measure | |||
! tolerance | |||
! Shape | |||
! Size in mm | |||
middle,large | |||
|- | |- | ||
| P318 | | P318 | ||
| 01 | | 01 | ||
| % | | % | ||
| L | | L | ||
| 30 | | 30 | ||
|} | |} | ||
[[Image:Body assemble.PNG|thumb|right | [[Image:Body assemble.PNG|thumb|right|300px]] | ||
=== Body Assemble === | === Body Assemble === | ||
Apply some wood glue and hammer the plywood with thin nails to the massive wood. | Apply some wood glue and hammer the plywood with thin nails to the massive wood. | ||
[[Image:Body-arms assemble parts.PNG|thumb|right | [[Image:Body-arms assemble parts.PNG|thumb|right|300px]] | ||
== Body-Arms Assemble Parts == | == Body-Arms Assemble Parts == | ||
''' Body-arms parts ''' | Use a bolt with only at the end screw thread. So the hole does not wear out. | ||
{| | |||
! Part | '''Body-arms parts ''' | ||
! Measure | |||
! Shape | {| cellspacing="0" cellpadding="5" border="1" | ||
! Size in mm | |- | ||
small, middle, large | ! Part | ||
! Measure | |||
! Shape | |||
! Size in mm | |||
small, middle, large | |||
|- | |||
| P412 | |||
| 02 | |||
| L | |||
| 20 | |||
|- | |||
| P412 | |||
| 03 | |||
| L | |||
| 50 | |||
|- | |- | ||
| P412|| | | P412 | ||
| 70 | |||
| Ø | |||
| 8 | |||
|- | |- | ||
| | | P414 | ||
| 70 | |||
| Ø | |||
| 8 | |||
|- | |- | ||
| P414 | | P414 | ||
| 72 | |||
| Ø | |||
| 14 | |||
|- | |- | ||
| P415 | | P415 | ||
| 70 | |||
| Ø | |||
| 8 | |||
|- | |- | ||
| P415 | | P415 | ||
| 72 | |||
| Ø | |||
| 12 | |||
|- | |- | ||
| P413 | | P413 | ||
| 70 | |||
| Ø | |||
| M8 | |||
|} | |} | ||
[[Image:Rope.PNG|thumb|right|300px]] | |||
=== Rope === | |||
''' Rope ''' | '''Please, do not use very thin rope'''. | ||
{| | |||
! Part | '''Rope ''' | ||
! Measure | |||
! Shape | {| cellspacing="0" cellpadding="5" border="1" | ||
|- | |||
! Part | |||
! Measure | |||
! Shape | |||
! Size in mm | |||
middle | |||
! Size in mm | |||
large | |||
|- | |- | ||
| P608 | | P608 | ||
| 10 | |||
| Ø | |||
| 6 | |||
| 6 | |||
|- | |- | ||
| P608 | | P608 | ||
| 14 | |||
| L | |||
| 2100 | |||
| 3000 | |||
|} | |} | ||
[[Image:Body-arms-rope assemble.PNG|thumb|right | [[Image:Body-arms-rope assemble.PNG|thumb|right|300px]] | ||
=== Body Arms Rope Assemble === | === Body Arms Rope Assemble === | ||
Bolt the arm to the base. | Bolt the arm to the base. | ||
Put some ring and the wing-nut (bolt you can operate by hand). | Put some ring and the wing-nut (bolt you can operate by hand). | ||
Put the rope through the hole. | Put the rope through the hole. | ||
[[Image:Bar or Pipe.PNG|thumb|right | [[Image:Bar or Pipe.PNG|thumb|right|100px]] | ||
== | == Metal-Bar == | ||
You can use a metal steel bar or pipe because wood or plastic are not strong enough. | You can use a metal steel bar or pipe because wood or plastic are not strong enough. | ||
This part much move smoothly in the the body part. | This part much move smoothly in the the body part. | ||
<br> '''Metal-Bar or Pipe ''' | |||
{| cellspacing="0" cellpadding="5" border="1" | |||
{| | |- | ||
! Part | ! Part | ||
! Measure | ! Measure | ||
! Shape | |||
! Size in mm | |||
middle | |||
! | ! Size in mm | ||
large | |||
|- | |- | ||
| P505 | | P505 | ||
| 02 | |||
| L | |||
| 650 | |||
| 800 | |||
|- | |- | ||
| P505 | | P505 | ||
| 90 | |||
| Ø | |||
| 15 | |||
| 15 | |||
|} | |} | ||
== Feet-Center == | ---- | ||
== Feet-Center == | |||
<gallery caption="Lamp Foot"> | <gallery caption="Lamp Foot"> | ||
| Line 583: | Line 982: | ||
Image:Feet assemble.png|Feet assemble | Image:Feet assemble.png|Feet assemble | ||
</gallery> | </gallery> | ||
The bar gives a big force on the center. Use beech wood quality for this part. | The bar gives a big force on the center. Use beech wood quality for this part. The other parts can be less quality. | ||
The other parts can be less quality. | |||
'''Feet Center ''' | |||
{| cellspacing="0" cellpadding="5" border="1" | |||
|- | |||
! Part | |||
! Measure | |||
! Shape | |||
! Size in mm | ! Size in mm | ||
|- | |- | ||
| Part | | Part | ||
| 01 | |||
| L | |||
| 20-30 | |||
|- | |||
| Part | |||
| 02 | |||
| L | |||
| 40-60 | |||
|- | |- | ||
| Part| | | Part | ||
| 03 | |||
| L | |||
| 300-400 | |||
|- | |- | ||
| Part | |||
| 04 | |||
| L | |||
| 600-700 | |||
|} | |||
| | [[Image:Feet center methode 2 .PNG|thumb|right]] | ||
== Simple Feet center == | |||
This is a more simple methode to make a foot out of plywood. | |||
There are many possibilities. | |||
---- | |||
[[Image:Weight plank.PNG|thumb|right|300px]] | |||
[[Image:Weight plank.PNG|thumb|right | |||
== Weight plank == | == Weight plank == | ||
'''Possibility 2'''''Italic text'' | |||
This is if you want to use a battery for a weight. You can use some less quality plywood and drill some holes. | |||
'''Weight-Plank ''' | |||
{| cellspacing="0" cellpadding="5" border="1" | |||
|- | |- | ||
! Part | |||
! Measure | |||
! Shape | |||
! Size in mm | |||
middle | |||
! Size in mm | |||
large | |||
|- | |- | ||
| P603|| | | P603 | ||
| 02 | |||
| Ø | |||
| 18 | |||
| 18 | |||
|- | |- | ||
| P603| | | P603 | ||
| 03 | |||
| L | |||
| 20 | |||
| 20 | |||
|- | |- | ||
| P603| | | P603 | ||
| 05 | |||
| L | |||
| 35 | |||
| 35 | |||
|- | |- | ||
| P603| | | P603 | ||
| 06 | |||
| L | |||
| 200 | |||
| 200 | |||
|- | |- | ||
| P603| | | P603 | ||
| 07 | |||
| L | |||
| 300 | |||
| 300 | |||
|- | |- | ||
| P603|| 10 | | P603 | ||
| 08 | |||
| L | |||
| 75 | |||
| 75 | |||
|- | |||
| P603 | |||
| 10 | |||
| Ø | |||
| 6 | |||
| 6 | |||
|} | |} | ||
[[Image:Tube in weight.PNG|thumb|right | [[Image:Tube in weight.PNG|thumb|right|300px]] | ||
=== | === Tube for Weight Plank === | ||
Find some metal tube that fits around the metal-bar. | Find some metal tube that fits around the metal-bar. | ||
''' Tube in weight plank ''' | '''Tube in weight plank ''' | ||
{| cellspacing="0" cellpadding="5" border="1" | |||
|- | |- | ||
! Part | |||
! Measure | |||
! Shape | |||
! Size in mm | |||
middle,large | |||
|- | |- | ||
| P605| | | P605 | ||
| 90 | |||
| Ø inner | |||
| 16 | |||
|- | |- | ||
| P605|| | | P605 | ||
| 02 | |||
| Ø outer | |||
| 18 | |||
|- | |- | ||
| P605 | |||
| 04 | |||
| L | |||
| 120 | |||
|} | |} | ||
<br> [[Image:Tube-weight plank-rope assemble.PNG|thumb|right|300px]] | |||
=== Tube-Weight Plank-Rope Assemble === | |||
=== Tube-Weight Plank-Rope Assemble === | |||
Hammer the tube tight in the plank hole. | Hammer the tube tight in the plank hole. | ||
Make the inner diameter of the tube a bit bigger, so it can move and turn smoothly around the metal-bar. | Make the inner diameter of the tube a bit bigger, so it can move and turn smoothly around the metal-bar. | ||
Put the rope through the holes. | Put the rope through the holes. | ||
== Balance the Weight Parts == | == Balance the Weight Parts == | ||
Balance the weight parts on the weight-plank. | Balance the weight parts on the weight-plank. | ||
The counter balance should be in balance on both sides of the tube. | The counter balance should be in balance on both sides of the tube. | ||
Otherwise the tube will not slide smoothly up and down on the Metal-Bar. | Otherwise the tube will not slide smoothly up and down on the Metal-Bar. | ||
[[Image:Balance.GIF|thumb|right | [[Image:Balance.GIF|thumb|right|300px]] | ||
[[Image:Plastic Jerry can.PNG|thumb | [[Image:Plastic Jerry can.PNG|thumb|100px]] | ||
== Weight Protection Box == | == Weight Protection Box == | ||
A weight protection Box is made of two (leak): (1) PE-HD or (2) PP plastic jerry cans bottoms. | A weight protection Box is made of two (leak): (1) PE-HD or (2) PP plastic jerry cans bottoms. | ||
This give's de lamp stand a better design look. | This give's de lamp stand a better design look. | ||
This Box give better protection to the the power supply parts like: | This Box give better protection to the the power supply parts like: | ||
Batteries, Chargers, Transformers, and other electronic parts. | Batteries, Chargers, Transformers, and other electronic parts. | ||
<br> | |||
<br> [[Image:Weight protection Box.PNG|thumb|300px]] | |||
Saw of cut the top of the jerrycans. | |||
Melt a hole 16mm from the inside out. | |||
By melting from the inside out the edge of the hole is more thick curved to the outside to prevent rainwater to get in. | |||
One can bottom to put the power supply parts in. | |||
And the second to slide over first can. | |||
Let the electric wires go in between the can-edges. | |||
[[Image:Brick weight .PNG|thumb|right|300px]] | |||
== Brick-Weight == | |||
This is a more simple method to make a counter weight. You can use a brick in stead of the battery plank as weight. Very simple a brick with a drilled hole or Concrete with metal inside. Or two bricks in both sides of the bar. | |||
This one must slide en rotate smooth around and metal-bar. | |||
This one must slide en rotate smooth around and metal-bar. | |||
'''Brick Weight ''' | '''Brick Weight ''' | ||
{| cellspacing="0" cellpadding="5" border="1" | |||
! Part | |- | ||
! Measure | ! Part | ||
! Measure | |||
! Shape | |||
! Size in mm | |||
middle | |||
! | ! Size in mm | ||
large | |||
|- | |- | ||
| P703 | | P703 | ||
| 02 | |||
| Ø | |||
| 18 | |||
| 18 | |||
|- | |- | ||
| P703 | | P703 | ||
| 03 | |||
| L | |||
| 60 | |||
| 60 | |||
|- | |- | ||
| P703 | |||
| 06 | |||
| L | |||
| 150 | |||
| 150 | |||
|- | |- | ||
| P703 | |||
| 06 | |||
| L | |||
| 200 | |||
| 200 | |||
|- | |- | ||
| P703 | |||
| counter | |||
| weight | |||
| 4Kg | |||
| 4Kg | |||
|} | |} | ||
<br> | |||
[[Image:Body-feet-weight plank .jpg|thumb|right|300px]] | |||
== Body-Feet-Weight Plank Assemble == | |||
'''Rope Length ''' | |||
''' Rope Length ''' | |||
! Shape | {| cellspacing="0" cellpadding="5" border="1" | ||
|- | |||
! Part | |||
! Measure | |||
! Shape | |||
! length in mm | |||
middle | |||
! length in mm | |||
large | |||
|- | |- | ||
| P608 | |||
| 12 | |||
| L | |||
| 780 | |||
| 1050 | |||
|} | |} | ||
== Battery weight == | == Battery weight == | ||
[[Image: | [[Image:3rd world arm lamp 2007.PNG|thumb|right|300px]] | ||
[[Batteries]] | [[Batteries]] | ||
This is the lamp with | This is the lamp with motorcycle batteries. | ||
[[Image: | [[Image:3rd world arm lamp straight arm 2007.PNG|thumb|right|300px]] | ||
== '''The stand is finished''' == | == '''The stand is finished''' == | ||
The outer-arm haves this shape because: Otherwise your fingers can get trap between the arms. | |||
The outer-arm | The rubber part on the outer-arm is to keep the four arms parallel. | ||
The | The shortest-arm haves a round shape, Otherwise there is to much forces on the hole and the hammered bar. | ||
The shortest-arm haves a round shape, Otherwise | The shortest-arm haves a round shape, Otherwise your fingers can get trap between the arms. | ||
The | The top of the body haves this round shape because: Otherwise human fingers can get trap between the arms. | ||
== More simple with one straight arm == | |||
Part P284 is for safety, without this part human fingers kan get trapped between the straight arm and the base. | |||
'''one straight arm P282''' | |||
{| cellspacing="0" cellpadding="5" border="1" | |||
|- | |||
{| | ! Part | ||
! Part | ! Measure | ||
! Measure | ! Shape | ||
! Size in mm | |||
middle | |||
! | ! Size in mm | ||
large | |||
|- | |- | ||
| P | |||
| 01 | |||
| L | |||
| 1000 | |||
| 1600 | |||
|- | |- | ||
| P | |||
| 02 | |||
| L | |||
| 150 | |||
| 200 | |||
|} | |} | ||
[[Image:Bamboo stick.PNG|thumb|right | [[Image:Bamboo stick.PNG|thumb|right|300px]] | ||
<br> | |||
==== Bamboo Stick ==== | |||
If you want to use a bamboo stick instead of the balanced-stand. | |||
If you want to use a bamboo stick instead of the balanced-stand. | |||
'''Plastic tube''' | '''Plastic tube''' | ||
! Part | {| cellspacing="0" cellpadding="5" border="1" | ||
! Measure | |- | ||
! Shape | ! Part | ||
! Measure | |||
! Shape | |||
! Size in mm | ! Size in mm | ||
|- | |- | ||
| P211 | |||
| 01 | |||
| L | |||
| 20mm | |||
|- | |- | ||
| P211 | |||
| 36 | |||
| Ø | |||
| 21mm | |||
|} | |} | ||
[[Image:12 Volt DC Camping or Work lamp fixation mehode 1.PNG|thumb|right | [[Image:12 Volt DC Camping or Work lamp fixation mehode 1.PNG|thumb|right|500px]] | ||
==Connecting the fluorescent or LED stick lamp== | == Connecting the fluorescent or LED stick lamp == | ||
Connecting to the out end of the balanced arm lamp with the top of a Small PET-Bottel and fishing tread. | Connecting to the out end of the balanced arm lamp with the top of a Small PET-Bottel and fishing tread. | ||
Easy, Simple, and Fast. | Easy, Simple, and Fast. | ||
Replace_reflector for better one. | Replace_reflector for better one. | ||
==Connecting a pivot-joint== | == Connecting a pivot-joint == | ||
[[Image:Saw the M6 nut.PNG|thumb|right | [[Image:Saw the M6 nut.PNG|thumb|right|300px]] | ||
[[Image:Stef-pivot-joint.png|thumb|right | [[Image:Stef-pivot-joint.png|thumb|right|300px]] | ||
For the middle sized arm length. | For the middle sized arm length. | ||
You need: | You need: | ||
* bold M5x40mm | *bold M5x40mm | ||
* Ring 5mm x 15mm x2mm | *Ring 5mm x 15mm x2mm | ||
* Ring 10mm x 20mm x2mm | *Ring 10mm x 20mm x2mm | ||
* Nut M6 | *Nut M6 | ||
* Hex screw or hex bold M5x50mm | *Hex screw or hex bold M5x50mm | ||
* Ring 10mm x 20mm x2mm | *Ring 10mm x 20mm x2mm | ||
* Ring 5mm x 15mm x2mm | *Ring 5mm x 15mm x2mm | ||
* Spacer | *Spacer | ||
* Spring ring M5 | *Spring ring M5 | ||
* Wingnut M5 | *Wingnut M5 | ||
* metal or aluminium strip proximately 2mm thick 15mm wide, long 175mm | *metal or aluminium strip proximately 2mm thick 15mm wide, long 175mm | ||
[[Image:Lamp cap joint parts assemble.JPG|thumb|right | [[Image:Lamp cap joint parts assemble.JPG|thumb|right|300px]] | ||
<br> | |||
[[Image:Lamp cap joint parts assembled.JPG|thumb|right|500px]] | |||
== Connecting a E27 socket == | |||
[[Image:Tinplate cap lamp socket e27.png|thumb|300px]] To make a Edison-27 E-27 lamp cap you need: | |||
*reflecting tinplate | |||
*reflecting tinplate | |||
*(energy saving)lamp bulb | *(energy saving)lamp bulb | ||
* Bulb socket E27 or bayonet | *Bulb socket E27 or bayonet | ||
* 2x Socket ring | *2x Socket ring | ||
[[Image:Lamp-bulb tinplate-cap.JPG|thumb|right|500px]] | |||
<br> | |||
[[Image: | [[Image:Replace reflector work lamp.PNG|thumb|right|100px]] | ||
==Connecting a stick lamp== | == Connecting a stick lamp == | ||
With the same pivot-joint it is possible to connect a stick lamp. | With the same pivot-joint it is possible to connect a stick lamp. | ||
== External links == | == External links == | ||
[[ | CCFL lamp cap for this stand [[3rd world CCFL lamp (2007 model)]] | ||
[[Category: | [[Category:How_tos]] [[Category:3rd_world_arm_lamp]] [[Category:Tools]] [[Category:2007]] | ||
[[Category:Tools]] | |||
[[Category:2007]] | |||
Revision as of 01:47, 24 September 2010
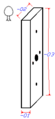
By user Stef

On the 3rd world arm lamp advantageslink you have some information wat kind of tools an material you need to make the arm-stand.


Outer-arm part 1
You can use less quality wood for this part.
Outer arm part 1
| Part | Measure | Shape | Size in mm
middle |
Size in mm
large |
|---|---|---|---|---|
| P251 | 04 | L | 25 | 25 |
| P251 | 06 | L | 450 | 670 |
| P251 | 30 | L | 20 | 20 |
| P251 | 32 | L | 20 | 20 |
| P240 | 36 | Ø | 21 | 21 |
| P251 | 41 | L | 20 | 20 |
| P251 | 42 | L | 20 | 25 |
| P251 | 43 | L | 30 | 30 |
| P251 | 44 | Ø | 5 | 5 |
| P251 | 46 | Ø | 5 | 5 |

Outer-arm part 2
Use beech-wood-quality for this part.
Outer arm part 2
| Part | Measure | Shape | Size in mm
middle |
Size in mm
large |
|---|---|---|---|---|
| P250 | 02 | L | 10 | 10 |
| P250 | 05 | L | 30 | 30 |
| P250 | 06 | L | 30 | 35 |
| P250 | 07 | L | 15 | 15 |
| P250 | 08 | L | 30 | 45 |
| P250 | 09 | L | 15 | 15 |
| P250 | 13 | Ø | 5 | 5 |
| P250 | 32 | L | 20 | 20 |
| P250 | 41 | L | 20 | 20 |
| P250 | 42 | L | 20 | 25 |
| P250 | 43 | L | 20 | 30 |
| P250 | 44 | Ø | 5 | 5 |
| P250 | 46 | Ø | 5 | 5 |
| P250 | 50 | Ø | 6 | 6 |
| P250 | 52 | Ø | 14 | 14 |
| P250 | 54 | L | 2 | 2 |
| P250 | 60 | Ø | 6 | 6 |
| P250 | 62 | Ø | 14 | 14 |
| P250 | 64 | L | 2 | 2 |

Small arm parts
You can use a eye-screw or hook-screw
Use beech-wood-quality for the three cylindrical pens.
The rubber part can be made out of car-tire.
small arm parts
| Part | Measure | Shape | Size in mm
middle,large |
material |
|---|---|---|---|---|
| P230 | 01 | Ø | 10-15 | metal |
| P230 | 02 | L | 20-25 | metal |
| P252 | 01 | L | 30 | wood |
| P252 | 13 | L | 5 | wood |
| P254 | 03 | L | 10 | Rubber |
| P254 | 04 | L | 8 | Rubber |
| P254 | 13 | Ø | 5 | Rubber |
| P256 | 11 | L | 40 | wood |
| P256 | 15 | Ø | 5 | wood |

Outer arm assemble
Glue the parts and the 3 pen together.
Put the rubber part around one pen end.
Dimensions of part P220 is on the 3rd world CCFL lamp (2007 model) page.
You can make the two big parts of the outer-arm, out of one peice of quality wood-multiplex.
Outer_arm_assembled
| Part | Shape | Size in mm
middle |
Size in mm
large |
|---|---|---|---|
| D1 | L | 20mm | 20mm |
| D2 | L | 580mm | 900mm |

Shortest-arm
Use beech-wood-quality for this part.
Shortest-arm
| Part | Measure | Shape | Size in mm
middle |
Size in mm
large |
|---|---|---|---|---|
| P240 | 02 | L | 20 | 20 |
| P240 | 05 | L | 32 | 40 |
| P240 | 06 | L | 32 | 40 |
| P240 | 07 | L | 15 | 15 |
| P240 | 08 | L | 35 | 52 |
| P240 | 09 | L | 15 | 15 |
| P240 | 70 | Ø | 8 | 8 |
| P240 | 72 | Ø | 14 | 14 |
| P240 | 74 | L | 6 | 6 |
| P240 | 80 | Ø | 6 | 6 |
| P240 | 82 | Ø | 14 | 14 |
| P240 | 84 | L | 2 | 2 |

Medium-arm
You can use less quality wood for this part.
Medium-arm
| Part | Measure
|
Shape | Size in mm
middle |
Size in mm
large |
|---|---|---|---|---|
| P260 | 02 | L | 15 | 15 |
| P260 | 04 | L | 520 | 780 |
| P260 | 06 | L | 20 | 30 |
| P260 | 08 | L | 20 | 20 |
| P260 | 09 | L | 20 | 20 |
| P260 | 50 | Ø | 6 | 6 |
| P260 | 70 | Ø | 8 | 8 |

Large Arm
You can use less quality wood for this part.
Large-Arm
| Part | Measure | Shape | Size in mm
middle |
Size in mm
large |
|---|---|---|---|---|
| P280 | 02 | L | 15 | 15 |
| P280 | 03 | L | 520 | 780 |
| P280 | 04 | L | 100 | 150 |
| P280 | 06 | L | 25 | 25 |
| P280 | 08 | L | 20 | 20 |
| P280 | 09 | L | 20 | 20 |
| P280 | 10 | Ø | 6 | 6 |
| P280 | 10 | Ø | 5 | 5 |
| P280 | 60 | Ø | 6 | 6 |
| P280 | 80 | Ø | 6 | 6 |

Arms assemble small parts
Use smooth steel metal bar for this part. please, do not use screw thread. So the holes does not wear out.
Arms assemble parts
| Part | Measure | Shape | Size in mm
middle,large |
|---|---|---|---|
| P290 | 01 | Ø | 12 |
| P290 | 01 | L | 40 |
| P290 | 03 | Ø | 6 |
| P292 | 01 | Ø | 12 |
| P292 | 03 | Ø | - |

Arms assemble

Put the wood and the ring around the bar and hammer the out ends of the bar thick.
Keep one (1) mm space between the wooden parts so they can rotate easy.

Body-Part
You can use less quality wood for this part.
Body-Part
| Part | Measure | Shape | Size in mm
middle |
Size in mm
large |
|---|---|---|---|---|
| P314 | 02 | L | 20 | 20 |
| P314 | 03 | L | 20 | 20 |
| P314 | 04 | L | 370 | 620 |
| P314 | 05 | L | 10 | 10 |
| P314 | 06 | L | 90 | 90 |
| P314 | 07 | L | 10 | 10 |
| P314 | 08 | L | 16 | 16 |
| P314 | 09 | L | 16 | 16 |
| P314 | 70 | Ø | 8 | 8 |
| P314 | 90 | L | 16 | 16 |
| P314 | 90 | L | 16 | 16 |

Small Wooden Body Part
Wood
You can use less quality wood for this part.
P315
| Part | Measure | Shape | Size in mm
middle,large |
|---|---|---|---|
| P315 | 02 | L | 110 |
| P315 | 04 | L | 16 |
| P315 | 90 | L | 16 |

Body Plywood Part
You can use less quality plywood for this part.
2x playwood plank
| Part | Measure | Shape | Size in mm
middle,large |
|---|---|---|---|
| P316 | 02 | L | 110 |
| P316 | 03 | L | 8 |
| P316 | 04 | L | 16 |
| P316 | 08 | L | 16 |
| P316 | 09 | L | 16 |
| P316 | 90 | L | 16 |
| P316 | 90 | L | 16 |

Body Assemble Parts
Use thin nails.
P318
| Part | Measure | tolerance | Shape | Size in mm
middle,large |
|---|---|---|---|---|
| P318 | 01 | % | L | 30 |

Body Assemble
Apply some wood glue and hammer the plywood with thin nails to the massive wood.

Body-Arms Assemble Parts
Use a bolt with only at the end screw thread. So the hole does not wear out.
Body-arms parts
| Part | Measure | Shape | Size in mm
small, middle, large |
|---|---|---|---|
| P412 | 02 | L | 20 |
| P412 | 03 | L | 50 |
| P412 | 70 | Ø | 8 |
| P414 | 70 | Ø | 8 |
| P414 | 72 | Ø | 14 |
| P415 | 70 | Ø | 8 |
| P415 | 72 | Ø | 12 |
| P413 | 70 | Ø | M8 |

Rope
Please, do not use very thin rope.
Rope
| Part | Measure | Shape | Size in mm
middle |
Size in mm
large |
|---|---|---|---|---|
| P608 | 10 | Ø | 6 | 6 |
| P608 | 14 | L | 2100 | 3000 |

Body Arms Rope Assemble
Bolt the arm to the base.
Put some ring and the wing-nut (bolt you can operate by hand).
Put the rope through the hole.

Metal-Bar
You can use a metal steel bar or pipe because wood or plastic are not strong enough.
This part much move smoothly in the the body part.
Metal-Bar or Pipe
| Part | Measure | Shape | Size in mm
middle |
Size in mm
large |
|---|---|---|---|---|
| P505 | 02 | L | 650 | 800 |
| P505 | 90 | Ø | 15 | 15 |
Feet-Center
- Lamp Foot
-
Feet-center
-
Feet assemble


The bar gives a big force on the center. Use beech wood quality for this part. The other parts can be less quality.
Feet Center
| Part | Measure | Shape | Size in mm |
|---|---|---|---|
| Part | 01 | L | 20-30 |
| Part | 02 | L | 40-60 |
| Part | 03 | L | 300-400 |
| Part | 04 | L | 600-700 |

Simple Feet center
This is a more simple methode to make a foot out of plywood.
There are many possibilities.

Weight plank
Possibility 2Italic text
This is if you want to use a battery for a weight. You can use some less quality plywood and drill some holes.
Weight-Plank
| Part | Measure | Shape | Size in mm
middle |
Size in mm
large |
|---|---|---|---|---|
| P603 | 02 | Ø | 18 | 18 |
| P603 | 03 | L | 20 | 20 |
| P603 | 05 | L | 35 | 35 |
| P603 | 06 | L | 200 | 200 |
| P603 | 07 | L | 300 | 300 |
| P603 | 08 | L | 75 | 75 |
| P603 | 10 | Ø | 6 | 6 |

Tube for Weight Plank
Find some metal tube that fits around the metal-bar.
Tube in weight plank
| Part | Measure | Shape | Size in mm
middle,large |
|---|---|---|---|
| P605 | 90 | Ø inner | 16 |
| P605 | 02 | Ø outer | 18 |
| P605 | 04 | L | 120 |

Tube-Weight Plank-Rope Assemble
Hammer the tube tight in the plank hole.
Make the inner diameter of the tube a bit bigger, so it can move and turn smoothly around the metal-bar.
Put the rope through the holes.
Balance the Weight Parts
Balance the weight parts on the weight-plank.
The counter balance should be in balance on both sides of the tube.
Otherwise the tube will not slide smoothly up and down on the Metal-Bar.


Weight Protection Box
A weight protection Box is made of two (leak): (1) PE-HD or (2) PP plastic jerry cans bottoms.
This give's de lamp stand a better design look.
This Box give better protection to the the power supply parts like:
Batteries, Chargers, Transformers, and other electronic parts.

Saw of cut the top of the jerrycans.
Melt a hole 16mm from the inside out.
By melting from the inside out the edge of the hole is more thick curved to the outside to prevent rainwater to get in.
One can bottom to put the power supply parts in.
And the second to slide over first can.
Let the electric wires go in between the can-edges.

Brick-Weight
This is a more simple method to make a counter weight. You can use a brick in stead of the battery plank as weight. Very simple a brick with a drilled hole or Concrete with metal inside. Or two bricks in both sides of the bar.
This one must slide en rotate smooth around and metal-bar.
Brick Weight
| Part | Measure | Shape | Size in mm
middle |
Size in mm
large |
|---|---|---|---|---|
| P703 | 02 | Ø | 18 | 18 |
| P703 | 03 | L | 60 | 60 |
| P703 | 06 | L | 150 | 150 |
| P703 | 06 | L | 200 | 200 |
| P703 | counter | weight | 4Kg | 4Kg |

Body-Feet-Weight Plank Assemble
Rope Length
| Part | Measure | Shape | length in mm
middle |
length in mm
large |
|---|---|---|---|---|
| P608 | 12 | L | 780 | 1050 |
Battery weight
This is the lamp with motorcycle batteries.

The stand is finished
The outer-arm haves this shape because: Otherwise your fingers can get trap between the arms.
The rubber part on the outer-arm is to keep the four arms parallel.
The shortest-arm haves a round shape, Otherwise there is to much forces on the hole and the hammered bar.
The shortest-arm haves a round shape, Otherwise your fingers can get trap between the arms.
The top of the body haves this round shape because: Otherwise human fingers can get trap between the arms.
More simple with one straight arm
Part P284 is for safety, without this part human fingers kan get trapped between the straight arm and the base.
one straight arm P282
| Part | Measure | Shape | Size in mm
middle |
Size in mm
large |
|---|---|---|---|---|
| P | 01 | L | 1000 | 1600 |
| P | 02 | L | 150 | 200 |

Bamboo Stick
If you want to use a bamboo stick instead of the balanced-stand.
Plastic tube
| Part | Measure | Shape | Size in mm |
|---|---|---|---|
| P211 | 01 | L | 20mm |
| P211 | 36 | Ø | 21mm |

Connecting the fluorescent or LED stick lamp
Connecting to the out end of the balanced arm lamp with the top of a Small PET-Bottel and fishing tread.
Easy, Simple, and Fast.
Replace_reflector for better one.
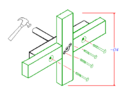
Connecting a pivot-joint


For the middle sized arm length.
You need:
- bold M5x40mm
- Ring 5mm x 15mm x2mm
- Ring 10mm x 20mm x2mm
- Nut M6
- Hex screw or hex bold M5x50mm
- Ring 10mm x 20mm x2mm
- Ring 5mm x 15mm x2mm
- Spacer
- Spring ring M5
- Wingnut M5
- metal or aluminium strip proximately 2mm thick 15mm wide, long 175mm


Connecting a E27 socket

To make a Edison-27 E-27 lamp cap you need:
- reflecting tinplate
- (energy saving)lamp bulb
- Bulb socket E27 or bayonet
- 2x Socket ring


Connecting a stick lamp
With the same pivot-joint it is possible to connect a stick lamp.
External links
CCFL lamp cap for this stand 3rd world CCFL lamp (2007 model)