Create the page "Terminal connectors" on this wiki! See also the search results found.
- parallel by connecting the positive wire from one panel to the other, and the negative wire from one panel to the other 6 Caption Connect the positive21 KB (1,974 words) - 11:51, 28 February 2024
- When connecting the system 1st - Connect the batteries to the charge controller 2nd - Connect the solar panels to the charge controller 3rd - Connect the12 KB (1,036 words) - 18:22, 29 January 2024
- parallel by connecting the positive wire from one panel to the other, and the negative wire from one panel to the other. 5 Caption Connect the positive20 KB (1,951 words) - 19:04, 29 January 2024
- inverter terminal end cables and wire the positive and negative cables from the inverter to the batteries. 2 Wire the positive battery terminal wires to35 KB (2,479 words) - 13:51, 28 February 2024
- onto aluminum extrusion with an M3 screw. Connect both WireHolders in each BotEnd with an M3 screw and bolt. Connect both SensorEnds in each WireHolder with3 KB (217 words) - 23:44, 8 July 2022
- battery is supplying power, its positive terminal is the cathode and its negative terminal is the anode. The terminal marked negative is the source of electrons3 KB (808 words) - 15:06, 14 June 2022
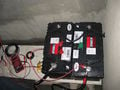
- fuse on the positive terminal. Then put a cover over the terminal to eliminate the possibility of something bridging the two terminals. I used a 5-Amp fuse16 KB (2,761 words) - 17:08, 22 November 2022
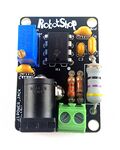
- Inductor 2 LM324N Amplifier 1 NE555 Timer 1 2.1x5.5mm barrel connector 1 2 positions terminal connector 3 3 positions right angle pin header 2 ~1 meter 20AWG5 KB (459 words) - 19:54, 19 March 2022
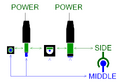
- POSITIVE terminal on the Melzi. Locate the supply power terminals in the center Melzi board (marked POWER). Clearly mark the POSITIVE terminal (the terminal10 KB (1,462 words) - 19:12, 21 July 2022
- cutting the terminal strip to size. Strip enough wire to cover across the terminal strip. Tin the wire and terminal strip pins. Place the terminal strip on4 KB (402 words) - 23:45, 7 July 2022
- supply to their terminals. Connect the screen/SD card assembly connectors to their appropriate sockets ensuring the keys line up in the connector sockets. Step6 KB (656 words) - 12:25, 28 February 2024
- following sequence accomplishes this: connect the inverter's negative terminal to the battery negative terminal connect a small gauge temporary insulated jumper35 KB (4,721 words) - 16:57, 29 January 2024
- POSITIVE terminal on the controller. Locate the supply power terminals on the controller taking care to identify the polarity of the terminals. The identity5 KB (601 words) - 23:16, 7 July 2022
- other bad outcome: The voltage. Connectors and wires have limits which should never be exceeded. The amperage. Connectors and wires have limits which should7 KB (594 words) - 14:22, 8 February 2023
- color wires to help differentiate between positive/negative Using connectors, connect fuse holder to positive wire between the charge controller and battery6 KB (640 words) - 19:36, 22 August 2023
- connected to the positive terminal of the charge controller is connected to the positive terminal of the inverter and the negative terminal of the charge controller38 KB (5,298 words) - 15:32, 29 January 2024
- wire. Fig. 3.6 Most switches, and plugs have screw a screw terminal outlets, fuse terminal is shown holders, connections. in Fig. 3.7. circuit The breakers42 KB (6,993 words) - 16:30, 22 September 2022
- configuration. Connect the ground alligator clip of the probe to the ―Ground Terminal‖ under the probe compensation signal output terminal. Compensation10 KB (1,289 words) - 14:56, 28 February 2024
- POSITIVE terminal on the Melzi. Locate the supply power terminals in the center Melzi board (marked POWER). Clearly mark the POSITIVE terminal (the terminal9 KB (1,210 words) - 14:16, 8 November 2022
- then leads to the positive terminal of the battery and is attached by a ring connector. The line off the negative terminal contains the volt gauge and19 KB (3,098 words) - 15:02, 28 February 2024