CPR with AED is included in this California-based EMT program as it is required for skills verification for California Registration.[1] This page is for general CPR knowledge, there are separate pages for the more specific changes made to child and infant CPR.
Cardiopulmonary Resuscitation (CPR) is a series of immediate actions to take to restore the flow of oxygenated blood to a person's brain and organs when they suffer Sudden Cardiac Arrest (SCA). If the flow of oxygenated blood to the brain is not restored within a few minutes the victim could die or suffer irreversible brain damage.
CPR
CPR is administered to patients who are unresponsive and not breathing or have abnormal breathing (ie. Agonal breathing) and no definitive pulse. An AED should be used as soon as it is available and Advanced Life Support (ALS) measures should be performed by trained personnel as soon as practical. The steps of CPR include:
- Check that the area is safe for you and your patient, and don appropriate PPE (PENMAN).
- Check for alertness/responsiveness with a tap of the shoulder (AVPU).
- Activate or (direct someone to activate) 911 or call ALS backup as appropriate, also if not already available bring or have someone bring an AED to the patients side.
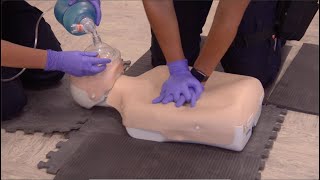
- Place the person on their back on a hard surface.
- Open the patients airway with a head tilt to slightly lift the chin.
- Simultaneously assess for carotid pulse in adults (brachial pulse in children and infants) and breathing for no more than 10 seconds.
- If patient is unresponsive and is not breathing or has abnormal breathing (ie. Agonal breathing) and no definitive pulse was, immediately begin chest compressions of at least 2 inches in depth (≥ 1/3 the anterior-posterior depth of the chest in children or infants) at a rate of 100-120 compressions per minute, allowing for full chest recoil. (See Self-Assessment sidebar for additional information).
- After performing 30 compressions administer two (2) rescue breaths via BVM, mouth to mouth, mouth to mask or through stoma as appropriate. For children and infants, if there are two rescuers performing CPR, the ratio of compressions to ventilations changes to 15:2.
- After the two rescue breaths have been administered immediately resume chest compressions.
- Repeat the cycle of 30 chest compressions and two rescue breaths and use the AED/Defibrillator as soon as it is available. Continue CPR until properly relieved by rescue personnel.
If additional personnel are available, switch compressors approximately every 4-5 cycles of 30 compressions and two breaths (approximately 2 minutes) to prevent rescuer fatigue and decreased compression effectiveness.
How to perform chest compressions
Compressions for an Adult/Child
- Place one hand over the other with your fingers interlocked (for very small adults and small children you may optionally only use one hand).
- Place your joined hands palm down with the heel of your hand on the lower half of the patient's breastbone. For an average adult, this means that your middle finger should be somewhat in line with the patient's nipple. Be careful to avoid placing your hands too low as compressions performed too low can cause the xiphoid process break off, lacerate the liver, etc.
- Place yourself so that you can compress straight down at a 90° angle to the patient's chest with your arms fully extended.
- Compress to the correct depth at a rate of 100-120 compressions/minute, allowing for full chest recoil after each compression. Avoid leaning on the patient's chest as this will not allow for full chest recoil.
- For an adult: Push down at least 2 inches (5 cm) but no more than 2.4 inches (6 cm) for each compression.
- For a child: Push down at least 1/3 the anterior-posterior diameter of the chest for each compression. Do not exceed a depth of 2.4 inches (6 cm).
- Follow proper protocol for the rate of compressions to ventilations. For adults and children with a single rescuer, this is generally 30:2. Two-rescuer CPR with a child uses a 15:2 compression to ventilation ratio.
Compressions for an Infant
Compressions for an infant follow the same basic rules as those for adults and children, but hand placement and compression depth differ.
- Hand placement for compressions changes depending on whether there are one or two rescuers.
- One rescuer: Position yourself at the side of the patient to minimize time lost when performing ventilations. Place two fingers in the center of the patient's chest, just below the nipple line.
- Two rescuers: Position yourself at the patient's feet. Place both thumbs in the center of the patient's chest, just below the nipple line with the rescuer's hands encircling the patient. The second rescuer will be at the patient's head.
- Compress at a rate between 100 and 120 compressions/minute (120 for neonate) and allow for full recoil of the chest between compressions. Avoid squeezing the patient in your hands when performing two-rescuer compressions.
- Compress to a depth of at least 1/3 the anterior-posterior diameter of the patient's chest (approximately 1.5 inches).
- Follow proper protocol for the rate of compressions to ventilations. For single rescuer CPR this is 30:2, two rescuer CPR changes to 15:2.
How to apply an AED


Fig. 2: Pediatric/Infant AED pad application.An AED should be applied as soon as it is available. The AED should be applied while CPR is ongoing. There are many variants of AED's in use, however, they all follow four universal steps with slight variations on how each step is performed.
The Four Universal Steps to operating an AED are:
- Turn the machine on
- Apply pads to patients bare chest
- Analyze the heart rhythm
- Deliver a shock if advised by the AED
Detailed description of the Four Universal Steps to operating an AED:
- Turn the Machine On: this step is usually accomplished by either pushing the button labeled "On" or by opening the lid. (Once the machine is on it will verbally prompt the steps of operating the AED)
- Apply Pads to Patients bare chest: place the pads as depicted on the pads or packaging. (See Sidebar for special circumstances such as medication patches, wet skin, hairy chest, jewelry, etc..)
- Analyze the heart rhythm: this step is usually accomplished in one of three ways. On many AED's the pads are already connected to the machine and placement the second pad on the patient's chest completes a circuit that will being the analyze process, on some AED's the pads are not connected to the machine plug them in now and the machine will start the analyze process and finally some machines require the operator to physical push a button labeled "Analyze" to start the analyze process. Follow voice prompts if unsure. (Important: Ensure that no one is touching the patient while the machine is analyzing the heart rhythm)
- Deliver a shock if advised to by the AED: Once the analyze process is complete the machine will either state "Shock advised" or "No shock advised". If the machine determines that no shock is advised immediately begin CPR starting with chest compression. If the machine determines that a shock is advised it will begin to charge the machine to the proper energy setting (it is appropriate to perform compressions while the machine is charging). Once the machine is charged there are two ways to deliver the shock depending upon the type of AED in use. In either case verbally and visually ensure that everyone is clear of the patient (No one touching the patient) by loudly stating "Clear!" prior to the shock being delivered.
- A semi-automatic machine requires you to physically push the "Shock" button which will be flashing once the machine is sufficiently charged, the voice command will be advising people to stay clear.
- A fully automatic machine will deliver the shock automatically and will begin a countdown to when the shock will be delivered, it will also be advising people to stand clear of the patient. Regardless of the type of AED used once the shock has been delivered immediately begin CPR beginning with chest compressions. Every two minutes the AED will advise people to stand clear so that it can begin the analyze process and will then again advise "Shock Advised" or No Shock Advised'. Unless the patient is moving and showing signs of life, anytime the machine states "No Shock Advised" immediately begin CPR. If the machine determines a shock is advised repeat the process of clearing the patient, delivering the shock and starting CPR.
(Note: Once the machine is turned on voice commands will walk the rescuer thru the steps of operating that particular AED, being familiar with these steps beforehand results in faster application of the AED and a more efficient rescue attempt.)
Transport Decision
If ALS is not arriving on the scene, most local protocols advise transporting the patient when one of the following occurs:[2]
- The patient regains a pulse
- Six to nine shocks have been delivered without Return of Spontaneous Circulation (ROSC)
- The AED gives three consecutive messages (separated by 2 minutes of CPR) that no shock is advised.
Your local protocol always takes precedence over this general guideline.
There are specialized pads for child and infant AED application, adult pads should be used if no pediatric pads are available.
Documentation
Documentation of the CPR intervention should be included in the Patient Care Report (PCR). For a cardiac event ensure the following are included:
- Patient data: age, gender, and any comorbid conditions.
- Event data: was collapse witnessed or unwitnessed, location of event, time from collapse to the beginning of cardiopulmonary resuscitation (CPR) if known.
- Observations and interventions: initial rhythm if known, essential interventions (how long CPR was performed, AED application, number of shocks delivered) with times recorded. Note time from collapse to first defibrillation when the initial rhythm is ventricular fibrillation or pulseless ventricular tachycardia.
- Outcomes: return of spontaneous circulation (for at least 20 minutes), transport, or discontinuation of CPR
Self Assessment
- Review and practice with Cardiac Arrest Management Skillsheet
- Verify that you are compressing 2" in the chest either visually by hearing the click from the CPR manikin
- Use a metronome to check the 100-120 compressions per minute rate
- Example GIF of Chest compression rate
- Deliver breaths over 1.5-2 seconds with a 4-5 second pause in between
- Observe chest rise and fall (link to video here), reposition airway if not observed
- In training manikins with a stomach simulator, ensure you are not filling the stomach with air
- Test your knowledge with this quiz
Tips and Tricks
- If you are assigning someone other than your partner to call for ALS backup, make sure that person knows you are appointing them for the task. Point if necessary and add descriptive characteristics: "You in the blue shirt, call 911 and tell them that we have an unresponsive adult". This removes confusion that can be caused by the bystander effect, ambiguity, and diffusion of responsibility. Make sure that person stays on the phone, if possible, to update 911 on changes to the patient condition, e.g. CPR has been started.
- When assigning tasks to other rescuers or bystanders, reduce confusion by giving each person a specific goal to work towards. One person can call 911 while another goes to find a defibrillator if one is not available. Giving a bystander multiple tasks increases the chance that one or more of the tasks goes uncompleted.
- If the patient is in a hard to reach or cluttered area, attempt to move the patient to an open space where multiple rescuers and their equipment can easily access and move around. If patient movement would take a long time or is too difficult for you and your partner due to environmental factors or patient weight, either enlist bystanders to assist with movement or treat the patient as best you can.
- While performing compressions, bent elbows can reduce depth and efficacy of compressions and lead to quicker rescuer fatigue. Use bodyweight to compress, not your shoulders/pectorals.
- In the absence of a rescue mask or BVM, The patient can be ventilated via the mouth to mouth technique however this is a judgement call on the rescuer's part as mouth to mouth carries the inherent risk of disease transmission. If you are unwilling or unable to perform mouth to mouth perform hands only CPR (chest compressions only).
- While performing two-person CPR, it may be helpful for the ventilator to count the cycles as the compressor counts compressions out loud. This allows for everyone involved to not only know where you are in the cycle of care but also helps keep track of cycles/shocks so that an accurate count can be given to ALS or the hospital if the patient is transported.
Additional Resources
- Neonatal CPR is a whole different subset of CPR that is separate from infant CPR. This specific type of CPR is often not taught during normal CPR classes as it is very specific (i.e. only used when the patient is a neonate that is within the first stages of life outside the womb) and because normal infant CPR can also be used for these patients. Neonatal CPR is often taught to NICU nurses, flight paramedics and nurses, and other advanced care providers and is certified through the AAP (American Association of Pediatrics) as part of the NRP (Neonatal Resuscitation Program).
- 2020 American Heart Association Guidelines for Cardiopulmonary Resuscitation and Emergency Cardiovascular Care Published: October 21, 2020