
Chances are you are familiar with pedal power at least in its most conventional form: Bicycle-riding! At CCAT the idea of pedaling to create energy that can be translated into work has been expanded beyond the conventional form. By pedalling a bicycle one can power a television, a laptop, a washing machine, a drill press... the options are limited only by your imagination.
The purpose of this page is to provide a "how to" guide to build a bicycle powered generator. The first two steps will also be useful for those who wish to build a mechanical pedal powered device, as the components are basically the same with some slight differences that will be specified in each case.
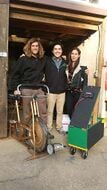
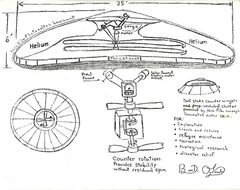
Of course it doesn't hurt to ask resident pedal power expert Bart Orlando for assistance. As a reference for your project, CCAT keeps a list of devices that students have worked on.
Components[edit | edit source]
These are the components needed for making an electrical DIY pedal-powered device:

- A stationary bicycle or an exercise bike
- A belt and pulley
- A generator
- A diode
- A fuse
- A battery
- An inverter
- A simple machine
Step 1: Bicycle[edit | edit source]
The bicycle is the first element in a pedal power device. Just about any bicycle is usable, including a multi-speed bicycle, a mountain bike, even an exercise bike (like the one used at the CCAT pedal electric blender)! The obvious important characteristics here are that one's arms or legs turn a crank that is attached to a gear causing a wheel to spin.
Stationary[edit | edit source]

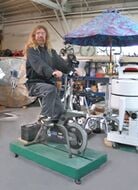
Designing a pedal-powered device with a standard bicycle like Rowan's portable pedal power generator has its advantages. It also requires more work than using an exercise bike, since the exercise bicycle is designed to be stationary. Bicycles can be very cheap (in Arcata, CA a great local resource is The Bike Library, where bikes can be rented for practically nothing!) Using a bike to power a device saves on your energy bill and gives your bike a second purpose.
One of the key challenges when designing a pedal-powered device is bicycle stability. The front tire must be kept from moving. Either remove it and stabilize the frame by placing it between cinder blocks, or use an adequate tire brace. The back tire must be elevated so it will spin freely. The best solution for this seems to be a bicycle trainer stand like the one used in the WaterPod Tour de Volts. It will require no removal of tires and no permanent modification of the bike, keeping the bike useable. Another more labor-intensive option is to use 2x4 beams and plywood to create a raised platform for the tire to hover. Be careful that the bike is solid and steady.
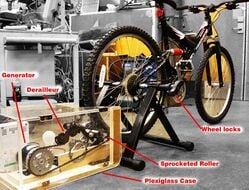
Once the bicycle is properly setup to be stationary, the pedal motion must be regulated with a flywheel. Basically, a flywheel is a heavy rotating disk used to store momentum. A flywheel resists changes in speed which helps to steady the rotation of the generator shaft since uneven torque comes from the bicycle. For a more in-depth explanation of flywheels, including design characteristic click here. If you don't care about making the bike temporarily unusable, you can remove the tire and tube around the back wheel and run a belt to a pulley attached to the generator (on a typical 10-speed bike a size B V-belt should work with a 2.5î pulley).
Exercise[edit | edit source]

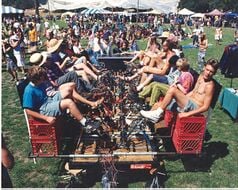
The exercise bicycle like the one used in the Pedal Power MEOW is an excellent option. It is designed to be stationary, so it should already be stable. Also, many of the necessary additions to a bicycle are not needed. In many cases, a flywheel is already around the bike's spinning wheel. Preferably a front mounted flywheel with a channel is used to accommodate a fan belt. The bike gearing that has proved effective is with a 52-tooth chain ring on the exercise bike connected by the chain to the flywheel, which has a 16 tooth freewheel. The flywheel diameter that has proven effective, is with a solid metal flywheel that is 15.5" in diameter.
Step 2: Belt and pulley[edit | edit source]

A belt is needed to connect the spinning wheel of the bicycle (or the flywheel) to the generator via the pulley. Depending on your configuration, some machine work may be necessary to fit the belt properly. Once the wheel is ready, simply run the belt along the wheel groove and connect it (without allowing any slack in the belt) to the pulley attached to the generator. An example of belt and pulley use can be found at Samoa Hostel Pain in the Axle.
The pulley works like the wheel on the bike. The belt attaches it to the generator. This allows the work done on the bike to be translated to the generator. The belt and the pulley are each one of six simple machines, commonly used for all sorts of mechanical projects.
On pedal power devices the type of pulley needed is divided between whether the pedal-power device replaces a motor device (as in the case of the CCAT pedal washing machine), or if the pedal power device generates electricity (as in the CCAT pedal powered TV). The motor-replacing devices commonly use a shaft-mounted drive pulley. The generator pulley is recommended at 3-4" in diameter. The pulley diameter can be altered to make the effort required to spin the pulley easier by putting on a larger pulley diameter. However the pulley for electricity-generating devices uses a fan belt.
Fan belt[edit | edit source]
The fan belt, like the one used at the CCAT pedal tv and vcr, must be large enough to cover circumference of the flywheel, the generator wheel, and the distance between each wheel. V - belts waste ~20% of your pedaling effort to friction. Tooth belts are ~95% efficient.
Lever arms and elliptical sprocket wheels[edit | edit source]

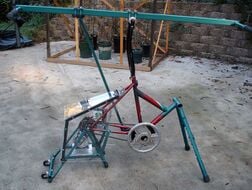
Lever arms on cranksets, like the one used on the Flock House Handcar Generator, can increase the power output (well) over 50%. One such system has been designed by Maurice Houbracken.
A similar objective can be achieved by having sprocket wheels on chain drives which are elliptical, rather than round. For example, if the sprocket that is attached to the pedals of a bicycle is elliptical, with its major axis perpendicular to the axis of the pedal cranks, and with the axle of the pedals passing through the center of the ellipse, then effectively the gear ratio of the drive varies as the pedals revolve. When the rider's foot is driving downward, the gear ratio is highest, to achieve highest speed. When the rider's feet are moving horizontally, with little force, the gear ratio is lowest, giving best mechanical advantage, and getting the feet past this alignment as fast as possible.
Step 3: Generator[edit | edit source]

Each of these configurations has a different set of design parameters, but their purpose is identical: To provide mechanical energy in the form of a rotating belt to a generator which will then produce electrical energy.
One might say the generator is where the magic happens. The generator uses a spinning motion (in our case, created by pedaling a bicycle) to spin magnets, creating an electromagnetic current. This current can be used in many ways, but using the current haphazardly will most likely lead to the non-function or destruction of your electrical or electronic device. You can learn about generators here.
For the case of this guide, all you really care about it picking the right generator. Typically, the best generator for the job is a permanent magnet DC motor that produces 24 volts at 600 rpm (the motor works as a generator so long as the diode and fuse are placed in series n which means in a row in electrical engineering terms n between the generator and the battery).
Also 24 volt DC generators that have proved effective are permanent magnet generators that are rated at 1800 rotations per minute (rpm), and a potential of 1/3 horsepower of output. The voltage output is directly proportional to the rpms and the capability of this system is to rotate the generator at 900 rpm's. This will lead to an output of 12 volts.
Do not use a car alternator. They are required to spin too fast (3000-10,000 rpm) and use 1/3 of your pedaling effort to power an electromagnet instead of using permanent magnets that use no power.
You're almost there! Now all the works will be electrical work. It is time to connect the battery to the generator (with a few things in-between).
Wiring[edit | edit source]
10 gauge copper stranded copper wire. Do not use solid copper wire. Electricity is conducted along the surface of copper wire. The more surface area, the less resistance (energy loss due to conversion of electricity to heat). The more copper strands the better.
Step 4: Diode[edit | edit source]

Have you ever gone through a line where a turnstile was used to keep people moving only one direction, into the subway station or amusement park? A diode works essentially the same way for current. A one way electricity valve placed on either the positive or negative wiring. Must be rated at 25 amps, and at least 35 volts. Because a motor is a two-way device, something must be in place to keep the current from going back the way it came, causing the motor to act like a motor and not like a generator (a motor performs the opposite job of a generator as it takes in current and converts it into mechanical energy).
You can purchase a diode at Radioshack for around one dollar. The diode will go between the generator and the battery, with only the fuse between it and the battery. However, a diode has both a positive and negative terminal. Make sure you connect positive to positive and negative to negative or the device will not work. Reference the packaging from your diode to determine which terminal is which, and if you are still having trouble, ask your friendly Radioshack, or other electronic store, customer service representative.
Step 5: Fuse[edit | edit source]

The concept of a fuse is generally well understood. If there is a surge in the electrical system that causes too much current to pass through the fuse, it pops, which creates an gap in the circuit (known as an open circuit) This gap prevents current from continuing its path. Yes this keeps the device from working. It also keeps the devices from being destroyed by too much current. For the price of a fuse, your device can live again!
The fuse should be 25 amps, and should be connected between the positive terminal of the battery and the positive terminal of the diode.
For an example of a bicycle generator using fuses visit the WaterPod Bicycle Energy Generator
Voltage regulator[edit | edit source]
The voltage regulator limits amount of current flow when battery reaches full charge to prevent damage to battery.
Ampere, Voltage, and RPM meter[edit | edit source]
Attached to exercise bike.
Step 6: Lead-Acid Battery[edit | edit source]

The battery stores the energy that you create, and releases it in a steady way, at whatever voltage and current you have purchased you battery to be. This means that you must match your battery to your device's needs. You can use multiple batteries in parallel (all of them connected side-by-side to the same device, in our case a generator) to get the right matching. Again, I recommend you ask an electronics vendor for advice on your specific setup. Once you get your battery parameters figured our, all you must do is connect the positive terminal from the generator-diode-fuse to the positive terminal of the battery, and the negative terminal to the negative terminal.
A 12 volt deep cycle battery can receive a supplemental charge with pedal power but it is better to use pedal power to match the load of an electrical appliance powered by the battery or via an inverter. It is better still to charge smaller flash light or cell phone batteries. It is best not to use a battery at all, as in the vase of the pedal powered electric blender.
One step to go...
Step 7: Inverter[edit | edit source]

The inverter converts your direct current (what comes out of the generator) into alternating current (that's the type of current that comes out of your wall socket). It changes 12 volt DC into 110 AC. Your alternator should have a 3-prong plug for easy connection to your device. Just connect the device's plug to an alternator socket and the alternator leads to the battery ís positive and negative terminals. As always, be sure to connect positive to positive and negative to negative.
Inverters must be able to handle potential peak electrical loads. To determine the loads, look at the watt requirement on the back of the appliances. This calculation should be used to insure that the inverter can handle the electrical loads. Most inverters vary in there efficiency under electrical loads allowing for 60%-90% of original 12 volt DC current to be transferred into 110 volt AC.
That's it! You're ready to generate electricity while getting a great workout! When generating electricity for non-electronic electrical devices such as running lamps the inverter is not necessary. After a long and hard process, it is finally time to test it.
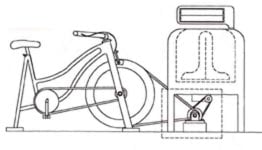
Step 8: A simple machine[edit | edit source]
This part will vary depending on your project, but the idea is to use one or more belts and pulleys to turn the mechanism that would otherwise be turned with electrical power. In the diagram by Matthew Rhodes, a belt is connected directly to the motor that turns the washing machine. This is the simplest configuration. To learn about simple machines click here.
Examples[edit | edit source]


Links to Parts[edit | edit source]
- Bicycle Resources:
- At the Bike Library in Arcata, CA, you can rent a bike for 6 months for $20. And you get your money back when you return your bike within the 6 months!
- ScienceShareware has an example of DC Voltage created from a stationary bike.
- Bike stands / trainers:
- Convergence Tech makes an excellent stand specifically for the purpose of generating pedal power current. The company sells instructions and provides parts lists for easy purchase. Most of the hard works is done for you!
- Generators:
- Check out this Java Applet showing how electrical generators work Neat!
- The Thomas Register Directory has a list of generator vendors.
- Diodes:
- Learn more about what a diode does here
- Batteries, fuses, inverters, generators and other electrical equipment can be purchased from Mouser Electronics.
Other Links[edit | edit source]
- CCAT official site
- View the current research on Pedal Power posted by CCAT.
- Learn about the electrical current in your home here.
- An alternator can be useful in some Pedal Power designs. Learn about them here.
Sendog6913 17:30, 2 March 2008 (PST) Cal Poly Humboldt - CCAT