
For the Spring 2021 semester of Engineering 535, Development Technology at Cal Poly Humboldt (HSU), we partnered with the U.S. Environmental Protection Agency and the SAFE project team of the Schatz Energy Research Center at HSU (SAFE = Smoke, Air, Fire, Energy) to develop technology systems related to wildfire smoke mitigation. The goal of our team was to design, build, and test a low-cost air filtration systems designed to remove airborne particulates generated by wildfires and other emission sources from residential indoor spaces. When deciding on the final design of the DIY unit, we took into consideration the efficacy of the filter with regard to removing PM2.5 particulates from the indoor space, the relative costs of the filter systems (considering initial and operating costs), and other factors such as usability, replicability, accessibility, reliability, and convenience. A complete project report can be found here.
Materials and Costs[edit | edit source]
Required Materials for the Triangular-shaped air filter design
| Item | Amount | Cost per unit | Total |
|---|---|---|---|
| 20" Box fan — Utilitech Model #FB50-16HB | 1 | USD 20.98 | USD 20.98 |
| MERV 13 filter — Filtrete Model #MA02DC-6 | 2 | USD 19.97 | USD 39.94 |
| Premium duct tape — 3M Model #2835-L | 1 | USD 9.98 | USD 9.98 |
| Carboard — Box Fan box (free) | 1 | USD 0.00 | USD 0.00 |
| Grand total | USD 70.9EUR 60.97 <br />GBP 51.76 <br />CAD 87.92 <br />MXN 1,478.27 <br />INR 5,306.87 <br /> | ||
The total costs for this design were slightly over $70, the price could be lower if one has any of the above materials already in their possession.
Any duct tape will do, but premium duct tape is highly recommended. We noticed that the premium duct tape molded very well to the edges of the air filter unit and made a very secure seal, which is very important given that we are using this for particulate removal.
When choosing a fan, we took into consideration the size of the panel filters, which are generally 20" in height and width. When using them with a 20" box fan, this allows for a more seamless fit. Having the same size fan and filters is recommend because having too small or too large when compared to the fan may affect the filtration efficacy. We choose the Triangle-shaped air filter design because we felt that the triangle design would help prevent overheating that was reported for many DIY air filter units when placing filters directly on the box fan. We choose a 3-speed fan not only to test filtration efficacy for the low and high setting, but also to analyze the noise produced from the air filter unit on the low and high setting. Noise produced from for air filter units often goes unmentioned, so if you are sensitive to noise having a fan that has a low setting may be something to take into consideration when deciding on a fan. Also, it is recommend that you choose a fan that has the control knobs (on/off and speed settings) in areas that will not be covered by the panels when the unit is assembled.
With DIY filters, there is more variability in the filter ratings that you can attach to your unit. Panel filters generally use the MERV rating value, which is based on the average removal efficiency within fibrous filters across three particle size ranges, 0.3–1.0 micrometers(µm), 1.0–3.0 µm, and 3.0–10.0 µm, and this measure is typically used to evaluate the performance standards of filters used in HVAC systems (Joseph et al. 2020). Therefore, the higher the particle removal efficiency of a filter, the higher the MERV rating (Joseph et al. 2020). When selecting a filter rating you need to determine which particles you are most concerned with in the airshed. Higher MERV rating filters can be expensive, buying the appropriate filters for your use will help cut costs too. Airborne particles generated by wildfire smoke contain particle sizes with a diameter smaller than 2.5 µm and is the main air pollutant of concern for public health (California Air Resources Board 2021). If using this air filter unit to remove airborne particulates generated by wildfires it is recommended that you use a MERV filter with a rating of at least 13 or higher, as these filter ratings are able to filter out a majority of ultrafine particles of PM2.5 concentrations that can lead to delayed health issues in the future.
Required Tools, Skills and Knowledge[edit | edit source]
A pair of scissors and a marking device (pencil or marker) are also needed to assemble this unit.
This unit is very easy to assemble. One needs only to cut cardboard into triangles and attach both the cardboard and filters to the box fan with duct tape and it is ready to be plugged into a wall outlet. This unit can be assembled within roughly 30 minutes.
Assembly[edit | edit source]
Assembly instructions are provided below. Alternatively and additionally, a more in-depth video guide is hosted here:
Determining Filter Placement[edit | edit source]
Verify which side of the fan is the inlet and outlet side. You can do this by plugging in the fan and turning the unit on. The side that blows air out, the high pressure side, is the outlet side and the side that doesn't is the inlet, the low pressure side. We chose to place our filters on the inlet side for two reasons, the first being that the inlet side has lower pressure than the outlet side and will suck everything together when the unit is turned on. As opposed to placing the filters on the outlet side, which has higher pressure and will push the filters apart when turned on. The second reason, was because of the specific model of box fan that we used has the knob on the outlet side, therefore by assembling the DIY unit you would be covering the knob to switch the box fan on. If the model of box fan you have has a knob on the top, you have more leeway to place the panels on either side you choose, but we recommend using the inlet side regardless. The panel filters also have an arrow on them that indicate the direction of flow. When attaching the filter to the box fan verify that your filters have the arrow pointing towards the inlet side, the arrow pointing towards the fan.
Power Cord[edit | edit source]
The model of the box fan that we used had the power cord coming from the bottom of the inlet side. To avoid taping the cord and trapping it within the filter design, make sure you tape around the cord.
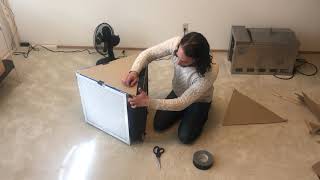
DIY Unit Assembly[edit | edit source]
Place the unit face down with the inlet side up.

Place one filter on the unit and align it with the edge of the box fan and verify that the arrow is facing the box fan. Use a couple pieces of duct tape to hold the filter in place, like a hinge. Repeat on the other side with the second filter.

Sit the unit up and form pull both filters out to form a triangle and secure the point of the triangle with a couple pieces of duct tape to hold it in place. Helpful tip: when attaching the duct tape to the end of both filters, it is recommended to crease the duct tape to (folding the tape in half with the sticky side facing the filters) and place it on each side of the filters to get a better seal between both filters.

Using the box that the box fan came in or other carboard material (that has at least 20"x 20" dimensions, preferably more to be easier to work with), place your partially assembled unit on the cardboard and trace the area of "triangle" using a pencil/marker, leaving a little extra on the bottom to have cardboard to attach to the box fan. Cut out this triangle and use it to trace out another triangle.

Place one triangle on top of the filters, making sure the cardboard slightly overlaps onto the filters and box fan, and secure with a couple small pieces of duct tape.

Gently fold the edges of cardboard to sit flush against the box fan and secure with duct tape.

Flip the unit over, so the bottom of the fan is facing up. Attach the other triangle to the bottom and make sure to move the power cord so that is hanging out of the triangle (and not taped inside!). Repeat Step 5 and 6 on the bottom side.

Lay the unit down with the box fan on the ground and the point of the triangle facing up, and begin adding more tape to secure and more importantly seal any gaps in the filter unit assembly. Repeat on each edge of the air filter unit, 9 edges total, making sure that the duct tape is flush against the edges and no gaps are visible.

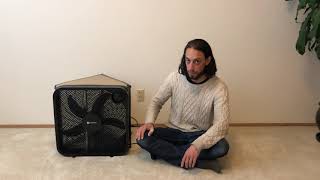
The unit is assembled and ready to be used. Place the unit sitting up right in an open area and plug it in to begin using.
Usage[edit | edit source]
The following section discusses the recommended best practices for operation and maintenance for the DIY air filter, including consideration of filter placement in rooms, filter management and replacement intervals (including a general estimate of how long to use a filter), factors that may affect system operation and maintenance in different climate zones, and other related issues. A video of the user manual for our triangular-shaped air filter unit is hosted here:
Turning the air filter on[edit | edit source]
Taking the power cord, plug in the unit to a wall outlet (the standard wall outlet voltage for US homes is 110). Then select which speed setting you would like, 1, 2 or 3 (low, medium and high).

Room considerations and specifications[edit | edit source]
When using this DIY air filter to clear particulates from a room it is recommended that you use a room that can be enclosed (i.e., windows and doors can be shut), and any heating vents can be closed. This design is well suited to a typical size bedroom (approximately 10' x 12' with 8' ceiling), from which it can purge essentially all wildfire smoke in about 20 minutes on high, or 40 minutes on low. Actual performance will depend on selected fan and filters.
When to use and how often to use[edit | edit source]
When to use this unit is up to you. We recommend using this air filter whenever air quality is bad and you should use your best judgment and if available, check the PurpleAir website (or any other real time PM 2.5 reporting website) to verify the air quality within the area. You can also use this unit anytime you would like to remove any particulates such as pollen, dust, mold and tobacco smoke within your home. This unit does produce a fair amount of noise when being used, therefore if you are sensitive to noise you can use this as needed when ambient outside and indoor air quality is good there is no need to use the air filter.
If using this unit during a wildfire event you should if available, check the PurpleAir website (or any other real time PM 2.5 reporting website) to monitor for high levels of particulate matter within your area. But if you see and smell smoke either within your home or surrounding your home, that is a good indicator that you should probably use an air filter to clean indoor air. Based on our test runs, the DIY air filter unit on the high setting, takes approximately 20 mins to clean high levels of PM2.5 with an average sized bedroom that is enclosed and if if used on the lowest setting it takes approximately double this time.
Where to place the air filter in the room[edit | edit source]
The air filter should be placed where it will have unrestricted air flow within the room and have access to a wall outlet. Neither the inlet filters nor the outlet side should be against a wall.
Do not place the air filter in the corner of a room. we understand that the air filter appears to fit perfectly in the corner of the room but that will restrict air flow and reduce air cleaning rate.

When to change the air filters[edit | edit source]
Currently there is no set answer on when filters for DIY air filter units should be changed during bad air quality usage that is not due to an extreme event such as wildfire. For commercial filters, such as Medify Air they recommend that their filters be changed every 2500 hours or 3-4 months but this is merely a "guidance" and can be highly variable given where you live and what particulates you are exposed to (Medify Air 2021).
For our DIY unit we recommend that if this is being used for heavy wildfire smoke, we recommend that it is changed at least every two weeks. You should inspect the filters periodically, to check filter quality. If the filters look dirty (i.e., dark, yellow, or any different color from when they were purchased) or if you smell smokiness (this is a sign that particles are off-gassing from the filter) coming from the filter these are good indicators that the filters should be swapped out. But again, you should use your best judgment when it comes to when the filters should be replaced.
One thing to keep in mind when changing the air filters is that you will have to disassemble the whole unit to remove the old filters. Carefully remove all the tape from the cardboard and it does not matter if the old filters are damaged in the removal process because you will be disposing of these anyways. We recommend that you have extra cardboard in the case that the cardboard is damaged in the removal process and also more duct tape and scissors to reassemble the air filter once the new filters are in place.
Checking seals and edges[edit | edit source]
Periodically the duct tape around the filters and box fan should be checked to ensure they are flush and not peeling off of any components to ensure that there are no gaps in the unit. But with premium duct tape, we noticed that the edges still were in good condition after being assembled a month ago, thus reinforcing our recommendation to purchase premium duct tape if available in your location and if it is within your budget.
Safety[edit | edit source]
With newer models of box fans, overheating is not a huge issue given that most models have an automatic shut off feature when the fan gets to hot. For this reason, it is not recommended to use this filter design with older box fans. But as such, the box fan should NEVER be left unattended in the room or when out of the house.
It is also recommended that people with children keep an eye that they do not stick their fingers or any other object through the front panel of the fan as they can cause harm to themselves and the unit.
DO NOT use this air filter in an area that has water present, such as a bathroom because that can lead to electrocution.
If you hear any weird noises from the air filter, stop use and investigate what is the cause of the noise to see if it is a small object trapped in the filters and remove to avoid damaging the unit. Again, if the filters are still in good condition carefully disassemble the unit to find the issue and then reassemble when solved.
This product was designed and tested in San Francisco, CA so it is possible that if used in other climates zones different from the test area other issues may arise that affect the overall performance of the unit.

Update 2022[edit | edit source]
Two of the top next step with this project were to design a solar array that could power it during the more likely power outages during large smoke events and to design a way to lower the power/energy use. These were tackled with this followup project from Spring 2022 semester at Cal Poly Humboldt - 215 DIY solar power box fan air filter.
References[edit | edit source]
- California Air Resources Board. (2021). "Inhalable Particulate Matter and Health (PM2.5 and PM10) | California Air Resources Board." <https://ww2.arb.ca.gov/resources/inhalable-particulate-matter-and-health> (Mar. 20, 2021).
- Joseph, G., Schramm, P. J., Vaidyanathan, A., Breysse, P., and Goodwin, B. (2020). "BRACE Technical Report Series." 36. <https://www.cdc.gov/air/wildfire-smoke/socialmedia/Wildfire-Air-Filtration-508.pdf>. (Apr.1, 2021).
- Medify Air. (2021). "MA-25 Replacement Filter Set." Medify Air, <https://medifyair.com/products/ma-25-replacement-filter-set> (Mar. 24, 2021).