Some introduction text and background can go here.
Background[edit | edit source]
A flexure is a special design with flexural bearings that allow motion by bending the material when a force is applied to it, because of the bending stresses created in the flexure. This property can be use for many applications, such as guided and motion-amplified actuators and positioning devices. In general flexures devices are drive by piezoelectric actuators, which provides one or more axis of motion. See [1]
Project goals[edit | edit source]
Design a positioning flexure frame that allows motion in X and Y direction, in order to analyse the displacement produce by applying a force. Ideally the force is applied by a piezoelectric, unfortunately piezoelectrics where not available by the time the project was done. Therefore some modifications were done to apply the force manually.
Design[edit | edit source]
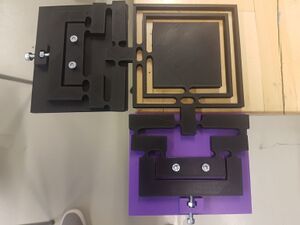
The design consist on a positioning bed connected to two flexures frames on the horizontal and vertical direction, and two bases with a screwholder. The flexures frame have eight flexural bearings that transfer the motion to the output connection, at the upper part. The force is applied in the axial direction of each of the flexures, at the bottom part. The top part will move linearly with respect to the bottom by the result of the flexure deflexion. The middle part of the flecure frame should be tied to the base plate, in order to generate more stresses at the upper part.
-
Flexure and positioning platform.
-
Flexure base.
Bill of material[edit | edit source]
1.- Flexures frame with positioning bed.
2.- Flexure base.
3.- 2 M6 X 25 mm screws.
4.- 4 M5 X 20 mm.
Costs[edit | edit source]
The cost corresponding to the amount of PLA filament used in the print = 12.68m (basex2) + 17.7 m (2flexures and positioning bed)
Printing time:
Flexure frame with positioning bed = 11 hrs 41 min.
Flexure base = 5 hrs for each base.
Printing directions[edit | edit source]
Link to the Model files can be found here [2]
1.- Download the stl file of flexure&platform. When printing, select support material, due to the positioning bed is not solid from the inside.
2.- Download the stl file of base and print twice.
Note: The 3D printings were scale to 80% from the original dimensions.
Assembly directions[edit | edit source]
1.- Attach each of the flexures to the base by using two screws.
2.- Set another screw and nut inside the screw holder.
Next steps[edit | edit source]
1.- Analyse the displacement and stress generated on the flexure frame with a FEM software, in order to get more information for further modifications.
2.- Rebuild the code, which was made in open scad, to make it easier to modify.
Conclusions[edit | edit source]
Further developments needs to be done in order to achieve more displacement at the output connection.

