
Background & Objective[edit | edit source]
The objective of this project is to design a resonance demonstration unit for the students at Zane Middle School. The demonstration unit is being built for the 7th grade Engineering and Science teacher Ken Pinkerton. Mr. Pinkerton currently lacks a demonstration unit that conveys the idea of resonance which is why the Resonauts have chosen this project. As a group, the design team call themselves the Resonauts. There are four members of the Resonauts. For more information about these group members, please visit our individual Appropedia pages at Robert Toledo III, Thomas Minniti, Alyssa Virgil, Kelly Rodman The resonance demonstration must be portable, aesthetically appealing, and informative. The goal of the design is to provide a visual aid for the students to learn about the principles of resonance. The design should function as a safe and useful teaching tool.
What is a Chladni Plate?[edit | edit source]
The Chladni Demonstration unit is based on the ideas of German Physicist Ernst Chladni, who developed the Chladni plate as a way to research sound and acoustics. He caused his plates to vibrate by bowing on them with a bow from a stringed instrument. A Chladni plate visually shows the nodes, or points of no displacement, of sound. Materials such as ceramic, glass, wood and a wide range of metals can be used for a Chladni plate. The Chladni plate can come in many shapes, although it is most commonly built as a square. The location of the nodes depends on the natural frequencies of the plate which depends on the shape, density and material used. Sand or other fine particles are placed on the top of the plate and when certain vibrations are induced on the plate, a standing wave pattern forms with the particles settling in the location of the nodes. A standing wave pattern is the pattern of the location of the nodes and anti-nodes.
-
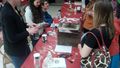
Demonstrating resonance at the Math Fair in April 2015 at the Bayshore Mall in Eureka, CA

Criteria[edit | edit source]
Criteria and constraints are given in a sortable table below. The criteria and constraints were developed by brainstorming as a group. After the Resonauts felt confident that all criteria and constraints were taken into consideration, an interview with Mr Pinkerton was held to verify and adjust any important criteria and constraints that were missed.
| Criteria | Weight | Definition |
|---|---|---|
| Safety | 8 | The ability to prevent injury of any kind to anyone using the demonstration unit. |
| Educational Value | 10 | The ability of the demonstration to visually demonstrate resonance to observers and educators in teaching the principles of resonance. |
| Cost | 9 | The total time in hours and money spent in dollars to develop and build the final demonstration unit. |
| Durability | 9 | The time the demonstration unit will last without breaking or needing repairs and its ability to withstand normal wear and tear. |
| Aesthetics | 6 | The designs visual appeal and ability to draw positive attention to itself. |
| Portability | 8 | The ease with which the demonstration can be packed up and moved between locations and its ability to be easily stored. |
| Ease of use | 7 | The accessibility of the demonstration unit to any educator without having to spend a lot of time learning how to operate the demonstration. |
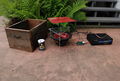
Description of Final Project[edit | edit source]
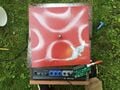
The final project turned out to be exactly as we had hoped. The final project is housed within a recycled redwood box. Inside this box lies an amplifier, subwoofer and function generator. The function generator is plugged into the back of the amplifier so that only one outlet is required to power the demonstration unit. All components are able to be removed from the box so that students can see all of the parts individually. The plate and rod that connect to the base of the subwoofer can also be easily removed so that the demonstration unit can be easily stored in Mr. Pinkertons classroom. The eagle logo on the chaldni plate is meant to boost school spirit when students see the demonstration unit and serves as a reminder to the students that this is their project.
How to Use[edit | edit source]
- Find a level surface with a power source.
- Plug in and turn on the amplifier.
- Lightly pour salt evenly over the Chladni plate.
- Pick a frequency on the function generator between 75-350 Hz.
- Turn on the function generator.
- Control the volume on the amplifier or the function generator.
- Watch the shapes form in front of your eyes!
-
-
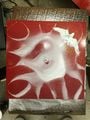
90Hz
-
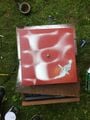
215Hz
-
175Hz
.JPG)


Costs[edit | edit source]
The total cost for the resonance demonstration was fairly inexpensive mainly due to the generous donations. The most expensive components of the design are the subwoofer, amplifier and redwood box. The redwood box is not a necessity for a working demonstration; however, it is very useful in housing and transporting all of the individual components and cutting down on sound. Due to the sturdiness of the components, the Resonauts have projected there will be minimal maintenance costs.

| Quantity | Material | Cost ($) | Total ($) |
|---|---|---|---|
| 20 | Hardware | .30 | 6.00 |
| 10 | Hooks | .20 | 2.00 |
| 2 | Spray Paint | 2.50 | 5.00 |
| 1 | Super Glue | 4.49 | 4.49 |
| 1 | Shelf Bracket | 7.99 | 7.99 |
| 2 | Dowel (1" x 48") | 5.99 | 11.98 |
| 4 | Threaded Rod (1/4"x 24") | 2.99 | 11.96 |
| 2 | Adapters | 7.99 | 15.98 |
| 1 | Pyramind PA Amplifier | 32.99 | 32.99 |
| 1 | Function Generator | 22.99 | 22.99 |
| 1 | Chladni Plate | Donated! | Donated! |
| 1 | Redwood (3/4" x 14" x 6') | Donated! | Donated! |
| 1 | Subwoofer | Donated! | Donated! |
| Sub Total | $121.38 | ||
| Tax (8.25%) | $10.01 | ||
| Total Cost | $131.39 | ||
Testing & Results[edit | edit source]
Through several days of testing, the team has been able to find a range of frequencies at which the Chladni Visual Demonstration Unit functions best. The optimal operation is at frequencies between 75-350Hz. The frequencies generated by the Chladni Visual Demonstration Unit, while not the exact replicas of, are comparable to the patterns shown on other mechanical wave drivers at similar frequencies. Salt poured on the plate forms several different unique geometric patterns. The redwood box has cut down on some of the excessive volume of the speaker. Team Resonauts have shown the design to Mr. Pinkerton who is enthusiastic about employing the demonstration for future demonstrations in his classroom at Zane Middle School. The demonstration unit has been debuted with success at the Humboldt Math Festival at the Bayshore Mall in Eureka as seen in the pictures below. People of all ages were interested to see the demonstration and play with the salt as different shapes would form on the Chladni plate. Kids really enjoyed being able to pour salt on the plate and see the different patterns that formed. Kids were fascinated with the different shapes that formed and many of them kept playing with the salt and were amazed at how the disrupted patterns always vibrated back to form.
-
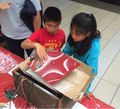
Kids enjoying playing with the salt as it vibrates around
-
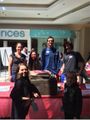
Resonauts group picture at Math Fair
-
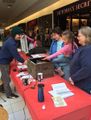
Tom showing off the demonstration


Video[edit | edit source]

How to Build[edit | edit source]

Obtain recycled redwood from a local source and build a box to house all of the components. Other material can be used. The box is not required for the resonance demonstration to function. It mainly serves to cut down on sound and for portability purposes.

Get a amplifier and speaker and hook them up together to make sure that they both work. When hooking up an amplifier to only 1 speaker, the positive and negative wires do not affect the sound of the speaker.

Drill holes in the edge of the speaker for the rods to go through and bolt the rods to the speaker, plexi-glass and metal plate. During this step, make sure to adjust the different lengths of the rods so that the metal plate sits level. The Chladni plate will vibrate best with the least amount of friction between the central rod and the plexi-glass. The patterns form best when you have a flat surface otherwise the vibrations will cause all of the salt to fall off.
.JPG)
Plug in your function generator power chord to your amplifier and also connect your auxiliary chord to the amplifier.

Put all of the components into the box and plug into some power. Be careful to have the volume turned down before powering on the unit. Ear damage can come from extremely high frequencies and decibel ranges. Pour on some salt and try at different frequencies to see all of the cool shapes you can make!
Special Thanks![edit | edit source]
The Resonauts want to give a special thanks to everyone who made this project a possibility. The Resonauts had a great time working on this project and appreciate having this amazing opportunity. We have learned so much throughout the whole process. Thank you Andy Alm, Marty Reed, Ken Pinkerton, Lonny Grafman, Audio Specialties, Zane Middle School and Humboldt Bay Trade and Pawn.