| (One intermediate revision by the same user not shown) | |||
| Line 165: | Line 165: | ||
! Steps | ! Steps | ||
! Description | ! Description | ||
! Pictures | |||
|- | |- | ||
|1: Choose Location | |1: Choose Location | ||
| Depending on where the edible landscaping is being implemented, choosing the location can be simple or at times complex. It could be as easy as a garden in your backyard or possibly a trickle of edible landscaping throughout an entire school. When choosing the location it is important to choose and objective or goal for what you're about to create. Examples of objectives are: Beautify the area, Create enough food for a cooking club, Produce enough food to attract wild life and Create an educational space for children. An important consideration when creating an objective is your budget. | | Depending on where the edible landscaping is being implemented, choosing the location can be simple or at times complex. It could be as easy as a garden in your backyard or possibly a trickle of edible landscaping throughout an entire school. When choosing the location it is important to choose and objective or goal for what you're about to create. Examples of objectives are: Beautify the area, Create enough food for a cooking club, Produce enough food to attract wild life and Create an educational space for children. An important consideration when creating an objective is your budget. | ||
| | |||
|- | |- | ||
|2: Analyze Solar Exposure, Soil Characteristics & Climate | |2: Analyze Solar Exposure, Soil Characteristics & Climate | ||
| | |||
| | | | ||
|- | |- | ||
|3: Explore Plant Options | |3: Explore Plant Options | ||
| | |||
| | | | ||
|- | |- | ||
|4: Create Potential Designs | |4: Create Potential Designs | ||
| | |||
| | | | ||
|- | |- | ||
|5: Choose Design that Meets Objective Best | |5: Choose Design that Meets Objective Best | ||
| | |||
| | | | ||
|- | |- | ||
|6: Purchase Materials | |6: Purchase Materials | ||
| Plans, Soil Amendments, Stakes, Barrier Options: Edging, Vinegar, Buffer, Mulch | | Plans, Soil Amendments, Stakes, Barrier Options: Edging, Vinegar, Buffer, Mulch | ||
| | |||
|- | |- | ||
|7: Implementation Process | |7: Implementation Process | ||
|Implementation is a step that consists of various sub-steps. Tools such as a tape measure, shovels, gardening gloves and a pix axe are needed. | |Implementation is a step that consists of various sub-steps. Tools such as a tape measure, shovels, gardening gloves and a pix axe are needed. | ||
| | |||
|- | |- | ||
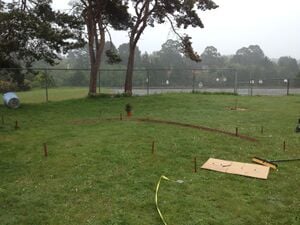
|7i: The first step of implementation is staking where your bed will be using a tape measure and stakes. [[Image:IMG 0849.JPG|thumb|Fig 1: Staking out bed]] | |7i: Staking | ||
|The first step of implementation is staking where your bed will be using a tape measure and stakes. | |||
|[[Image:IMG 0849.JPG|thumb|Fig 1: Staking out bed]] | |||
|- | |- | ||
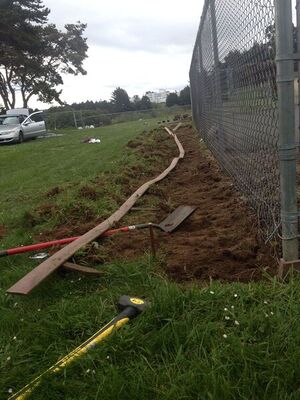
|7ii: Once the location is set the existing plants must be removed. This process can mostly be done with a shovel however the compactness of soil varies and may call for other tools such as a pick axe or rototiller. After removing all the existing plants covering the surface area continue digging to loosen up the soil to make it easy for the roots as well as air to move through. | |7ii: Tearing Soil | ||
[[Image:Blueberry Bed.JPG|thumb|Fig | |Once the location is set the existing plants must be removed. This process can mostly be done with a shovel however the compactness of soil varies and may call for other tools such as a pick axe or rototiller. After removing all the existing plants covering the surface area continue digging to loosen up the soil to make it easy for the roots as well as air to move through. | ||
|[[Image:Blueberry Bed.JPG|thumb|Fig 2: Blueberry bed after tearing up soil with pick axe]] | |||
|- | |- | ||
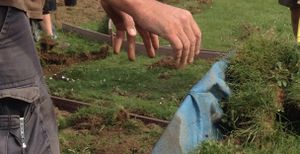
|7iii: | |7iii: Establishing Borders | ||
|There are various ways to establish border with a garden. The Rainbow Walkway has 4'x2' recycled edging around the border however this is not the only option. Other methods include brick, concrete or even vinegar around the beds. These all have different affects with he plants as well as aesthetics. When using edging it is important to dig deep enough so that the edging had space to sink in and is not higher than the bed. | |||
|[[Image:Edging Sink In.jpg|thumb|Fig 3: Putting edging into place]] | |||
|} | |} | ||
Revision as of 03:21, 25 April 2014
Abstract
The purpose of the project is to create an edible landscaping that will help incorporate the STEAM (Science, Technology, Engineering, Art, and Math) program that Zane Middle School focuses their curriculum around. The edible landscaping will be an example of the engineering process necessary to create the landscaping as well as a space to observe the different biological cycles of plants.
Background
Team Seedling is composed of four Humboldt State University Students, Daniel Holter, Jared, Jax Cat, and Tanya Garcia, currently enrolled in the Spring of 2014 Engr215 Introduction to Design taught by Lonny Grafman. The group is collaborating with Zane Middle School to create an edible landscape on campus that will be utilized by students and community members through out the year. The edible landscaping must be aesthetically pleasing so that it attracts students and sparks their interest with nature.
Problem statement and criteria
The objective of Team Seedling is to add sustainable edible landscaping to Zane Middle School’s campus. This landscaping should be low maintenance and child friendly while providing education and awareness of the local, native environment. Table-1 lists the criteria that Team Seedling has created along with the specifications and considerations emphasized by Zane Middle School. The criteria will be weighted in importance and thus will help when making the final design decision.
Table-1:Criteria and Description
| Criteria | Description | Weight |
|---|---|---|
| Aesthetics | Better than it is now according to Trevor’s eye | 7 |
| Cost | Total < $900, <$30 a square yard | 6 |
| Safety | No possible projectiles unless in areas where students are supervised, does not block supervisor’s lines of visibility | 9 |
| Maintenance | <3 hours per month, low to no water after 1st year | 8 |
| Education | Provide educational signage that includes plant name and various facts and class curriculum that connects the plants to nutrition and students’ lives | 10 |
| Cleanliness | Does not litter pathways, minimizes pest attraction | 6 |
Description of final project
The Dezee Rainbow Pathway is a half oval or "rainbow" consisting of shrubs aligned on the east side of the garden. Within the half oval there is a semicircle with shrubs, ground cover, a wooden bench and a wooden pamphlet holder. There's a 6½ feet walk way between the two beds, thus creating a rainbow shape. There are five trees lined up in a rough "J" shape. Behind the rainbow there are two trees equidistant from each other and to the left there are three trees in a triangle shape. There is another bed against the northeast fence of the school garden which consists of blueberries, grapes and groundcover. Unfortunately, due to fire regulations, the tree that was not aligned with the "J" had to be moved into the "J" shape. Thanks to donations and discounts from various sources, this design fits perfectly within the budget. The layout is aesthetically pleasing because of the immense contrast in colors and easy to mow around.
Costs
| Quantity | Material | Source | Retail Cost Per Unit ($) | Team Total Cost ($) |
|---|---|---|---|---|
| 3 | Grapes | Piersons | 6.49 | 19.47 |
| 2 | Frost Peach Tree | Miller Farms Nursery | 14.49 | 28.99 |
| 1 | Honeycrisp Apple Tree | Miller Farms Nursery | 24.99 | 24.99 |
| 1 | Liberty Apple Tree | Miller Farms Nursery | 22.99 | 22.99 |
| 1 | 20th Century Asian Pear Tree | Mad River Gardens | 26.99 | 26.99 |
| 6 | Landscape Edging - 20 ft | Miller Farms Nursery | 36.99 | 177.54 |
| 10 | Huckleberries | Lost Foods Nursery | 5.00 | 0.00 |
| 12 | Blueberries | Miller Farms Nursery | 10.00 | 120.00 |
| 8 | Chilean Guavas | Flora Organica | 10.00 | 80.00 |
| 8 | Oregon Grape | Lost Foods Nursery | 5.00 | 0.00 |
| 3 | Salal | Lost Foods Nursery | 5.00 | 0.00 |
| 4 | Strawberry | Lost Foods Nursery | 5.00 | 0.00 |
| 3 | Yerba Buena | Jared Gobel's Backyard | 0.00 | 0.00 |
| 2 | Borage | Lost Foods Nursery | 4.49 | 0.00 |
| 3 | Checkerbloom | Lost Foods Nursery | 3.00 | 0.00 |
| 1 | Ph, NPK Soil Tester | Ace Hardware | 20.49 | 20.49 |
| 10 | Screws | Jared Gobel's Backyard | 0.00 | 0.00 |
| 3 | Fence Board | Piersons | 3.75 | 11.25 |
| 5 | Wood Blocks | Jared Gobel's Backyard | 0.00 | 0.00 |
| 15 | Sign Stakes | Piersons | 1.00 | 15.00 |
| 14 | Edging Stakes | Miller Farms Nursery | 0.53 | 2.06 |
| 3.3 cu.yd. | Mulch | Wes Green | 38.00 | 125.40 |
| 2.3 cu.yd. | Compost | Wes Green | 45.00 | 0.00 |
| 0.3 cu.yd. | Top Soil | Wes Green | 47.00 | 14.10 |
| 2 | Flowering Currant | Lost Foods | 5.00 | 0.00 |
| Total Cost | $689.27 | |||
Results
Plants Are Alive.
How to build
When creating you're own edible landscape, it is important to follow every step listed. Although some steps may ….
Discussion and next steps
- Suggestions: Make names link to user pages when listed out under background section.
References
See Help:Footnotes for more. Template:Reflist


