m (Mass replacement for maintenance) |
|||
| (118 intermediate revisions by 13 users not shown) | |||
| Line 1: | Line 1: | ||
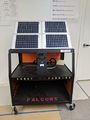
[[File:TeamWoodenLionsSRCS.jpg|thumb|Team Wooden Lions and the finished solar station.]] | |||
==Abstract== | {{Project data | ||
| made = yes | |||
The purpose of this project was to troubleshoot the previously made solar robot charging station and find out why it no longer worked. | }} | ||
{{Device data}} | |||
== Abstract == | |||
The purpose of this project was to troubleshoot the previously made solar robot charging station and find out why it no longer worked. The client requested that the station be made waterproof after getting the it back in working order. The station will be re-implemented at Zane Middle School in a classroom and will recharge the classes robots. The station is designed to inspire the children at Zane Middle School and spark their interest in renewable energy. The final product is a working solar robot charging station that is resistant to water. | |||
<gallery> File:Before photo of SRCS.jpg|thumb|middle|The previous solar-powered robot charging station before being fixed and upgraded by team Wooden Lions </gallery> | |||
== Background == | == Background == | ||
Team Wooden Lions was formed during Lonny | |||
Team Wooden Lions was formed during [[Lonny]]'s Spring 2018 [[Engr205 Introduction to Design]] course at [[Cal Poly Humboldt]] to come up with a solution to fix a solar robot charging station from a previous ENGR 215 class. The station was used in a classroom at [[Zane Middle School]] in Eureka, California to recharge their robots, introduce renewable energy principles, and provide an educational and inspirational impact on the middle school students. After a few years of use the station no longer worked after being left out in the rain. Team Wooden Lions were tasked to troubleshoot the station to figure out what was wrong with it and then get it back in working order. The station was made to be waterproof to ensure it does not meet the same fate as before.The team also worked to improve the station where possible outside of the client's requirements. | |||
== Problem statement and criteria == | == Problem statement and criteria == | ||
====Criteria==== | The station needed to first be made operational again and then made waterproof as it is subject to coastal weather conditions. The team's budget is $325 and needed to be completed by May 2018. After meeting the requirements, our team worked to improve the station in new ways determined by our team. Below is a list of criteria that both meet the clients needs and the team's improvement goals. | ||
{| class="wikitable | |||
==== Criteria ==== | |||
!Criteria | |||
!Weight | {| class="wikitable" | ||
!Constraints | ! Criteria | ||
! Weight | |||
! Constraints | |||
|- | |- | ||
|Safety | | Safety | ||
|10 | | 10 | ||
|Must be | | Must be safety approved by multiple teachers at the school. | ||
|- | |- | ||
|Durability | | Durability | ||
|9 | | 9 | ||
|Must be durable enough to not break while | | Must be durable enough to not break while transporting and withstand middle school kids. Must be waterproof. | ||
|- | |- | ||
|Mobility | | Mobility | ||
|8 | | 8 | ||
|Needs to | | Needs to be easy to maneuver around a classroom by a teacher or students, as well as various terrains such as dirt, grass, concrete, etc. | ||
|- | |- | ||
|Security | | Security | ||
|7 | | 7 | ||
| | | Locking capabilities to securely store Zane Middle School's $400 robots. | ||
|- | |- | ||
|Capacity | | Capacity | ||
|6 | | 6 | ||
|Must charge at least 6 robot batteries, each 2200mAh | | Must charge at least 6 robot batteries, each 2200mAh. | ||
|- | |- | ||
|Cost | | Cost | ||
|4 | | 4 | ||
|$325 | | Budget of $325. | ||
|- | |- | ||
|Versatility | | Versatility | ||
|3 | | 3 | ||
| | | The team was given the option to increase versatility past the waterproofing requirement. | ||
|- | |- | ||
|Aesthetics | | Aesthetics | ||
|2 | | 2 | ||
| | | | ||
Must look at least as professional as the previous project | Must look at least as professional as the previous project. | ||
|} | |} | ||
== Description of final project == | == Description of final project == | ||
The solar powered robot charging station consists of the basics needed to generate solar energy. Four solar panels are mounted to the top of the station, which is connected to the charge controller that regulates the charging of a power-storage battery. The charge controller is used to protect the electronics by regulating the power delivered to the devices and keeps them from overheating. The charge controller also provides the level of charge that the battery is at. The battery is a 12v, 35Ah, deep-cycle solar battery. All the electronics are routed together through the bus bar which then goes through a voltage regulator to bring the voltage from the 12v battery down to a usable 5v for the usb and robot chargers. Everything is housed in a metal tv stand that is waterproofed by epoxy in the gaps. A door and lock was installed on the front to protect all the electronics from theft and water damage. | |||
The solar powered robot charging station consists of the basics needed to | |||
== | == Alternative Solutions == | ||
Ten designs have been written up in order to come to a decision for the final design. | |||
{| class="wikitable" | |||
! Image | |||
! Description | |||
|- | |||
| [[File:Treasure Chest design for SRCS.png|180px]] | |||
! Treasure Chest: The body of the station is replaced with a wooden body that can withstand the weather conditions of Humboldt County. This design opens up like a treasure chest with a lock in the front for security. The solar panels are secured on top of the station to avoid being thrown off when the lid is open. | |||
|- | |||
| [[File:Renewables design of SRCS.jpg|180px]] | |||
! Bang for the Buck: After replacing all devices that are no longer functioning, a power inverter to power any device a student or teacher may have. | |||
|- | |||
| [[File:RC Station design for SRCS.png|180px]] | |||
! R/C Station: The station is able to be moved around from a controller to make the station easier for transportation. | |||
|- | |||
| [[File:Renewable design for SRCS.jpg|180px]] | |||
! Renewables: A small wind mill and hand crank are installed to supply more power to the station. | |||
|- | |||
| [[File:Interactive Education Design of SRCS.jpg|180px]] | |||
! Interactive Education: Transparent material is installed in order for the students to see and understand the circuitry of the station. A page of explanations are also provided with the station for the students. | |||
|- | |||
| [[File:Jack be nimble Jack be quick design of SRCS.jpg|180px]] | |||
! Jack be Nimble Jack be Quick: The station has new wheels installed that can be taken off road and has a system to keep it locked in place. The station also has collapsible arms to hold attachments. | |||
|- | |||
| [[File:Secured design of SRCS.jpg|180px]] | |||
! Secured: The station would be made out of durable materials to keep out weather and thieves. The solar panels would have a cage with a lock and all ways to access the system would have locks. | |||
|} | |||
== Costs == | |||
This is a table explaining what we spent on the station and where we got the materials used. | |||
== | {| class="wikitable" | ||
! Quantity | |||
! Material | |||
! Source | |||
! Cost ($) | |||
! Total ($) | |||
|- | |||
| 2 | |||
| Hinges | |||
| Ace Hardware | |||
| align="right"| 5.69 | |||
| align="right"| 11.38 | |||
|- | |||
| 1 | |||
| Padlock | |||
| Ace Hardware | |||
| align="right"| 9.49 | |||
| align="right"| 9.49 | |||
|- | |||
| 3 | |||
| Epoxy Caulk Bottles | |||
| Ace Hardware | |||
| align="right"| 8.54 | |||
| align="right"| 25.62 | |||
|- | |||
| 2 | |||
| Cans of Spray Paint | |||
| Ace Hardware | |||
| align="right"| 3.79 | |||
| align="right"| 7.58 | |||
|- | |||
| 1 | |||
| Caulk Gun | |||
| Ace Hardware | |||
| align="right"| 3.79 | |||
| align="right"| 3.79 | |||
|- | |||
| 1 | |||
| Wire Stripper | |||
| Ace Hardware | |||
| align="right"| 12.34 | |||
| align="right"| 12.34 | |||
|- | |||
| 2 | |||
| Vinyl Weather Strip (*ft packages) | |||
| Ace Hardware | |||
| align="right"| 5.12 | |||
| align="right"| 10.24 | |||
|- | |||
| 2ft | |||
| 12 Gauge Wire | |||
| Ace Hardware | |||
| align="right"| 0.66 | |||
| align="right"| 1.32 | |||
|- | |||
| 2 | |||
| Lift Handles | |||
| Ace Hardware | |||
| align="right"| 4.74 | |||
| align="right"| 9.48 | |||
|- | |||
| 1 | |||
| Spool of Soldering Wire | |||
| Ace Hardware | |||
| align="right"| 11.75 | |||
| align="right"| 11.75 | |||
|- | |||
| 1 | |||
| Metal Cutting Saw Blade | |||
| Harbor Freight Tools | |||
| align="right"| 21.64 | |||
| align="right"| 21.64 | |||
|- | |||
| 1 | |||
| Charge Controller | |||
| Amazon | |||
| align="right"| 19.99 | |||
| align="right"| 19.99 | |||
|- | |||
| 1 | |||
| Trickle Charger | |||
| Amazon | |||
| align="right"| 16.26 | |||
| align="right"| 16.26 | |||
|- | |||
| ~ | |||
| Screws and Hardware | |||
| Ace Hardware | |||
| align="right"| 16.72 | |||
| align="right"| 16.72 | |||
|- | |||
| 1 | |||
| 12V 35Ah Deep Cycle Solar Battery | |||
| Walmart | |||
| align="right"| 71.90 | |||
| align="right"| 71.90 | |||
|- class="sortbottom" | |||
| colspan="4" align="right" | '''Total Cost''' | |||
| align="right"| '''$249.45''' | |||
|} | |||
==How to build== | == How to build == | ||
[[File:Circuit Diagram.PNG|thumb|center|425px|A basic design to create a simple solar powered charging unit.]] | |||
== Maintenance == | == Maintenance == | ||
The previous station was poorly maintained and is one of the reasons why it failed | The previous station was poorly maintained and is one of the reasons why it failed. This section will include how to keep the station working for years to come. | ||
=== Maintenance Schedule === | |||
;Weekly | ;Weekly | ||
*Charge the battery fully in sun once a week | * Charge the battery fully in sun once a week | ||
* If there is not enough sun plug the battery into the provided trickle charger | |||
*If there is not enough sun plug the battery into the provided trickle charger | * Connect trickle charger to battery first, then plug in. When both lights are green the battery is charged | ||
;Monthly | ;Monthly | ||
*Clean the solar panels with just water if possible and if that doesn't work then just soap and water. | * Clean the solar panels with just water if possible and if that doesn't work then just soap and water. | ||
;Every 4-8 years | ;Every 4-8 years | ||
*Replace battery depending on how well maintained every 4-8 years. If the battery can no longer hold a charge it is time to replace it. Take the battery to an auto parts store to recycle and they will refund a core fee of about $10-15. | * Replace battery depending on how well maintained every 4-8 years. If the battery can no longer hold a charge it is time to replace it. Take the battery to an auto parts store to recycle and they will refund a core fee of about $10-15. | ||
*If the paint is faded spray paint a new layer on | * If the paint is faded spray paint a new layer on | ||
=== Instructions === | === Instructions === | ||
If LED remote battery runs out, replace with 3V disc battery. | |||
If the charge controller needs to be unplugged, Remove consumer wires, negative and then positive. Then the solar panels in same wire order, and lastly the battery in same wire order. (Refer to circuit diagram) | |||
If the charge controller needs to be unplugged, Remove consumer wires, negative and then positive. Then the solar panels in same wire order, and lastly the battery in same wire order. ( | |||
{{ | {{Step | ||
| number = 1 | |||
| text = Hook up positive clamp (red) of trickle charger first to the positive terminal on the battery. | |||
| image = IMG 1716.jpg | |||
| caption = Picture of Battery | |||
}} | |||
{{Step | |||
| number = 2 | |||
| text = Hook up the negative clamp (black) to the negative terminal on battery. | |||
| image = IMG 1717.jpg | |||
| caption = Picture of Trickle Charger | |||
}} | |||
{{Step | |||
| number = 3 | |||
| text = Plug in the trickle charger to an outlet. | |||
}} | }} | ||
== Troubleshooting == | == Troubleshooting == | ||
{| class="wikitable" | {| class="wikitable" | ||
! Problem | ! Problem | ||
! Suggestion | ! Suggestion | ||
|- | |- | ||
| Items plugged in won't charge. | |||
| | | Make sure the switch is turned to the "On" position. | ||
|- | |||
| | | Battery won't charge. | ||
| Make sure all wires are correctly connected in the system. (i.e positive to positive) | |||
|- | |- | ||
| Nothing is working. | |||
| Use multimeter to check readings from charge controller. Solar input~20V, Battery input~13V, Consumer output~12V. | |||
|} | |||
== Discussion and next steps == | |||
Our team successfully fixed and made the station waterproof so it should last into the extended future with proper maintenance and care. The base of the station is extremely sturdy, being made of all rustproof and weatherproof material. Zane Middle School will need to follow the maintenance procedures, as well as replace parts when necessary. Team Wooden Lions was excited to begin the project and is excited to see it in use after working hard to restore the solar station. | |||
| | <gallery> File:Final PosterTWL.jpg|thumb|middle|Project Poster. </gallery> | ||
== Suggestions for future changes == | |||
An upgrade that could be done to the station that would vastly increase its versatility would be to install an AC inverter. Doing so would allow for anything that has a plug to be used with the station. If an inverter is installed, a larger battery storage may be useful if the currently installed one needs to be recharged too often. | |||
Security could be improved by replacing all the screws on the station with security screws thus making it less likely to be taken apart and having its contents stolen. A bigger chain and lock could also be installed to the station as well as thicker or stronger metal on the sides. | |||
An RC system could be incorporated into the design to make moving the station as easy as possible and powered by the battery already installed on the station. | |||
One idea our team had that we did not get to implement would be to install more types of renewable energies on the station such as wind power, hand crank, etc. This would likely be more of an educational aspect as they would be small scale but it would further educate and interest the children in clean and renewable energies. | |||
== | == References == | ||
* Basic Wiring by Time-Life Books, 1994. Accessed Feb. 21, 2018. | |||
* Manipulating the Quantum State of an Electrical Circuit Vol. 296 Issue 5569 pages 886-889 by D. Vion, A. Aassime, and A. Cottet. Accessed Feb. 21, 2018 | |||
* Alternating Current (AC) vs. Direct Current (DC) by Shaw Nhymel. Accessed by Feb. 16, 2018 [https://learn.sparkfun.com/tutorials/alternating-current-ac-vs-direct-current-dc] | |||
* Measurement sensors for renewable energy by Soluzione Solare. Accessed Feb 16, 2018 [http://web.archive.org/web/20190310032834/https://www.solarwind-sensor.com/renewable-energy-measurement-sensors/] | |||
* How to choose the best battery for a solar panel system by United States Department of Energy. Accessed by Feb. 16, 2018 [https://www.energysage.com/solar/solar-energy-storage/what-are-the-best-batteries-for-solar-panels/] | |||
= | {{Page data | ||
| keywords = Battery | |||
}} | |||
[[Category: | [[Category:Engr205 Introduction to Design]] | ||
[[Category:Project testing]] | |||
[[Category:Zane Middle School]] | |||
[[Category:Photovoltaics]] | |||
Latest revision as of 20:29, 22 August 2023

Abstract[edit | edit source]
The purpose of this project was to troubleshoot the previously made solar robot charging station and find out why it no longer worked. The client requested that the station be made waterproof after getting the it back in working order. The station will be re-implemented at Zane Middle School in a classroom and will recharge the classes robots. The station is designed to inspire the children at Zane Middle School and spark their interest in renewable energy. The final product is a working solar robot charging station that is resistant to water.
-
The previous solar-powered robot charging station before being fixed and upgraded by team Wooden Lions

Background[edit | edit source]
Team Wooden Lions was formed during Lonny's Spring 2018 Engr205 Introduction to Design course at Cal Poly Humboldt to come up with a solution to fix a solar robot charging station from a previous ENGR 215 class. The station was used in a classroom at Zane Middle School in Eureka, California to recharge their robots, introduce renewable energy principles, and provide an educational and inspirational impact on the middle school students. After a few years of use the station no longer worked after being left out in the rain. Team Wooden Lions were tasked to troubleshoot the station to figure out what was wrong with it and then get it back in working order. The station was made to be waterproof to ensure it does not meet the same fate as before.The team also worked to improve the station where possible outside of the client's requirements.
Problem statement and criteria[edit | edit source]
The station needed to first be made operational again and then made waterproof as it is subject to coastal weather conditions. The team's budget is $325 and needed to be completed by May 2018. After meeting the requirements, our team worked to improve the station in new ways determined by our team. Below is a list of criteria that both meet the clients needs and the team's improvement goals.
Criteria[edit | edit source]
| Criteria | Weight | Constraints |
|---|---|---|
| Safety | 10 | Must be safety approved by multiple teachers at the school. |
| Durability | 9 | Must be durable enough to not break while transporting and withstand middle school kids. Must be waterproof. |
| Mobility | 8 | Needs to be easy to maneuver around a classroom by a teacher or students, as well as various terrains such as dirt, grass, concrete, etc. |
| Security | 7 | Locking capabilities to securely store Zane Middle School's $400 robots. |
| Capacity | 6 | Must charge at least 6 robot batteries, each 2200mAh. |
| Cost | 4 | Budget of $325. |
| Versatility | 3 | The team was given the option to increase versatility past the waterproofing requirement. |
| Aesthetics | 2 |
Must look at least as professional as the previous project. |
Description of final project[edit | edit source]
The solar powered robot charging station consists of the basics needed to generate solar energy. Four solar panels are mounted to the top of the station, which is connected to the charge controller that regulates the charging of a power-storage battery. The charge controller is used to protect the electronics by regulating the power delivered to the devices and keeps them from overheating. The charge controller also provides the level of charge that the battery is at. The battery is a 12v, 35Ah, deep-cycle solar battery. All the electronics are routed together through the bus bar which then goes through a voltage regulator to bring the voltage from the 12v battery down to a usable 5v for the usb and robot chargers. Everything is housed in a metal tv stand that is waterproofed by epoxy in the gaps. A door and lock was installed on the front to protect all the electronics from theft and water damage.
Alternative Solutions[edit | edit source]
Ten designs have been written up in order to come to a decision for the final design.
| Image | Description |
|---|---|

|
Treasure Chest: The body of the station is replaced with a wooden body that can withstand the weather conditions of Humboldt County. This design opens up like a treasure chest with a lock in the front for security. The solar panels are secured on top of the station to avoid being thrown off when the lid is open. |

|
Bang for the Buck: After replacing all devices that are no longer functioning, a power inverter to power any device a student or teacher may have. |

|
R/C Station: The station is able to be moved around from a controller to make the station easier for transportation. |

|
Renewables: A small wind mill and hand crank are installed to supply more power to the station. |

|
Interactive Education: Transparent material is installed in order for the students to see and understand the circuitry of the station. A page of explanations are also provided with the station for the students. |

|
Jack be Nimble Jack be Quick: The station has new wheels installed that can be taken off road and has a system to keep it locked in place. The station also has collapsible arms to hold attachments. |

|
Secured: The station would be made out of durable materials to keep out weather and thieves. The solar panels would have a cage with a lock and all ways to access the system would have locks. |
Costs[edit | edit source]
This is a table explaining what we spent on the station and where we got the materials used.
| Quantity | Material | Source | Cost ($) | Total ($) |
|---|---|---|---|---|
| 2 | Hinges | Ace Hardware | 5.69 | 11.38 |
| 1 | Padlock | Ace Hardware | 9.49 | 9.49 |
| 3 | Epoxy Caulk Bottles | Ace Hardware | 8.54 | 25.62 |
| 2 | Cans of Spray Paint | Ace Hardware | 3.79 | 7.58 |
| 1 | Caulk Gun | Ace Hardware | 3.79 | 3.79 |
| 1 | Wire Stripper | Ace Hardware | 12.34 | 12.34 |
| 2 | Vinyl Weather Strip (*ft packages) | Ace Hardware | 5.12 | 10.24 |
| 2ft | 12 Gauge Wire | Ace Hardware | 0.66 | 1.32 |
| 2 | Lift Handles | Ace Hardware | 4.74 | 9.48 |
| 1 | Spool of Soldering Wire | Ace Hardware | 11.75 | 11.75 |
| 1 | Metal Cutting Saw Blade | Harbor Freight Tools | 21.64 | 21.64 |
| 1 | Charge Controller | Amazon | 19.99 | 19.99 |
| 1 | Trickle Charger | Amazon | 16.26 | 16.26 |
| ~ | Screws and Hardware | Ace Hardware | 16.72 | 16.72 |
| 1 | 12V 35Ah Deep Cycle Solar Battery | Walmart | 71.90 | 71.90 |
| Total Cost | $249.45 | |||
How to build[edit | edit source]

Maintenance[edit | edit source]
The previous station was poorly maintained and is one of the reasons why it failed. This section will include how to keep the station working for years to come.
Maintenance Schedule[edit | edit source]
- Weekly
- Charge the battery fully in sun once a week
- If there is not enough sun plug the battery into the provided trickle charger
- Connect trickle charger to battery first, then plug in. When both lights are green the battery is charged
- Monthly
- Clean the solar panels with just water if possible and if that doesn't work then just soap and water.
- Every 4-8 years
- Replace battery depending on how well maintained every 4-8 years. If the battery can no longer hold a charge it is time to replace it. Take the battery to an auto parts store to recycle and they will refund a core fee of about $10-15.
- If the paint is faded spray paint a new layer on
Instructions[edit | edit source]
If LED remote battery runs out, replace with 3V disc battery.
If the charge controller needs to be unplugged, Remove consumer wires, negative and then positive. Then the solar panels in same wire order, and lastly the battery in same wire order. (Refer to circuit diagram)

Hook up positive clamp (red) of trickle charger first to the positive terminal on the battery.

Hook up the negative clamp (black) to the negative terminal on battery.
Plug in the trickle charger to an outlet.
Troubleshooting[edit | edit source]
| Problem | Suggestion |
|---|---|
| Items plugged in won't charge. | Make sure the switch is turned to the "On" position. |
| Battery won't charge. | Make sure all wires are correctly connected in the system. (i.e positive to positive) |
| Nothing is working. | Use multimeter to check readings from charge controller. Solar input~20V, Battery input~13V, Consumer output~12V. |
Discussion and next steps[edit | edit source]
Our team successfully fixed and made the station waterproof so it should last into the extended future with proper maintenance and care. The base of the station is extremely sturdy, being made of all rustproof and weatherproof material. Zane Middle School will need to follow the maintenance procedures, as well as replace parts when necessary. Team Wooden Lions was excited to begin the project and is excited to see it in use after working hard to restore the solar station.
-
Project Poster.

Suggestions for future changes[edit | edit source]
An upgrade that could be done to the station that would vastly increase its versatility would be to install an AC inverter. Doing so would allow for anything that has a plug to be used with the station. If an inverter is installed, a larger battery storage may be useful if the currently installed one needs to be recharged too often.
Security could be improved by replacing all the screws on the station with security screws thus making it less likely to be taken apart and having its contents stolen. A bigger chain and lock could also be installed to the station as well as thicker or stronger metal on the sides.
An RC system could be incorporated into the design to make moving the station as easy as possible and powered by the battery already installed on the station.
One idea our team had that we did not get to implement would be to install more types of renewable energies on the station such as wind power, hand crank, etc. This would likely be more of an educational aspect as they would be small scale but it would further educate and interest the children in clean and renewable energies.
References[edit | edit source]
- Basic Wiring by Time-Life Books, 1994. Accessed Feb. 21, 2018.
- Manipulating the Quantum State of an Electrical Circuit Vol. 296 Issue 5569 pages 886-889 by D. Vion, A. Aassime, and A. Cottet. Accessed Feb. 21, 2018
- Alternating Current (AC) vs. Direct Current (DC) by Shaw Nhymel. Accessed by Feb. 16, 2018 [1]
- Measurement sensors for renewable energy by Soluzione Solare. Accessed Feb 16, 2018 [2]
- How to choose the best battery for a solar panel system by United States Department of Energy. Accessed by Feb. 16, 2018 [3]