Better Farming Series 39 - Raising Ducks (FAO, 1990, 73 p.)
How to begin
Choosing a place to raise ducks
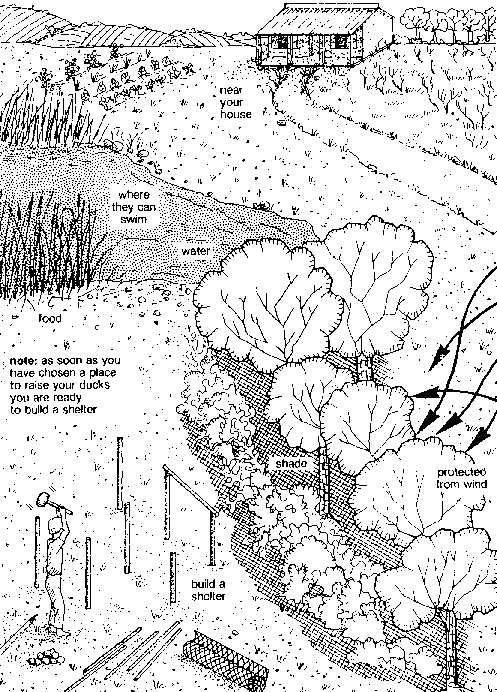
63. It is best to keep your ducks where you can watch them easily. So, the place that you choose should be as close as possible to where you live.
64. Look for a place on your land that has enough of the kinds of food that ducks like to eat (see Item 26).
65. Look for a place that has shade for your ducks on hot days. There should also be a place for them to go for protection from wind or on days when it is cold or wet.
66. A good place is one near a pond or a stream where your ducks can easily get to water and where they can swim.
67. Raising a flock of ducks is only one use for your land, so be careful not to choose a place for them that could be better used for something else, such as planting crops or growing a vegetable garden.
68. Remember, that ducks can live just about anywhere outside as long as they can find enough to eat and drink.
Ducks must have enough food and water
Building a shelter for your ducks
69. You can build either a pen or a house to shelter your ducks and keep them safe at night.
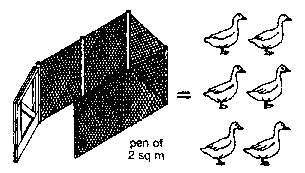
70. A pen should have about 1 square metre of space for 3 ducks. So, if you begin with a flock of 6 you will need a pen of 2 square metres.
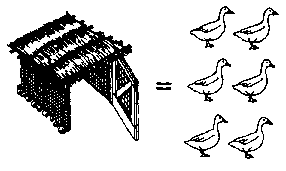
71. A house, where your ducks can sleep, should have about 1 square metre for a flock of 6.
72. Never try to put too many ducks in either a pen or a house. If a shelter is too crowded, it will quickly become wet and dirty and your ducks may get sick.
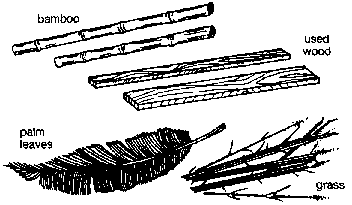
73. You can build a pen or a house using local materials such as bamboo, used wood, palm leaves or grass.
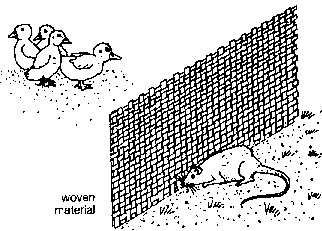
74. A fence of woven bamboo, palm leaves or strong grass makes a good pen cover.
75. However, it must be strong enough to keep the enemies of your ducks out and fine enough to keep small ducks in.
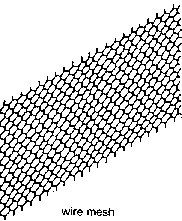
76. If you can get wire mesh you can use that too. However wire mesh can cost a lot of money.
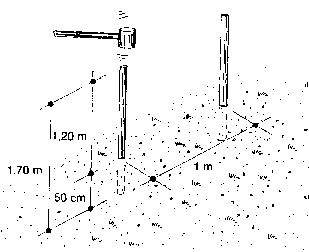
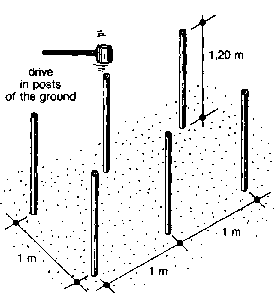
77. Build the fence of your pen using posts at least 1.20 metres high to keep out harmful animals.
78. The posts should be about 1.00 metre apart and about 0.50 metre in the ground.
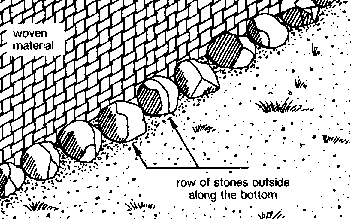
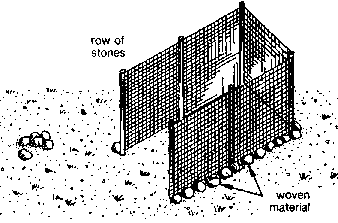
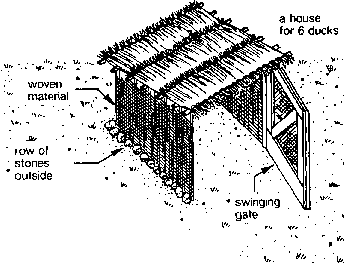
79. To keep animals from digging under the fence of a pen made of bamboo or woven material, put a row of stones along the bottom on the outside of the fence.
Put a row of stones along the fence
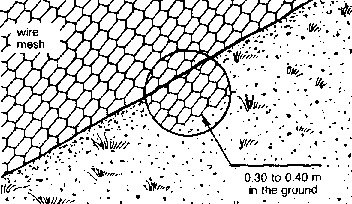
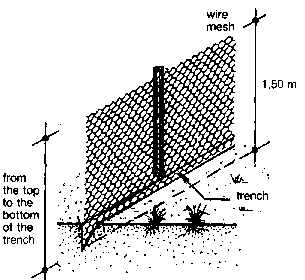
80. To keep animals from digging under the fence of a pen made of wire mesh, bury the wire mesh about 0.30 to 0.40 metre in the ground.
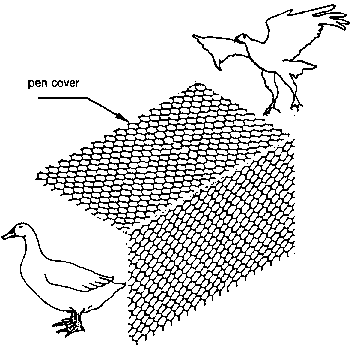
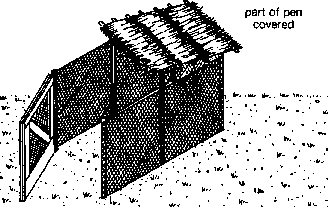
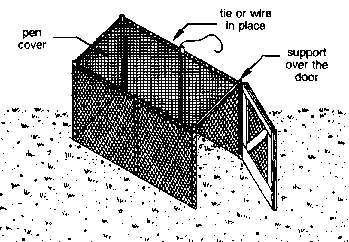
81. If there are meat- eating birds nearby, you should cover the pen as well. You can use the same material that you used for the fence.
82. Try to find a place for your pen on ground which is higher so that the water will run away. That way your pen will stay dry.
83. Have the pen built and ready for your ducks before you get them. That way they can become used to their new home from the beginning.
84. The drawings on pages 27 to 41 will show you how to build several kinds of pens and houses.
How to build a duck pen
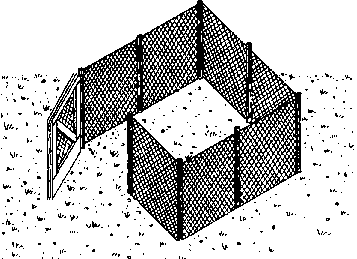
1 for a pen of 2 square metres, you will need 6 posts of 8 to 10 cm in diameter and about 1.70 m long (each post should be buried in the ground about 0.50 m)
2 drive the posts into the ground to form a rectangle
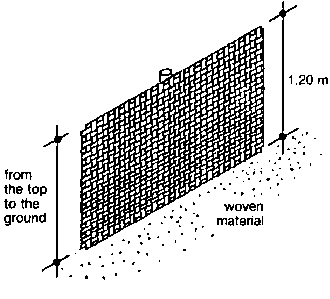
3 if you are using woven material as a fence cover, be sure it is high enough to reach from the post tops down to the level
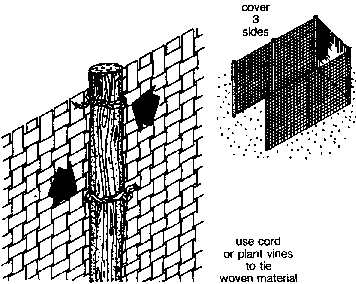
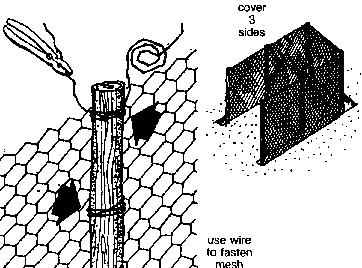
4 cover 3 sides of the pen; tie the woven material to the posts using strong cord; You can also use strong plant vines
Use plant vines or cord to tie the woven material
5 put a row of stones around the 3 covered sides of the pen
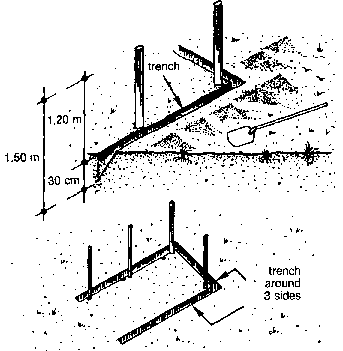
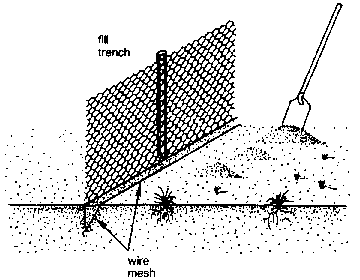
6 if you are using wire mesh as a fence cover dig a trench 0.30 to 0.40 m deep around the 3 covered sides of the pen
7 be sure that the wire mesh is high enough to reach from the post tops down to the bottom of the trench
From the top to the bottom of the trench
8 cover 3 sides of the pen; fasten the wire mesh to the posts using light but strong wire
9 then, fill the trench
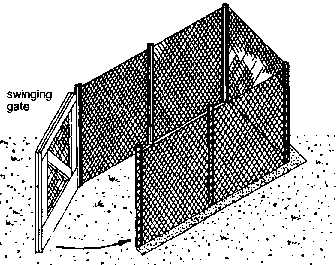
10 now, you are ready to build a swinging gate for the open end of the pen
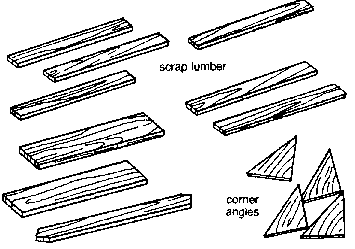
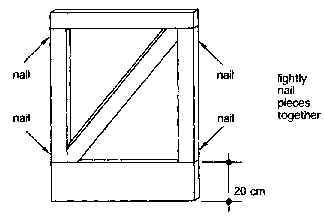
11 you can build a gate frame from used or scrap lumber and corner angles of lightweight wood
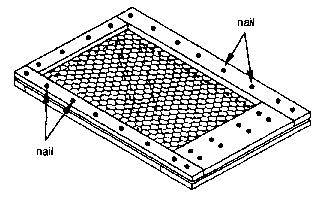
12 first, build the inside part using 4 pieces of wood for the sides, top and bottom (make the bottom piece wider than the sides and top); a centre brace between two corners will make the gate stronger; lightly toenail the pieces as shown below
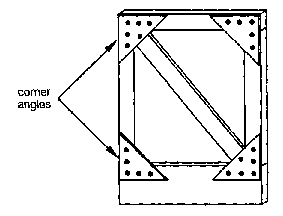
13 then, turn the inside part over and nail on the 4 corner braces
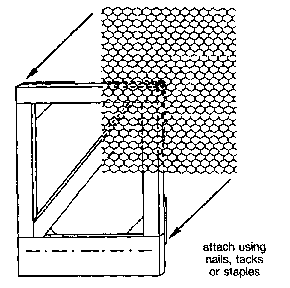
14 now, turn the inside part over again and cover it with the same material that you used for the fence; attach the material using flat- headed nails, tacks or staples
Attach using nails, tacks or staples
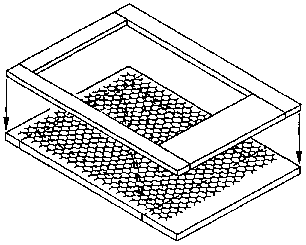
15 assemble the outside part of frame as shown
Assemble the outside part of frame
16 nail on the outside part; when you have done this the material will be held in place between the inside and outside parts of the frame
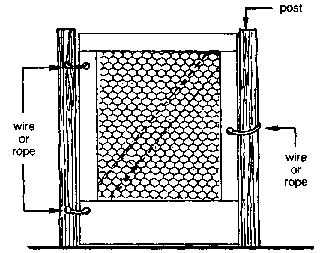
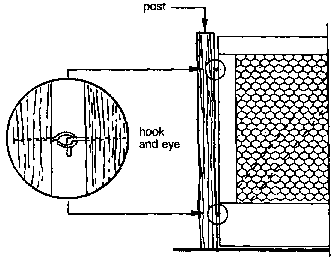
17 fit the gate to the open end of the pen using rope or wire: you can also use hooks and eyes
note: tie or wire the gate closed when the ducks are inside
How to build a duck house
1 you can build a duck house in much the same way and using the same materials that you use to build a duck pen
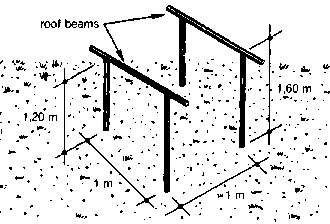
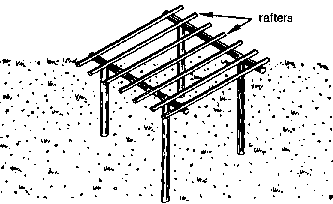
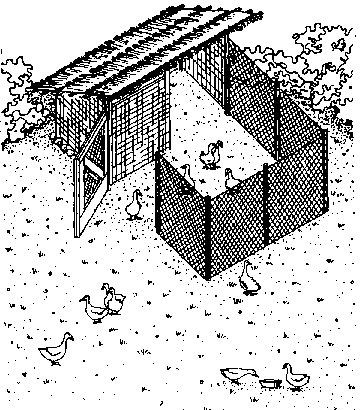
2 drive 4 posts into the ground to form a square and attach the 2 roof beams
3 tie or wire lightweight poles for the rafters of the roof between the roof beams
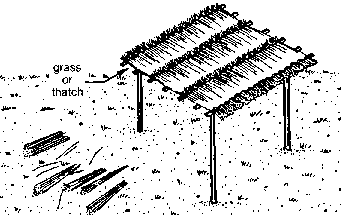
4 cover the rafters with grass or thatch
5 cover the side and back walls with woven material; put a row of stones outside around the 3 covered sides; for the front of the house, you can build a swinging gate like the one on pages 32 to 35
note: you can also cover the walls with wire mesh to keep out harmful animals before you put on the woven material
How to improve a duck pen
1 here are a number of simple things that you can do to a duck pen to make it better
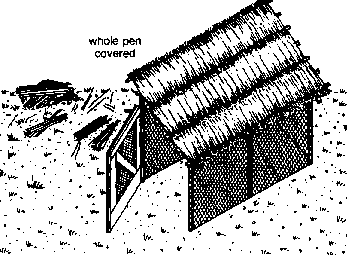
2 a roof of grass or thatch will keep your ducks dry in wet weather
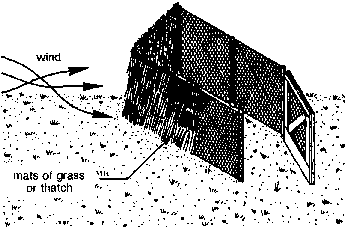
3 woven mats of grass or thatch tied to the fence will protect your ducks from wind
4 a pen cover of the same material as the fence will protect your ducks from harmful birds and animals
The fence will protect your ducks
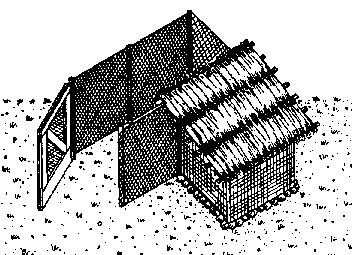
5 you can build a duck house next to one corner of a pen so that the ducks can sleep inside at night
6 you can also make your duck pen bigger
7 however, if your bigger pen has a duck house attached and you have more than 6 ducks you will need a bigger house too
note: remember, for each 6 ducks you will need 2 square metres of pen and 1 square metre of house; so, with 12 ducks you will need 4 square metres of pen and 2 square metres of house
The floor of a duck shelter
85. You have already learned that ducks sleep on the ground and if the ground where they sleep is cold or wet or dirty they may get sick.
86. So, you must be very careful to keep the floor of the shelter as dry and as clean as you can to keep the ducks healthy and well.
87. If you have a shelter which is on high enough ground for the water to run away, you can have a dirt floor.
A shelter on high ground can have a dirt floor
88. However, if the shelter is built in a low, wet place you will need to keep it dry by covering the floor with some kind of dry material.
A shelter on low ground should have a floor of some kind of dry material
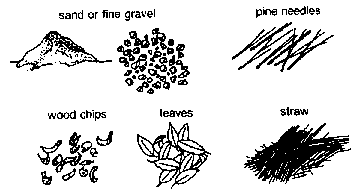
89. To cover the floor you can use sand or fine gravel, pine needles, wood chips or leaves and give your ducks a bed of straw or cut grass to sleep on as well.
90. Change the floor material when it becomes wet or dirty and especially if it becomes mouldy. Mould will make your ducks sick.
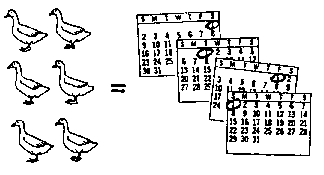
91. With a flock of 6 ducks, change the floor covering at least once a month or sooner if it becomes wet, dirty or mouldy.
Pick a day each month, change floor covering once a month
Building nests
92. You have already learned that ducks mostly lay their eggs either at night or very early in the morning.
93. If you keep your ducks inside at night and give them nests to use, there will be fewer broken eggs and you can collect them more easily.
94. As soon as you have finished building a pen or a house you are ready to build the nests.
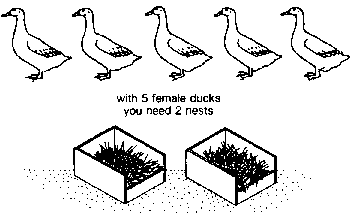
95. You will need 1 nest for every 3 female ducks. So, when you first begin with a flock of 6 ducks (5 females and 1 male ducks you will need 2 nests.
With 5 female ducks you need 2 nests
96. Ducks like small nests with just enough room to get in, turn around and sit down. So, give your female ducks a cosy nest of just the right size.
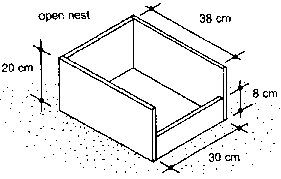
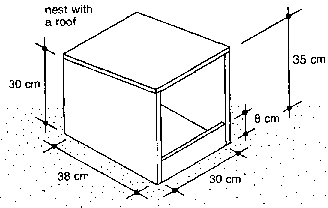
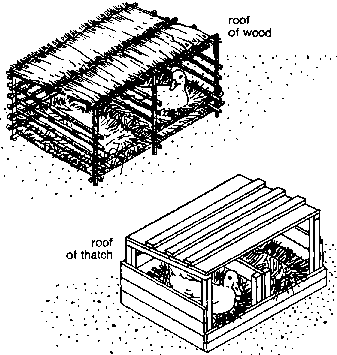
97. A good duck nest is about 30 centimeters wide, 38 centimeters deep and, if it has a roof, from 30 to 35 centimeters high.
note: nests rest on the ground and do not need a bottom
98. Ducks live and sleep on the ground and they prefer to lay their eggs on the ground as well. So, put the nests on the ground.
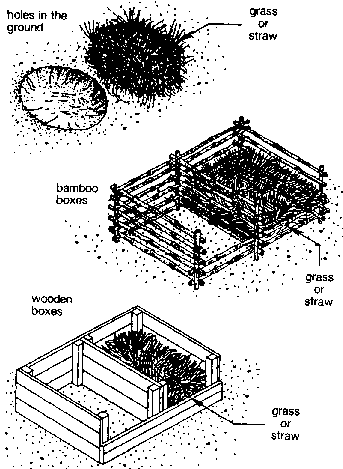
99. A nest can be a hole in the ground or a box of bamboo or of wood which is lined with clean material such as cut grass or dry straw.
100. Ducks prefer dark, quiet places to lay their eggs. So, it is best to cover the nest with a roof of thatch or wood to make it dark and quiet.
Roof of wood and roof of thatch
101. As soon as you have finished building the nests, put them in the shelter. That way your ducks can become used to their nests as soon as you bring them home.
102. Be sure to change the grass or the straw in each nest as soon as it gets dirty.
