Print Design (talk | contribs) No edit summary |
Print Design (talk | contribs) No edit summary |
||
| (3 intermediate revisions by the same user not shown) | |||
| Line 1: | Line 1: | ||
" Beaglebone Black " | |||
== BeagleBone Black powered by Franklin gcode sender and Melzi controller == | |||
Beaglebone Black was uploaded with debian linux distribution OS. Franklin is a firmware package which is a gcode sender and melzi firmware uploader with printer calibration settings editor which can be used to communicate with Melzi controller and world internet for having the gcode files sent from any system to the beaglebone ip address. | |||
=Abstract= | =Abstract= | ||
It is very good experience to have 3D printers at your home, so that you can print anything anytime you need. But it becomes very annoying when you have to recalibrate it now and then. So I decided to use Franklin package for 3D printer developed by Bas Wijnen. Everything from Z height length to tie rod length is configurable from the software browser interface itself. Configure deploy to the printer and start printing. Beagle bone black is a good small computer which can run variety of OS's right from android to other unix based systems. As Bas has developed the firmware and gcode sender based on browser on debian based linux system, I also did the same and uploaded latest eMMC flasher for debian linux distribution from official website for beagle bone black rev C(link given in the manual for beagle bone black rev C). Running a server version of linux gives you the advantage of being connected to the world internet and have the gcodes downloaded directly to your system and have them printed whenever you like to print them. | |||
[[File: | [[File:Beagleboneblack.jpg|Beaglebone Black|250px|right|Beaglebone Black]] | ||
= Bill of Materials= | = Bill of Materials= | ||
# | # AmazonBasics RJ45 Cat5e Ethernet Patch Cable (14 Feet/4.2 Meters) ~ $5.5 [https://www.amazon.com/gp/product/B001TH7GVE/ref=oh_aui_detailpage_o03_s02?ie=UTF8&psc=1] | ||
# HDE 13-Port High Speed USB 2.0 Hub with On/Off Switch - Black ~ $ 12 [http://www.amazon.com/gp/product/B00802O1JQ/ref=oh_aui_detailpage_o03_s02?ie=UTF8&psc=1] | |||
# Kara Mobile High Quality DC5V 2A Power Supply AC100/240V Regulated UL 2.1/5.5mm Plug ~ $15 [https://www.amazon.com/gp/product/B00DV6W9MW/ref=oh_aui_detailpage_o03_s01?ie=UTF8&psc=1] | |||
# Beagleboard (BeagleBone Rev C) ~ $58 [http://www.amazon.com/gp/product/B00K7EEX2U/ref=oh_aui_detailpage_o03_s00?ie=UTF8&psc=1] | |||
# BeagleBone / Boards / BeagleBone Black Rev C ~ $55 [https://www.adafruit.com/product/1876] | |||
# Edimax EW-7811Un 150Mbps 11n Wi-Fi USB Adapter, Nano Size Lets You Plug it and Forget it, Ideal for Raspberry Pi, Supports Windows, Mac OS, Linux ~ $9 [http://www.amazon.com/computers-accessories/dp/B005CLMJLU] | |||
# Setting up WiFi with BeagleBone Black ~ $12-$20 [https://learn.adafruit.com/setting-up-wifi-with-beaglebone-black] | |||
| Line 144: | Line 155: | ||
[[category: MOST methods]] | [[category: MOST methods]] | ||
[[category:3D | [[category:3D | ||
Revision as of 18:53, 18 December 2014
" Beaglebone Black "
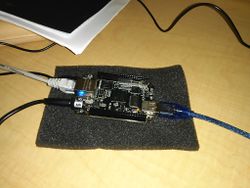
BeagleBone Black powered by Franklin gcode sender and Melzi controller
Beaglebone Black was uploaded with debian linux distribution OS. Franklin is a firmware package which is a gcode sender and melzi firmware uploader with printer calibration settings editor which can be used to communicate with Melzi controller and world internet for having the gcode files sent from any system to the beaglebone ip address.
Abstract
It is very good experience to have 3D printers at your home, so that you can print anything anytime you need. But it becomes very annoying when you have to recalibrate it now and then. So I decided to use Franklin package for 3D printer developed by Bas Wijnen. Everything from Z height length to tie rod length is configurable from the software browser interface itself. Configure deploy to the printer and start printing. Beagle bone black is a good small computer which can run variety of OS's right from android to other unix based systems. As Bas has developed the firmware and gcode sender based on browser on debian based linux system, I also did the same and uploaded latest eMMC flasher for debian linux distribution from official website for beagle bone black rev C(link given in the manual for beagle bone black rev C). Running a server version of linux gives you the advantage of being connected to the world internet and have the gcodes downloaded directly to your system and have them printed whenever you like to print them.
Bill of Materials
- AmazonBasics RJ45 Cat5e Ethernet Patch Cable (14 Feet/4.2 Meters) ~ $5.5 [1]
- HDE 13-Port High Speed USB 2.0 Hub with On/Off Switch - Black ~ $ 12 [2]
- Kara Mobile High Quality DC5V 2A Power Supply AC100/240V Regulated UL 2.1/5.5mm Plug ~ $15 [3]
- Beagleboard (BeagleBone Rev C) ~ $58 [4]
- BeagleBone / Boards / BeagleBone Black Rev C ~ $55 [5]
- Edimax EW-7811Un 150Mbps 11n Wi-Fi USB Adapter, Nano Size Lets You Plug it and Forget it, Ideal for Raspberry Pi, Supports Windows, Mac OS, Linux ~ $9 [6]
- Setting up WiFi with BeagleBone Black ~ $12-$20 [7]
Tools
- MOST Delta RepRap or similar RepRap 3-D printer
- Solder Iron
- Solder Flux
- Micro Soldering station (for Surface Mount components)
- Arduino UNO ~ $14.95 [8]
- Jumper Wires
- Bread Board
Skills and Knowledge Necessary
- Knowledge of Arduino Programming
- Micro Soldering (Surface mount components)
Before You Begin
Review the process below and collect all of the tools and consumables you need to begin the build.
Software to download and install
Building
Setting up JY-MCU bluetooth module
- The JY-MCU module need to be programmed to receive the g-code instructions from the computer.
- This can be done by programming up the module by hooking up with Arduino and programming it with AT commands.
- Connect the Arduino UNO microcontroller and JY MCU Module using a breadboard and some jumper wires to make connections.
The following images show the schematic of the required connections and the actual setup.
NOTE: The TX pin of the Bluetooth is connected to pin 10 and RX pin of the Bluetooth is connected to pin 11
- Open Arduino IDE and select the board type to Arduino UNO and the corresponding COM port
- Copy and paste the following Code found at Github[9] in the compiler
- Now click on the serial monitor icon and wait for the following message
Starting config
OK
OKlinvorV1.8
OKsetPIN
OKsetname
OK115200
Done!
- You are all set now
- But Instead if you get the following message, then try changing the mySerial.begin baud rate
Starting config
Done!
- You may need to play with the mySerial.begin baud rate as it varies from firmware to firmware installed on the JY-MCU module
- Once the serial monitor output is as desired, you may try pairing the device with you PC using the pass code as set in the Arduino code (0000 set in the code provided)
- This generates 2 COM ports to communicate with.
- Open your bluetooth settings and note down the corresponding outgoing COM port number generated after pairing the device.
- Now open Repetier Host software and to printer setting and select the same COM port as noted before
Soldering on Melzi Board
Overall 5 wires needed to be soldered on the melzi board
- Connect the RX pin on the Bluetooth ----> TX wire soldered on Melzi
- Connect the TX pin on the Bluetooth ----> RX wire soldered on Melzi
- Ensure that the shorting block on the controller power supply selector pins in the middle of the printer controller are set so the right-most pair of pins are shorted (controller powered over VREG) as shown in the picture.
Pairing the Device and Printing
- Connect the Delta printer to power supply, the bluetooth dongle should start rapidly flashing red light.
- Now open Repetier Host and connect the printer as you would usually do (provided you have followed the change of printer settings as elaborated in the previous steps)
- You should see a solid red light instead of a flashing one. This means the device is successfully paired
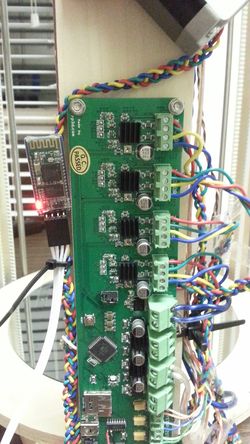
- Try homing the printer using manual home button
- If it homes, you should have successfully configured the device and made your printer wireless!
References
- ↑ Bluetooth Module Programming: https://github.com/rwaldron/johnny-five/wiki/JY-MCU-Bluetooth-Serial-Port-Module-Notes
- ↑ Wireless solution for melzi: http://reprap.org/wiki/Melzi
[[category:3D


