Print Design (talk | contribs) No edit summary |
|||
| Line 1: | Line 1: | ||
Project developed by [[User:Print Design|Pankaj Deshmukh]] | |||
=Abstract= | |||
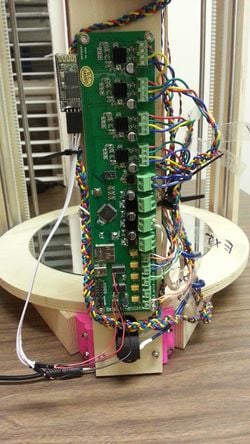
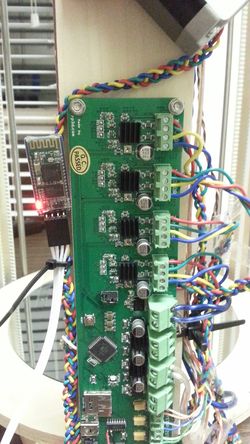
The need for connecting the MOST Delta printer with a PC using USB cable could be eliminated by implementing this simple hack. | |||
This makes the printer a stand alone device within the range of bluetooth. | |||
[[File:Melzi with Bluetooth.jpg|Melzi Board with Bluetooth|250px|right|Melzi Board with Bluetooth]] | |||
= Bill of Materials= | |||
# JY-MCU Arduino Bluetooth Wireless Serial Port Module ~ $12.99 [http://www.amazon.com/JY-MCU-Arduino-Bluetooth-Wireless-Serial/dp/B009DZQ4MG/ref=sr_1_1?ie=UTF8&qid=1418264265&sr=8-1&keywords=Jy+mcu] | |||
= | = Tools= | ||
# [http://www.appropedia.org/Delta_Build_Overview:MOST MOST Delta RepRap] or similar RepRap 3-D printer | |||
# | # Solder Iron | ||
# | # Solder Flux | ||
# | # Micro Soldering station (for Surface Mount components) | ||
# Arduino UNO ~ $14.95 [http://www.amazon.com/Development-Board-ATmega328P-ATMEGA16U2-Arduino/dp/B00H1HR576/ref=sr_1_2?ie=UTF8&qid=1418264390&sr=8-2&keywords=arduino+uno] | |||
# Jumper Wires | |||
# Bread Board | |||
= Skills and Knowledge Necessary = | |||
# Knowledge of Arduino Programming | |||
# Micro Soldering (Surface mount components) | |||
== | =Before You Begin= | ||
Review the process below and collect all of the tools and consumables you need to begin the build. | |||
== | =Software to download and install= | ||
# [http://www.repetier.com/download/ Repetier Host] | |||
# [http://arduino.cc/en/main/software Arduino IDE] | |||
=Building= | |||
==Setting up JY-MCU bluetooth module== | |||
*The JY-MCU module need to be programmed to receive the g-code instructions from the computer. | |||
* | *This can be done by programming up the module by hooking up with Arduino and programming it with AT commands. | ||
*Connect the Arduino UNO microcontroller and JY MCU Module using a breadboard and some jumper wires to make connections. | |||
The following images show the schematic of the required connections and the actual setup. | |||
== | {{gallery | ||
|width=250 | |||
|height=250 | |||
|File:Ardunio Connections.jpg|Arduino Connections | |||
|File:2014-11-23 21.08.15.jpg|Actual Connections (Front View) | |||
|File:2014-11-23 21.08.08.jpg|Actual Connections (Top View) | |||
}} | |||
NOTE: The TX pin of the Bluetooth is connected to pin 10 and RX pin of the Bluetooth is connected to pin 11 | |||
*Open Arduino IDE and select the board type to Arduino UNO and the corresponding COM port | |||
*Copy and paste the following Code found at Github[https://github.com/jayantchalke/Bluetooth_Melzi.git] in the compiler | |||
*Now click on the serial monitor icon and wait for the following message | |||
Starting config | |||
OK | |||
OKlinvorV1.8 | |||
OKsetPIN | |||
OKsetname | |||
OK115200 | |||
Done! | |||
*You are all set now | |||
*But Instead if you get the following message, then try changing the mySerial.begin baud rate | |||
Starting config | |||
[[ | |||
Done! | |||
*You may need to play with the mySerial.begin baud rate as it varies from firmware to firmware installed on the JY-MCU module | |||
*Once the serial monitor output is as desired, you may try pairing the device with you PC using the pass code as set in the Arduino code (0000 set in the code provided) | |||
*This generates 2 COM ports to communicate with. | |||
*Open your bluetooth settings and note down the corresponding outgoing COM port number generated after pairing the device. | |||
*Now open Repetier Host software and to printer setting and select the same COM port as noted before | |||
==Soldering on Melzi Board== | |||
Overall 5 wires needed to be soldered on the melzi board | |||
{{gallery | |||
|width=250 | |||
|height=250 | |||
|File:Melzi.jpg|Schematic for Melzi Soldering | |||
|File:2014-12-10 19.44.50.jpg|Actual Soldering Connections | |||
}} | |||
*Connect the RX pin on the Bluetooth ----> TX wire soldered on Melzi | |||
*Connect the TX pin on the Bluetooth ----> RX wire soldered on Melzi | |||
*Ensure that the shorting block on the controller power supply selector pins in the middle of the printer controller are set so the right-most pair of pins are shorted (controller powered over VREG) as shown in the picture. | |||
{{gallery | |||
|width=250 | |||
|height=250 | |||
|File:MOST_Delta_melzi_power_jumper.JPG|The Melzi power source jumper is in the middle of the board. | |||
|File:Switch.jpg|Closeup Melzi power source jumper. Note that it is in the VREG power position. | |||
}} | |||
==Pairing the Device and Printing== | |||
*Connect the Delta printer to power supply, the bluetooth dongle should start rapidly flashing red light. | |||
*Now open Repetier Host and connect the printer as you would usually do (provided you have followed the change of printer settings as elaborated in the previous steps) | |||
*You should see a solid red light instead of a flashing one. This means the device is successfully paired | |||
[[File:2014-12-10 19.46.26.jpg|Melzi Board with Bluetooth|250px|right|Connected Bluetooth dongle]] | |||
*Try homing the printer using manual home button | |||
*If it homes, you should have successfully configured the device and made your printer wireless! | |||
=References= | |||
<ref> Bluetooth Module Programming: https://github.com/rwaldron/johnny-five/wiki/JY-MCU-Bluetooth-Serial-Port-Module-Notes</ref> | |||
<ref> Wireless solution for melzi: http://reprap.org/wiki/Melzi</ref> | |||
<references/> | |||
<nowiki> | |||
</nowiki> | |||
[[category: MOST methods]] | |||
[[category:3D printing]] | |||
Revision as of 05:49, 18 December 2014
Project developed by Pankaj Deshmukh
Abstract
The need for connecting the MOST Delta printer with a PC using USB cable could be eliminated by implementing this simple hack. This makes the printer a stand alone device within the range of bluetooth.
Bill of Materials
- JY-MCU Arduino Bluetooth Wireless Serial Port Module ~ $12.99 [1]
Tools
- MOST Delta RepRap or similar RepRap 3-D printer
- Solder Iron
- Solder Flux
- Micro Soldering station (for Surface Mount components)
- Arduino UNO ~ $14.95 [2]
- Jumper Wires
- Bread Board
Skills and Knowledge Necessary
- Knowledge of Arduino Programming
- Micro Soldering (Surface mount components)
Before You Begin
Review the process below and collect all of the tools and consumables you need to begin the build.
Software to download and install
Building
Setting up JY-MCU bluetooth module
- The JY-MCU module need to be programmed to receive the g-code instructions from the computer.
- This can be done by programming up the module by hooking up with Arduino and programming it with AT commands.
- Connect the Arduino UNO microcontroller and JY MCU Module using a breadboard and some jumper wires to make connections.
The following images show the schematic of the required connections and the actual setup.
NOTE: The TX pin of the Bluetooth is connected to pin 10 and RX pin of the Bluetooth is connected to pin 11
- Open Arduino IDE and select the board type to Arduino UNO and the corresponding COM port
- Copy and paste the following Code found at Github[3] in the compiler
- Now click on the serial monitor icon and wait for the following message
Starting config
OK
OKlinvorV1.8
OKsetPIN
OKsetname
OK115200
Done!
- You are all set now
- But Instead if you get the following message, then try changing the mySerial.begin baud rate
Starting config
Done!
- You may need to play with the mySerial.begin baud rate as it varies from firmware to firmware installed on the JY-MCU module
- Once the serial monitor output is as desired, you may try pairing the device with you PC using the pass code as set in the Arduino code (0000 set in the code provided)
- This generates 2 COM ports to communicate with.
- Open your bluetooth settings and note down the corresponding outgoing COM port number generated after pairing the device.
- Now open Repetier Host software and to printer setting and select the same COM port as noted before
Soldering on Melzi Board
Overall 5 wires needed to be soldered on the melzi board
- Connect the RX pin on the Bluetooth ----> TX wire soldered on Melzi
- Connect the TX pin on the Bluetooth ----> RX wire soldered on Melzi
- Ensure that the shorting block on the controller power supply selector pins in the middle of the printer controller are set so the right-most pair of pins are shorted (controller powered over VREG) as shown in the picture.
Pairing the Device and Printing
- Connect the Delta printer to power supply, the bluetooth dongle should start rapidly flashing red light.
- Now open Repetier Host and connect the printer as you would usually do (provided you have followed the change of printer settings as elaborated in the previous steps)
- You should see a solid red light instead of a flashing one. This means the device is successfully paired
- Try homing the printer using manual home button
- If it homes, you should have successfully configured the device and made your printer wireless!
References
- ↑ Bluetooth Module Programming: https://github.com/rwaldron/johnny-five/wiki/JY-MCU-Bluetooth-Serial-Port-Module-Notes
- ↑ Wireless solution for melzi: http://reprap.org/wiki/Melzi

