MarieFarson (talk | contribs) |
MarieFarson (talk | contribs) No edit summary |
||
| Line 3: | Line 3: | ||
==Assignment== | ==Assignment== | ||
[[image:mini-tensile-diagram.png|right]] | [[image:mini-tensile-diagram.png|right]] | ||
# Download files from the [https://osf.io/ur7un/ Open Science Framework] (click on the one you want and then click "download") Ideally you only need 3 | # Download files from the [https://osf.io/ur7un/ Open Science Framework] (click on the one you want and then click "download") Ideally you only need 3 stl files and one ini file. | ||
## The .amf holds positional coordinates and rotational coordinates for any imported .stl file(s). Thus, you should "Load model file..." and print in the orientation and qty. as opened. This is critical as we already know these orientations work. | ## The .amf holds positional coordinates and rotational coordinates for any imported .stl file(s). Thus, you should "Load model file..." and print in the orientation and qty. as opened. This is critical as we already know these orientations work. | ||
## The .ini is the profile. The provided .ini contains all parameter settings for getting a good quality slice file. We have intentionally left '''layer thickness, print temperature, print speed, flow %, and bed temperature''' blank. These are the variables you can play with. This .ini is to be used for all specimens - it has already been shown to work on 3 deltas. <font color="red">'''Note: Loading the .ini file provide will REMOVE the current profile in Cura. Please save your standard default profile before loading.''' If you happen to lose the profile, you can reload it from an old .gcode file without trouble.</font> | ## The .ini is the profile. The provided .ini contains all parameter settings for getting a good quality slice file. We have intentionally left '''layer thickness, print temperature, print speed, flow %, and bed temperature''' blank. These are the variables you can play with. This .ini is to be used for all specimens - it has already been shown to work on 3 deltas printers. <font color="red">'''Note: Loading the .ini file provide will REMOVE the current profile in Cura. Please save your standard default profile before loading.''' If you happen to lose the profile, you can reload it from an old .gcode file without trouble.</font> | ||
# Choose your optimal print settings (e.g. what you think gives you the best looking part and max strength) and then using PLA from any vendor you like print: | # Choose your optimal print settings (e.g. what you think gives you the best looking part and max strength) and then using PLA from any vendor you like print: | ||
## 3X large horizontal, | ## 3X large horizontal, | ||
| Line 18: | Line 18: | ||
Basic inputs to start with: | Basic inputs to start with: | ||
* Layer Thickness: 0.2mm | * Layer Thickness: 0.2mm | ||
* Temperature: | * Temperature: 210C | ||
* Flow: 100% | * Flow: 100% | ||
* Speed: 80mm/s | * Speed: 80mm/s | ||
Revision as of 20:15, 20 February 2017
Assignment

- Download files from the Open Science Framework (click on the one you want and then click "download") Ideally you only need 3 stl files and one ini file.
- The .amf holds positional coordinates and rotational coordinates for any imported .stl file(s). Thus, you should "Load model file..." and print in the orientation and qty. as opened. This is critical as we already know these orientations work.
- The .ini is the profile. The provided .ini contains all parameter settings for getting a good quality slice file. We have intentionally left layer thickness, print temperature, print speed, flow %, and bed temperature blank. These are the variables you can play with. This .ini is to be used for all specimens - it has already been shown to work on 3 deltas printers. Note: Loading the .ini file provide will REMOVE the current profile in Cura. Please save your standard default profile before loading. If you happen to lose the profile, you can reload it from an old .gcode file without trouble.
- Choose your optimal print settings (e.g. what you think gives you the best looking part and max strength) and then using PLA from any vendor you like print:
- 3X large horizontal,
- 3X small horizontal, and
- 3X small vertical
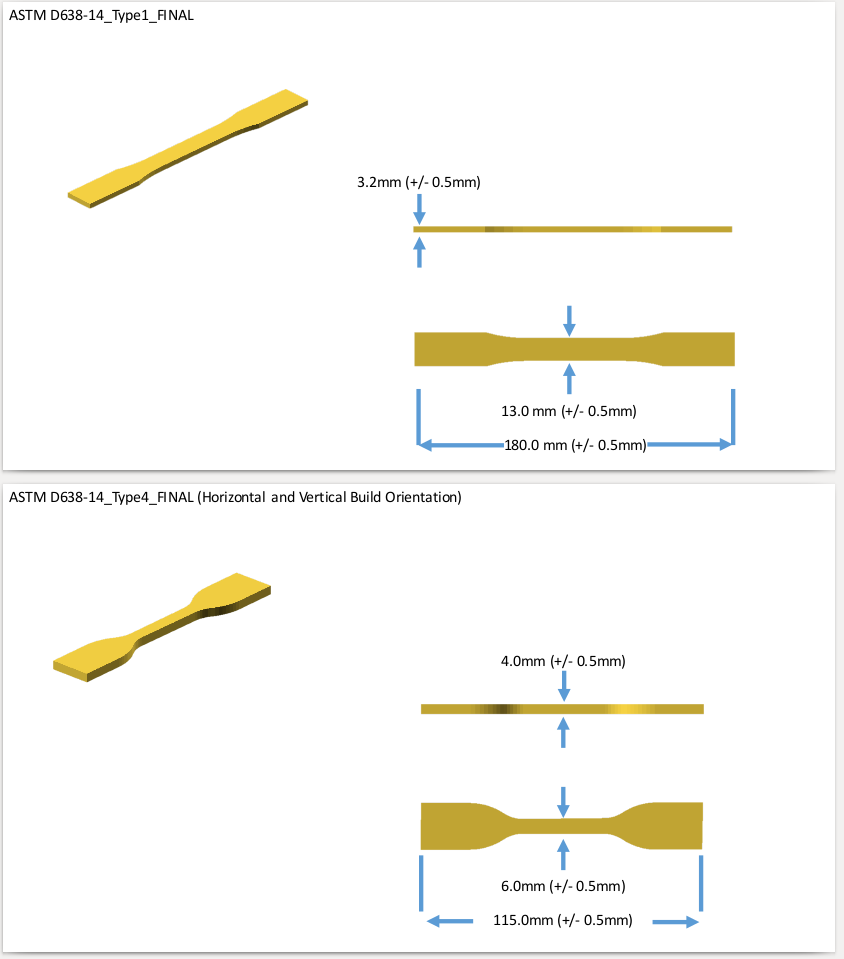
- Note: Parts must conform to dimensional specifications as indicated on right to be acceptable per ASTM D628-14 Type I and IV.
- Put your specimens in a bag with your name and course labelled on/in the bag
- Input your variable parameters with your name to the course data spread sheet in a single line here
Having Trouble?
Basic inputs to start with:
- Layer Thickness: 0.2mm
- Temperature: 210C
- Flow: 100%
- Speed: 80mm/s
- Bed Temp: N/A unless you have a heated bed then put it in the comments
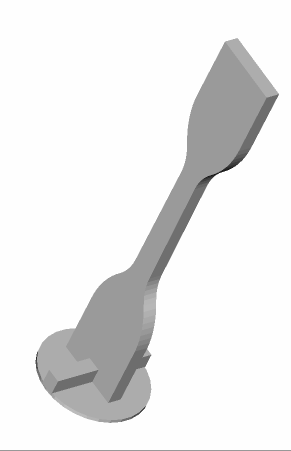
Make sure the horizontal ones are printing flat and the vertical one prints on the circle (see image below).
