
The purpose of this Solar Panel project is to show how to construct a solar panel by yourself at home, that produces enough power to charge any small devices or a small battery.
The idea to build a solar panel by myself came about as my final project for my alternative energy systems class. Originally the plan was to build a solar panel that would charge the batteries on an electric bike, however there were a few set backs. The biggest one being the amount of power needed to charge the batteries exceeded the amount of solar cells that were bought. Therefore the project turned into a learning experience with a couple roadblocks and of course solutions that eventually led to a solar panel that produces enough energy to charge a smaller battery or a device. This project was a huge learning experience on every level, from what tools and materials I would need,to finding affordable solar cells and lastly learning the mechanics of proper wiring. What I hope to show from my project is the steps I took to build the solar panel and produce energy.
Project Challenges/Goals[edit | edit source]
- Build a homemade solar panel that produces energy
- Have the panel connect to a electric bike battery (original concept)
- Learn how to wire the panel without any previous experience with wiring
Materials Needed[edit | edit source]
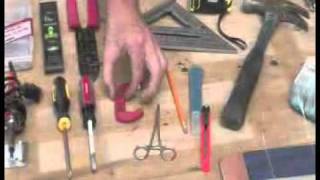
This is a list of what basic materials you will need as well as additional materials you can add to your panel that I did not use for mine.
- Solar Cells (You can easily find these online. Mine where bought as a small kit on eBay)
- Flex Pen
- Tabbing wire
- Bus tab
- Soldering iron
- Piece of Plywood
- 10 Gage stranded cooper wire (one black one red)
- Alligator Clips
- Tube of Silicon
- Multimeter
Additional materials:
- Piece of Plexiglass
- Additional pieces of plywood or any material to use for panel boarders
Design Steps[edit | edit source]
-

Run the flex pen over the white lines on the front of the cell, then lay the tabbing wires on them, and run your soldering iron on the surface of the tabbing wire.
-
You will then need to flip the solar cell over and run the flex pen over the tabs on the back, repeat the same process of solder the tabbing wire to the back tabs as you did to the front. Side Note: when you cut the tabbing wire make sure its twice the length of the cell because from here on out you will be tabbing the front (negative side) to the back (positive side) of the next solar cell.
-


Steps Continued[edit | edit source]
- You will continue tabbing the cells together positive to negative until you have four rows of 9 or 36 cells all together.
- Before you secure the rows, purchase a half sheet or go to a scrap yard to find a piece of plywood. This is going to be the backing for your panels. The plywood does not have to be primed or painting, however online video's recommended it. If you don't want to buy or don't have paint on hand I would not worry about that part of the process.
- Once the plywood is set up, you will want to organize your rows so that the end of the rows alternate negative to positive.
- With your rows laid out and before you connect them together with the bus wire, make sure that you have wired them correctly before you silicon them to the plywood (all you need to do to silicon them to the plywood is flip them to their back side and put a small dab of silicon in the middle then flip them over and press gently down so that they will stick) otherwise you will discover a lack of energy when you go to test the overall connection later.
- Test your connection and to see how many volts you are producing by using the multimeter. Black is positive and goes on the front of the cell, red is negative and will go on the back side of the cell
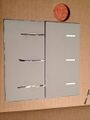
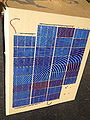
- After you have your rows together with alternating positive and negative ends, you are going to connect them with the bus wire, the image below shows the rows connected with bus wire, this helps the flow of energy continue through all for rows.
- Once you have the rows connect, the outside rows bottom panel should be left unhooked. These panels are where the "home run" wires aka the stranded cooper wires will solder to.
- Solder the red cooper wire onto the positive home run, and the black cooper wire onto the negative home run. These together are what will have the alligator clips hooked on to them and then hooked up to whatever you are wanting to charge.
-
There is a red wire at the top and a black wire at the bottom. These are the "home run" wires that connect to the panel on its positive and negative end.

Costs[edit | edit source]
The overall cost of this project came out to be about $57.95 all together.
- Solar cell kit (purchased on eBay) - $48.00
- Plywood (purchased at local hardware store) half sheet - $9.95
Everything else was borrowed or had around the house.
Discussion[edit | edit source]
As a side note for this project, in my pictures you will notice there is one row that has only 7 cells. I unfortunately messed up when wiring the panels together and had already glues them down at the point. So instead of having four rows that worked I ended up with only three. So I had to disconnect the bad row from the other three and of course lost some power and volts. But I still had enough power to charge the iPod.
Conclusions[edit | edit source]
Overall I was not able to charge the bike battery, however as shown in the photos below,I was able to hook the panel up to an Ipod touch and charge the ipod.

References[edit | edit source]
This link shows a really good 6 part video of step by step instructions to help build your solar panel. The video will help with any confusion and give more visuals.