mNo edit summary |
Sophivorus (talk | contribs) m (Rename "affiliations" parameter to "organizations", to unify terminology throughout Appropedia) |
||
| (92 intermediate revisions by 13 users not shown) | |||
| Line 1: | Line 1: | ||
[[File:Step Overview 1.jpeg|thumb]] | |||
= | {{Project data | ||
| authors = User:P.Diakow | |||
| status = Designed | |||
| completed = 2010 | |||
| made = No | |||
| replicated = No | |||
| cost = CAD 61.85 | |||
| instance-of = Tilling system | |||
}} | |||
The Purpose of a Chicken Tractor is to use it as a passive tilling system for a tract of land. The chickens living inside the tractor walk, pick, and eat off the grass. | |||
[[Chicken tractors]] are commonly used all over the world as mobile chicken coops, however they have not been given much engineering attention. They are almost always developed in a trial and error fashion and therefore there is an opportunity for their design to be optimized. | |||
The Purpose of a Chicken Tractor is to use it as a passive tilling system for a tract of land. The chickens living inside the tractor walk, pick, and eat off the grass. They also defaecate in the same area, all the activity tills up the shallow surface of the soil and reduces the plant and insect population. By moving the tractor every few days all the soil in an area is slowly tilled and fertilized. | |||
The | The complete 3D CAD is available, however it is a Autodesk Inventor file, and is not posted online yet. It can be accessed by request through the discussion section. | ||
== Overview == | |||
The chosen design was optimized to meet the requirements set out in the Design Requirements section, it can be seen bellow. | |||
The Chicken Tractor is split into 2 main sections, the outdoor section enclosed with only chicken wire, and the interior section enclosed by two plywood walls and covered by a tarp of some sort. | The Chicken Tractor is split into 2 main sections, the outdoor section enclosed with only chicken wire, and the interior section enclosed by two plywood walls and covered by a tarp of some sort. The two sections were designed large enough to hold four chickens at any time, leaving the chickens 4 Sq-ft of space each. The exterior section is meant for use during the day, the chickens can get sun, they can walk on the grass, pick seeds and defecate outside, this turns up the shallow surface of the ground like a tractor does. At night, or during unfavorable weather the chickens can move into the enclosed section, where they will be protected from the elements. | ||
Having two sections in the design allows for much more flexibility then a one chamber system. | Having two sections in the design allows for much more flexibility then a one chamber system. The overall design is friendly to modifications towards either; more sheltering or openness. Using a tarp or other light plastic for the covering material has many advantage, particularly the simplicity of removing or attaching it. If the size of the enclosed area needs to be changed (increased, or deceased) for any reason it is very simple to do, the entire Tractor can become enclosed by a tarp during rainy seasons, or the tarp can be removed during hot dry periods. The floor for the enclosed section can also be modular; by not permanently attaching it, the grass area of the Chicken Tractor can be doubled, as seen in figure 2. | ||
[[ | [[File:Step Overview 2.jpeg|thumb]] | ||
Although the design is very large the system is still mobile, which is critical for the concept of a Chicken Tractor. | Although the design is very large the system is still mobile, which is critical for the concept of a Chicken Tractor. This design, which kept costs to a minimum, did not include wheels or an axle and is dragged along on it's side supports like a sled. A possible location for an axle and wheels are located at the back and with additional money a more complex movement system can be installed. However the current configuration, with someone using the arms at the front to pull the system along does not require excessive force. | ||
<gallery> | <gallery> | ||
Image:Step Overview 3.jpeg|Figure 3: | Image:Step Overview 3.jpeg|Figure 3: Front arms for pulling the Tractor | ||
Image:Step Overview 4.jpeg|Figure 4: | Image:Step Overview 4.jpeg|Figure 4: Back entrance for chicken removal | ||
</gallery> | </gallery> | ||
== Functional Specifics == | |||
The Chicken Tractor is to be used for housing chickens, they can enter through a movable wire flap in the front or in the rear of the structure. The whole system is designed to move with chickens inside or outside. The front of the Tractor is lifted up and pulled with the arms. The system doesn't need to move far, just enough to get to a new section of grass for the chickens to use. The system should be moved every few days depending on the size and number of chickens inside. | |||
== Force Analysis == | == Force Analysis == | ||
[[File:Free Body Diagram.jpeg|thumb|Figure 5: Free Body Diagram of Chicken Tractor]] | |||
The forces on the Chicken Tractor are being evaluated to determine how much effort will be required to move it. It is assumed the system will be lifted from one end and dragged on the back tracks, so the whole thing makes an angle with the ground. The free body diagram for the system can be seen bellow in figure 5. | |||
The sum of the forces is taken in the Y-direction knowing that there is no acceleration, since the object is not moving up or down, the sum of the forces must equal zero. | The sum of the forces is taken in the Y-direction knowing that there is no acceleration, since the object is not moving up or down, the sum of the forces must equal zero. | ||
<math> | <math>\sum F_y = 0 </math> | ||
<math> | <math>0 = F_N-F_g+F_y </math> | ||
The force of gravity can also be written as gravitational acceleration multiplied by mass. | The force of gravity can also be written as gravitational acceleration multiplied by mass. | ||
<math> | <math>0 = F_N-g*m+F_y </math> [1] | ||
The sum of the forces is taken in the X-direction, since the object will be pulled at a constant velocity the sum of the forces will be equal to zero. | The sum of the forces is taken in the X-direction, since the object will be pulled at a constant velocity the sum of the forces will be equal to zero. | ||
<math> | <math>\sum F_x = 0 </math> | ||
<math> | <math>0 = F_x-F_f </math> | ||
The force of friction can also be written as the normal force times the coefficient of friction, 0.62<ref> Engineer's Handbook, "Coefficient of Friction", http:// | The force of friction can also be written as the normal force times the coefficient of friction, 0.62<ref>Engineer's Handbook, "Coefficient of Friction", [https://web.archive.org/web/20190614200412/http://engineershandbook.com:80/Tables/frictioncoefficients.htm http://web.archive.org/web/20190614200412/http://engineershandbook.com:80/Tables/frictioncoefficients.htm], Accessed April 7, 2010</ref> was used for the coefficient of friction between the object and the grass, based on the value between wood and concrete. | ||
<math> | <math>0 = F_x-F_N* \mu</math> [2] | ||
The sum of the moments is taken about point A, this point cannot support a torque, therefore the moment, M at that point must be equal to zero. | The sum of the moments is taken about point A, this point cannot support a torque, therefore the moment, M at that point must be equal to zero. | ||
<math> | <math>\sum M_A= 0 </math> | ||
<math> | <math>0 = F_y*L*cos( \theta )-F_x*L*sin(\theta)-m*g*(L/2)*cos(\theta) </math> [3] | ||
The total force required to move the Chicken Tractor is calculated as the resultant of the forces in the X and Y direction. | Equations 1, 2 and 3 can be simultaneously solved for <math>F_x, F_y and F_N </math>. The total force required to move the Chicken Tractor is calculated as the resultant of the forces in the X and Y direction. | ||
<math> | <math>F = \sqrt(F_x^2+F_y^2) </math> | ||
The dimensions of the system were optimized so that the force required to move it are minimized for a given mass. The calculated forces are shown bellow in table 1. | |||
{| class="wikitable" | |||
|+ Table 1: Resulting Force's on Chicken Tractor | |||
! | |||
! | |||
! Force (N) | ! Force (N) | ||
|- | |- | ||
|X | | X | ||
| | | 222.7 | ||
|- | |- | ||
| Y | | Y | ||
| | | 499.2 | ||
|- | |- | ||
| Total | | Total | ||
| | | 546.6 | ||
|} | |} | ||
== Design Requirements == | == Design Requirements == | ||
There were a number of requirements for the design so that the final chicken tractor would be optimized. | There were a number of requirements for the design so that the final chicken tractor would be optimized. The following criteria were used to choose the final design. | ||
* Mobility - The chicken tractor must be easy to move, however it also needs to be sturdy enough to withstand incremental weather conditions. | |||
* All Season - The design must be able to keep the inhabitants warm and dry at night and during rain storms, while still remaining cool during the day. The design does not have to be able to withstand Canadian winters as it is intended for warmer climates. | |||
* Spacious - The design must be able to accommodate between 3-4 grown chickens, at 4 Sq-ft per chicken. | |||
* Affordable - The design must cost less then $60.00 CAD to fully construct. | |||
* Flexibility - Easily modified for different needs. | |||
* Locally available - All the materials must be locally available. | |||
== Construction and Assembly == | |||
To be able to fully construct the Chicken Tractor basic knowledge of [https://en.wikipedia.org/wiki/Carpentry Carpentry] will be required. The complete construction requires, sawing, hammering, framing and other basic carpentry skills. | |||
=== Required Materials === | |||
Shown bellow in table 2 is a list of all the materials that are needed to construct the Chicken Tractor, along with the approximate cost of all the items. | |||
'''Note:''' These are only guidelines and different materials can be substituted where appropriate. | |||
{| class="wikitable" | |||
|+ Table 2: Required Materials | |||
| | |||
! Material | ! Material | ||
! Number Required | ! Number Required | ||
! Use/Alternatives | |||
! Total Cost (CAD) | ! Total Cost (CAD) | ||
|- | |- | ||
|Chicken Wire | | Chicken Wire | ||
48"x50' | 48"x50' | ||
| 1 | | 1 | ||
| $ | | Only need 5ft by 9ft in total is really needed , netting is not suggested as chickens can rip through it easily | ||
| $10.00<ref>Home Hardware, "NETTING, POULTRY GALV 21G 2X48X50'", http://www.homehardware.ca/Products/index/show/product/I5258231/name/netting_poultry_galv_21g_2x48x50, Accessed April 7, 2010</ref> | |||
|- | |- | ||
| 1/4" Plywood sheet 4x8 | | 1/4" Plywood sheet 4x8 | ||
| 1 | | 1 | ||
| $6.87 <ref> Andysezwoodshop.ca, "Plywood Prices: Typical Prices for Estimating the Cost of Plywood Panels", http://www.ezwoodshop.com/plywood/plywood-prices.html, Updated March 2010 </ref> | | Plywood in used for the floor and front/back entrances, other wood or sheet metal can be substituted if available | ||
| $6.87<ref>Andysezwoodshop.ca, "Plywood Prices: Typical Prices for Estimating the Cost of Plywood Panels", http://www.ezwoodshop.com/plywood/plywood-prices.html, Updated March 2010</ref> | |||
|- | |- | ||
| 2X4 10 ft | | 2X4's 10 ft | ||
| 3 | | 3 | ||
| | | Wood is the material of choice for the framing, however different sized wood thinner/thicker pieces can be used instead of 2X4's | ||
| $12.00<ref>Answers.com, "How much per foot does a 2x4 cost?", [https://wiki.answers.com/Q/How_much_per_foot_does_a_2x4_cost http://wiki.answers.com/Q/How_much_per_foot_does_a_2x4_cost], Accessed April 2010</ref> | |||
|- | |||
| Nails/Screws | |||
| 50 | |||
| Bolts could be substituted for nails, however they are less available and harder to work with | |||
| $12.00<ref>The Home Depot, "8 X 3 Construction Screws Gold", http://www.homedepot.ca/webapp/wcs/stores/servlet/CatalogSearchResultView?D=908155&Ntt=908155&catalogId=10051&langId=-15&storeId=10051&Dx=mode+matchallpartial&Ntx=mode+matchall&recN=113283&N=0&Ntk=P_PartNumber, Accessed April 2010</ref> | |||
|- | |||
| Staples | |||
| 500 | |||
| Small nails can be used instead of staples to hold down the chicken wire, however this is more work and harder to accomplish | |||
| $14.99<ref>The Home Depot, "Arrow JT21 1/4" staples - Pack of 1000 staples", hhttp://www.homedepot.ca/webapp/wcs/stores/servlet/CatalogSearchResultView?D=900837&Ntt=900837&catalogId=10051&langId=-15&storeId=10051&Dx=mode+matchallpartial&Ntx=mode+matchall&recN=113292&N=0&Ntk=P_PartNumber, Accessed April 2010</ref> | |||
|- | |||
| Tarp | |||
| 1 | |||
| Any rain resistant covering can be put over the enclosed section of the Chicken Tractor | |||
| $5.99<ref>Canadian Tire, "Multi-Purpose Tarpaulins, Blue", http://www.canadiantire.ca/AST/browse/5/SportsRec/Camping/Tarpaulins/PRD~0405004P/Multi-Purpose%252BTarpaulins%25252C%252BBlue.jsp?locale=en, Accessed April 2010</ref> | |||
|- | |- | ||
| | | | ||
| | | | ||
| | | Total | ||
| $61.85 | |||
|} | |} | ||
== Required Tools == | (Note: This is only possible if materials are split with others, costs will be higher if materials have to be bought at double the required amounts.) | ||
To construct a Chicken Tractor you will need access to a number or tools. | |||
=== Required Tools === | |||
To construct a Chicken Tractor you will need access to a number or tools. Shown bellow in table 3 are the tools that are required, and what they will be used for, so that alternative tools can be used where possible. | |||
{| class="wikitable" | |||
|+ Table 3: Required Tools | |||
| | |||
! Tool | ! Tool | ||
! Possible Alternative Tool | |||
! Use | ! Use | ||
|- | |- | ||
| Hammer | | Hammer or drill for screws | ||
| Mallet, or hard piece of metal, a screw driver is not suggested for screws. | |||
| Nailing 2x4 framing together | | Nailing 2x4 framing together | ||
|- | |- | ||
| Saw | | Saw | ||
| Anything that can cut large pieces of wood | |||
| Cutting 2x4's and plywood to length, shaping plywood | | Cutting 2x4's and plywood to length, shaping plywood | ||
|- | |- | ||
| Staple Gun | | Staple Gun | ||
| Hammer, mallet or any blunt edge | |||
| Attaching the chicken wire to the wood frame | | Attaching the chicken wire to the wood frame | ||
|} | |} | ||
== Construction == | === Construction === | ||
Shown bellow in table 4 is a list of all the different pieces that will be needed to construct the Chicken Tractor, they are co-located with dimensional drawings so that they can be easily produced. | Shown bellow in table 4 is a list of all the different pieces that will be needed to construct the Chicken Tractor, they are co-located with dimensional drawings so that they can be easily produced. | ||
{| class="wikitable" | |||
|+ Table 4: Parts | |||
| | |||
! Part | ! Part | ||
! Dimensional Drawings | ! Dimensional Drawings | ||
|- | |- | ||
| Bottom Frame | | Bottom Frame | ||
| [[ | | [[File:Bottom Frame.jpeg|thumb|center|Fig 6: Bottom Frame]] | ||
|- | |- | ||
| Complete Chicken Wire Casing | | Complete Chicken Wire Casing | ||
| [[ | | [[File:Complete Chicken Wire Casing.jpeg|thumb|center|Fig 7: Complete Chicken Wire Casing]] | ||
|- | |- | ||
| Cross Support | | Cross Support | ||
| [[ | | [[File:Cross Support.jpeg|thumb|center|Fig 8: Cross Support]] | ||
|- | |- | ||
| Door Cover | | Door Cover | ||
| [[ | | [[File:Door Cover.jpeg|thumb|center|Fig 9: Door Cover]] | ||
|- | |- | ||
| Floor Sheet | | Floor Sheet | ||
| [[ | | [[File:Floor Sheet.jpeg|thumb|center|Fig 10: Floor Sheet]] | ||
|- | |- | ||
| Front Cross Support | | Front Cross Support | ||
| [[ | | [[File:Front Cross Support.jpeg|thumb|center|Fig 11: Front Cross Support]] | ||
|- | |- | ||
| Entrance | | Entrance | ||
| [[ | | [[File:Entrance.jpeg|thumb|center|Fig 12: Entrance]] | ||
|- | |- | ||
| Vertical Supports | | Vertical Supports | ||
| [[ | | [[File:Vertical Supports.jpeg|thumb|center|Fig 13: Vertical Supports]] | ||
| | |} | ||
=== Assembly === | |||
Once all the pieces have been cut to the proper length it is possible to begin assembly. Follow the steps in table 5 to construct the Chicken Tractor. | |||
Once all | |||
{| class="wikitable" | |||
|+ Table 5: Assembly | |||
| | |||
! Step # | ! Step # | ||
! Required Parts | ! Required Parts | ||
| Line 204: | Line 231: | ||
| Bottom Frame | | Bottom Frame | ||
| Layout the 2 pieces as shown in the figure. | | Layout the 2 pieces as shown in the figure. | ||
| [[ | | [[File:Step One.jpeg|thumb|center|Fig 14: Step 1]] | ||
|- | |- | ||
| 2 | | 2 | ||
| Cross Support, Front Cross Support | | Cross Support, Front Cross Support | ||
| Layout the 2 pieces as shown in the picture. | | Layout the 2 pieces as shown in the picture. Using screws or nails attach the pieces together. | ||
| [[ | | [[File:Step Two.jpeg|thumb|center|Fig 15: Step 2]] | ||
|- | |- | ||
| 3 | | 3 | ||
| Floor Sheet | | Floor Sheet | ||
| Layout the floor sheet as shown in the figure and nail down, or leave unattached for a larger grass section. | | Layout the floor sheet as shown in the figure and nail down, or leave unattached for a larger grass section. | ||
| [[ | | [[File:Step Three.jpeg|thumb|center|Fig 16: Step 3]] | ||
|- | |- | ||
| 4 | | 4 | ||
| Vertical Supports | | Vertical Supports | ||
| Screw or nail the vertical supports down into position so that they are centered and securely attached. | | Screw or nail the vertical supports down into position so that they are centered and securely attached. | ||
| [[ | | [[File:Step Four.jpeg|thumb|center|Fig 17: Step 4]] | ||
|- | |- | ||
| 5 | | 5 | ||
| Entrance | | Entrance | ||
| Screw or nail the 3 entrances in, as shown in the figure. | | Screw or nail the 3 entrances in, as shown in the figure. | ||
| [[ | | [[File:Step Five.jpeg|thumb|center|Fig 18: Step 5]] | ||
|- | |- | ||
| 6 | | 6 | ||
| Door Cover | | Door Cover | ||
| Attach the two door covers using nails or on one side so they can | | Attach the two door covers using nails or staples. Attach on one side so they can hinge open for the chickens. | ||
| [[ | | [[File:Step Six.jpeg|thumb|center|Fig 19: Step 6]] | ||
|- | |- | ||
| 7 | | 7 | ||
| Complete Chicken Wire Casing | | Complete Chicken Wire Casing | ||
| Unroll the chicken wire to surround the frame as shown in the figure, attach along the Bottom Frame with staples or nails and anywhere else that is appropriate. | | Unroll the chicken wire to surround the frame as shown in the figure, attach along the Bottom Frame with staples or nails and anywhere else that is appropriate. | ||
| [[ | | [[File:Step Seven.jpeg|thumb|center|Fig 20: Step 7]] | ||
|- | |- | ||
| 8 | | 8 | ||
| Cover | | Cover | ||
| Cover the floor section chicken wire with a tarp, as shown in the figure. | | Cover the floor section chicken wire with a tarp, as shown in the figure. | ||
| [[ | | [[File:Step Eight.jpeg|thumb|center|Fig 21: Step 8]] | ||
|} | |} | ||
= Regional Considerations = | == Regional Considerations == | ||
The Chicken Tractor can be utilized in any region that can support an outdoor chicken habitat during a few months of the year. The design was intended for warmer climates so that it can be used all year round. If the tractor was used in cold climates the chickens would need a separate location to live in during the winter months, as it was not designed to shelter chickens in the winter. | |||
Also it should be noted that the tractor does take some effort to move every few days. Those that build it should be awake that there is physical labor involved with day to day use. | |||
== References == | |||
<references /> | |||
= | {{Page data | ||
| keywords = chicken tractor, poultry, permaculture, Chicken wire, plywood | |||
| sdg = SDG02 Zero hunger, SDG15 Life on land | |||
| published = 2010 | |||
| organizations = Category:Queen's University, MECH425 Engineering for Sustainable Development | |||
| license = CC-BY-SA-3.0 | |||
| language = en | |||
}} | |||
[[Category: | [[Category:Permaculture]] | ||
Latest revision as of 14:57, 29 January 2024

The Purpose of a Chicken Tractor is to use it as a passive tilling system for a tract of land. The chickens living inside the tractor walk, pick, and eat off the grass.
Chicken tractors are commonly used all over the world as mobile chicken coops, however they have not been given much engineering attention. They are almost always developed in a trial and error fashion and therefore there is an opportunity for their design to be optimized.
The Purpose of a Chicken Tractor is to use it as a passive tilling system for a tract of land. The chickens living inside the tractor walk, pick, and eat off the grass. They also defaecate in the same area, all the activity tills up the shallow surface of the soil and reduces the plant and insect population. By moving the tractor every few days all the soil in an area is slowly tilled and fertilized.
The complete 3D CAD is available, however it is a Autodesk Inventor file, and is not posted online yet. It can be accessed by request through the discussion section.
Overview[edit | edit source]
The chosen design was optimized to meet the requirements set out in the Design Requirements section, it can be seen bellow.
The Chicken Tractor is split into 2 main sections, the outdoor section enclosed with only chicken wire, and the interior section enclosed by two plywood walls and covered by a tarp of some sort. The two sections were designed large enough to hold four chickens at any time, leaving the chickens 4 Sq-ft of space each. The exterior section is meant for use during the day, the chickens can get sun, they can walk on the grass, pick seeds and defecate outside, this turns up the shallow surface of the ground like a tractor does. At night, or during unfavorable weather the chickens can move into the enclosed section, where they will be protected from the elements.
Having two sections in the design allows for much more flexibility then a one chamber system. The overall design is friendly to modifications towards either; more sheltering or openness. Using a tarp or other light plastic for the covering material has many advantage, particularly the simplicity of removing or attaching it. If the size of the enclosed area needs to be changed (increased, or deceased) for any reason it is very simple to do, the entire Tractor can become enclosed by a tarp during rainy seasons, or the tarp can be removed during hot dry periods. The floor for the enclosed section can also be modular; by not permanently attaching it, the grass area of the Chicken Tractor can be doubled, as seen in figure 2.

Although the design is very large the system is still mobile, which is critical for the concept of a Chicken Tractor. This design, which kept costs to a minimum, did not include wheels or an axle and is dragged along on it's side supports like a sled. A possible location for an axle and wheels are located at the back and with additional money a more complex movement system can be installed. However the current configuration, with someone using the arms at the front to pull the system along does not require excessive force.
-
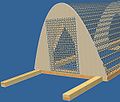
Figure 3: Front arms for pulling the Tractor
-
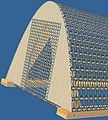
Figure 4: Back entrance for chicken removal


Functional Specifics[edit | edit source]
The Chicken Tractor is to be used for housing chickens, they can enter through a movable wire flap in the front or in the rear of the structure. The whole system is designed to move with chickens inside or outside. The front of the Tractor is lifted up and pulled with the arms. The system doesn't need to move far, just enough to get to a new section of grass for the chickens to use. The system should be moved every few days depending on the size and number of chickens inside.
Force Analysis[edit | edit source]

The forces on the Chicken Tractor are being evaluated to determine how much effort will be required to move it. It is assumed the system will be lifted from one end and dragged on the back tracks, so the whole thing makes an angle with the ground. The free body diagram for the system can be seen bellow in figure 5.
The sum of the forces is taken in the Y-direction knowing that there is no acceleration, since the object is not moving up or down, the sum of the forces must equal zero.


The force of gravity can also be written as gravitational acceleration multiplied by mass.
[1]

The sum of the forces is taken in the X-direction, since the object will be pulled at a constant velocity the sum of the forces will be equal to zero.


The force of friction can also be written as the normal force times the coefficient of friction, 0.62[1] was used for the coefficient of friction between the object and the grass, based on the value between wood and concrete.
[2]

The sum of the moments is taken about point A, this point cannot support a torque, therefore the moment, M at that point must be equal to zero.

[3]

Equations 1, 2 and 3 can be simultaneously solved for . The total force required to move the Chicken Tractor is calculated as the resultant of the forces in the X and Y direction.


The dimensions of the system were optimized so that the force required to move it are minimized for a given mass. The calculated forces are shown bellow in table 1.
| Force (N) | |
|---|---|
| X | 222.7 |
| Y | 499.2 |
| Total | 546.6 |
Design Requirements[edit | edit source]
There were a number of requirements for the design so that the final chicken tractor would be optimized. The following criteria were used to choose the final design.
- Mobility - The chicken tractor must be easy to move, however it also needs to be sturdy enough to withstand incremental weather conditions.
- All Season - The design must be able to keep the inhabitants warm and dry at night and during rain storms, while still remaining cool during the day. The design does not have to be able to withstand Canadian winters as it is intended for warmer climates.
- Spacious - The design must be able to accommodate between 3-4 grown chickens, at 4 Sq-ft per chicken.
- Affordable - The design must cost less then $60.00 CAD to fully construct.
- Flexibility - Easily modified for different needs.
- Locally available - All the materials must be locally available.
Construction and Assembly[edit | edit source]
To be able to fully construct the Chicken Tractor basic knowledge of Carpentry will be required. The complete construction requires, sawing, hammering, framing and other basic carpentry skills.
Required Materials[edit | edit source]
Shown bellow in table 2 is a list of all the materials that are needed to construct the Chicken Tractor, along with the approximate cost of all the items.
Note: These are only guidelines and different materials can be substituted where appropriate.
| Material | Number Required | Use/Alternatives | Total Cost (CAD) |
|---|---|---|---|
| Chicken Wire
48"x50' |
1 | Only need 5ft by 9ft in total is really needed , netting is not suggested as chickens can rip through it easily | $10.00[2] |
| 1/4" Plywood sheet 4x8 | 1 | Plywood in used for the floor and front/back entrances, other wood or sheet metal can be substituted if available | $6.87[3] |
| 2X4's 10 ft | 3 | Wood is the material of choice for the framing, however different sized wood thinner/thicker pieces can be used instead of 2X4's | $12.00[4] |
| Nails/Screws | 50 | Bolts could be substituted for nails, however they are less available and harder to work with | $12.00[5] |
| Staples | 500 | Small nails can be used instead of staples to hold down the chicken wire, however this is more work and harder to accomplish | $14.99[6] |
| Tarp | 1 | Any rain resistant covering can be put over the enclosed section of the Chicken Tractor | $5.99[7] |
| Total | $61.85 |
(Note: This is only possible if materials are split with others, costs will be higher if materials have to be bought at double the required amounts.)
Required Tools[edit | edit source]
To construct a Chicken Tractor you will need access to a number or tools. Shown bellow in table 3 are the tools that are required, and what they will be used for, so that alternative tools can be used where possible.
| Tool | Possible Alternative Tool | Use |
|---|---|---|
| Hammer or drill for screws | Mallet, or hard piece of metal, a screw driver is not suggested for screws. | Nailing 2x4 framing together |
| Saw | Anything that can cut large pieces of wood | Cutting 2x4's and plywood to length, shaping plywood |
| Staple Gun | Hammer, mallet or any blunt edge | Attaching the chicken wire to the wood frame |
Construction[edit | edit source]
Shown bellow in table 4 is a list of all the different pieces that will be needed to construct the Chicken Tractor, they are co-located with dimensional drawings so that they can be easily produced.
| Part | Dimensional Drawings |
|---|---|
| Bottom Frame |  |
| Complete Chicken Wire Casing |  |
| Cross Support |  |
| Door Cover |  |
| Floor Sheet |  |
| Front Cross Support |  |
| Entrance |  |
| Vertical Supports |  |
Assembly[edit | edit source]
Once all the pieces have been cut to the proper length it is possible to begin assembly. Follow the steps in table 5 to construct the Chicken Tractor.
| Step # | Required Parts | Instructions | Figure |
|---|---|---|---|
| 1 | Bottom Frame | Layout the 2 pieces as shown in the figure. |  |
| 2 | Cross Support, Front Cross Support | Layout the 2 pieces as shown in the picture. Using screws or nails attach the pieces together. |  |
| 3 | Floor Sheet | Layout the floor sheet as shown in the figure and nail down, or leave unattached for a larger grass section. |  |
| 4 | Vertical Supports | Screw or nail the vertical supports down into position so that they are centered and securely attached. |  |
| 5 | Entrance | Screw or nail the 3 entrances in, as shown in the figure. |  |
| 6 | Door Cover | Attach the two door covers using nails or staples. Attach on one side so they can hinge open for the chickens. |  |
| 7 | Complete Chicken Wire Casing | Unroll the chicken wire to surround the frame as shown in the figure, attach along the Bottom Frame with staples or nails and anywhere else that is appropriate. |  |
| 8 | Cover | Cover the floor section chicken wire with a tarp, as shown in the figure. |  |
Regional Considerations[edit | edit source]
The Chicken Tractor can be utilized in any region that can support an outdoor chicken habitat during a few months of the year. The design was intended for warmer climates so that it can be used all year round. If the tractor was used in cold climates the chickens would need a separate location to live in during the winter months, as it was not designed to shelter chickens in the winter.
Also it should be noted that the tractor does take some effort to move every few days. Those that build it should be awake that there is physical labor involved with day to day use.
References[edit | edit source]
- ↑ Engineer's Handbook, "Coefficient of Friction", http://web.archive.org/web/20190614200412/http://engineershandbook.com:80/Tables/frictioncoefficients.htm, Accessed April 7, 2010
- ↑ Home Hardware, "NETTING, POULTRY GALV 21G 2X48X50'", http://www.homehardware.ca/Products/index/show/product/I5258231/name/netting_poultry_galv_21g_2x48x50, Accessed April 7, 2010
- ↑ Andysezwoodshop.ca, "Plywood Prices: Typical Prices for Estimating the Cost of Plywood Panels", http://www.ezwoodshop.com/plywood/plywood-prices.html, Updated March 2010
- ↑ Answers.com, "How much per foot does a 2x4 cost?", http://wiki.answers.com/Q/How_much_per_foot_does_a_2x4_cost, Accessed April 2010
- ↑ The Home Depot, "8 X 3 Construction Screws Gold", http://www.homedepot.ca/webapp/wcs/stores/servlet/CatalogSearchResultView?D=908155&Ntt=908155&catalogId=10051&langId=-15&storeId=10051&Dx=mode+matchallpartial&Ntx=mode+matchall&recN=113283&N=0&Ntk=P_PartNumber, Accessed April 2010
- ↑ The Home Depot, "Arrow JT21 1/4" staples - Pack of 1000 staples", hhttp://www.homedepot.ca/webapp/wcs/stores/servlet/CatalogSearchResultView?D=900837&Ntt=900837&catalogId=10051&langId=-15&storeId=10051&Dx=mode+matchallpartial&Ntx=mode+matchall&recN=113292&N=0&Ntk=P_PartNumber, Accessed April 2010
- ↑ Canadian Tire, "Multi-Purpose Tarpaulins, Blue", http://www.canadiantire.ca/AST/browse/5/SportsRec/Camping/Tarpaulins/PRD~0405004P/Multi-Purpose%252BTarpaulins%25252C%252BBlue.jsp?locale=en, Accessed April 2010