

It has been almost ten years since CCAT has been painted. The last natural paint project was in 2007: CCAT natural paints and since then some of the walls have faded, cracked and chipped. In spring of 2017, students of Engineering 305 researched and developed new natural paint recipes to repaint CCAT.
As time has passed, the natural paint of almost a decade prior has faded. We will be using different pigments to create an appropriate paint that adheres to the guidelines of what is considered a natural paint and repaint a certain section within CCAT.
Team[edit | edit source]
The 4 person team that worked on this project:
Problem statement[edit | edit source]
The objective of this project is to use natural and local materials to repaint CCAT. Through research, development and documentation we will publish our findings and make natural painting more accessible to the general public.
Project Criteria[edit | edit source]
The following criteria were determined by spending time with the students living at CCAT. This involved asking for their input directly, observing their interactions with their space, and gauging their reactions to certain aspects from the last project or suggestions from our team. The only additional specification was that the paints be made from non-toxic materials, which was inherent to the project.

| Criteria | Constraints | Weight (1-10) |
|---|---|---|
| Rooms | At least the main upstairs. This includes kitchen, dining, living. CCAT Directors are open to us doing the downstairs as well. | 4 |
| Locality | Ingredients must come from within California or closer | 9 |
| Aesthetics | Must be more pleasing to the eye than the 2007 project. | 6 |
| Feeling of "lightness" | The painted rooms must feel lighter than a "cave"-like feeling, as described by one CCAT resident. | 5 |
| Durability | The paints used should hold up longer than the ones used in 2007. We will attempt to test and compare for each binder option. | 7 |
| Cost | We want to see if we can meet the constraint of the paint being cheaper than conventional paints, or at least cheaper than the project paints in 2007, which were more expensive than conventional paints. | 8 |
| Color: hue | Restricted to cool side of color wheel, also exclude purple. | 3 |
| Color: saturation | Restricted to neutral tones rather than vibrant ones. | 1 |
| Color: value | Restricted to the light-grey to white side of the scale. | 2 |
Literature Review[edit | edit source]
This is a review of the available literature pertinent to the Appropriate Paints Project at CCAT 2017.
Paint Basics[edit | edit source]
What is paint?[edit | edit source]
Paint is applied to a surface as a liquid and dries to a solid, called a film.[1] Paint is made from a resin/binder, a pigment, and a solvent/thinner; it can also have an extender or additives.[1][2] The pigment, usually a powder, gives the paint its color and level of gloss. The binder is a solid that holds the pigment, gives the paint its texture, and makes the paint stick to surfaces. The solvent makes the paint less viscous and easier to spread for application; the solvent and binder together are called the vehicle.[1]An extender is an additional pigment that has larger particles.[1]Extenders help conserve binder and increase the lifespan of the paint film. Additives can be used to modify properties of the paint, e.g. to make it more weather resistant, to reduce drying time, or to make the paint last when stored.[1]
Conventional Paints[edit | edit source]
Pigments and Binders Used[edit | edit source]
Binders are the component in household paints that make it have a thicker consistency. If binders were not added, the water component would be too strong to adhere to the wall for instance and just drip to the bottom of said surface. Furthermore, the binder, sometimes referred to as resin, is the ingredient that holds the pigment together in a tough, continuous film, and provides film integrity and adhesion. When the binder is mixed with the solvent, the combination is known as a vehicle. The most widely used binders in paints today are: acrylic polymers, alkyd polymers, epoxy polymers.[3] To give color to paints, pigments are used. Commonly, inorganic pigments such as white titanium dioxide (titanium(IV) oxide) and calcium carbonate are the most frequent to appear in an ingredient list. Other recurring pigments include: iron oxides to give hues of red, yellow, and black, followed by zinc oxide and carbon black.
Environmental Impact[edit | edit source]
The impacts from conventional paints have historically come from the choice of solvent. Paint can be water-based or solvent-based. Solvent-based paints use an organic solvent such as benzene instead of water. When solvent-based paints are applied, drying, and curing, the solvent evaporates and releases volatile organic compounds (VOCs) to the environment.[2]This is what causes the smell that freshly painted walls often have. About 50 years ago, most paints available on the market were solvent-based, but today, up to 80% of paints available are water-based due to VOC regulations.[4] Even so, solvents are the third highest VOC-emitting industry in the US.[5] In addition to being more environmentally friendly, water-based paints are easier to handle, quicker-drying, and more economic than solvent-based paints.[2]Water's properties (surface tension, density, and thermal conductivity) make it a better solvent than most organic solvents.[2]According to the EPA, the concentration of many VOCs is up to ten times higher indoors than outdoors.[6] The agency stresses that while some products may be exempt from VOC regulations because they are safe to use outside, these same products may be health hazards if used inside, and best use practices (e.g. using outdoors or in a well-ventilated area) outlined on product labels should be followed closely. The agency also warns against buying more paint than one needs and storing the excess.[6]The main impacts of VOCs in the atmosphere are ground-level ozone production, human health effects, and effects on plants. VOCs react with sunlight and gases such as nitrogen oxides and carbon monoxide to form secondary pollutants, such as ozone, which contributes to photochemical smog and the greenhouse effect when generated in the troposphere; tropospheric ozone is also toxic to plants.[2][6][7] Human symptoms of VOC exposure are nose and throat irritation, eye irritation, headaches, dizziness, nausea, fatigue, and allergic reactions on the skin.[6]Long-term, VOCs can cause damage to the central nervous system, liver, and kidneys.[6]VOC exposure can exacerbate pre-existing conditions, such as asthma. Additionally, certain VOCs are known to cause cancer in animals and humans.[6]Even "low VOC" or "VOC-free" marketed paints consistently emit more VOCs than their labels claim to have in the product.[8]
The relationship between plants and VOCs is complicated, because about 70% of total VOC emissions come from plants (US data.)[5]All plants emit VOCs, and studies suggest that they either have physiological roles in plants or are emitted due to their properties (e.g. their volatility.)[9] VOCs are a very widely defined group, and just because plants produce them does not mean they are always good for plants. High concentrations of VOCs can damage plants. Emissions of different VOC species do different things to plants, for example, ethylene is known to mimic a growth-regulating hormone.[7]Conventional paint, and many of the products associated with them (e.g. thinners) are classified as household hazardous waste by the EPA and must be disposed of properly.[10]
Many materials are used as pigments in paint, but one of the main sources of pigment is titanium dioxide (TiO2). TiO2 must be processed from ilmenite ore, which means it has inherent environmental impacts, such as ozone layer depletion, land use, ecotoxicity, and the indirect impacts from the mining being powered by fossil fuels.[11]
Finally, a life cycle impact of conventional paints is that multiple components can come from petroleum, such as the binder and mainly the solvent. This means conventional paints directly contribute to greenhouse gas emissions as well as soil, air, and water pollution by virtue of being petroleum products.
Wall Maintenance in Local Climate (Humboldt County, California USA)[edit | edit source]
Conventional paints within a controlled environment and applied with correct procedure can last up to five years without maintenance.[12] However, there are many real factors that can affect the performance of interior paint making maintenance more frequent and necessary. Humidity is one factor that has a strong effect on interior paint. It can disrupt the function of paint subsequently causing damage to the walls. Exposed to high humidity, interior paints can: alter in color, form deposits, crack, swell, peel and sweat. All of which require a procedure of cleaning and removing of malfunctioning paint, and reapplication of paint with a possible sealer or finish coating.
Appropriate Paints[edit | edit source]
Pigments and Binders Used[edit | edit source]
In 2007, the group that did the previous round of appropriate paints at CCAT extensively covered alternative binders; the list has not changed since then, though new recipes exist. The paint options, classified by binder, are flour paint, curdled milk paint, clay paint, egg paint, and oil paint.[13] The binders produce differently textured paints, as documented in 2007: the flour paint is thick and textured, the egg and oil paints are velvety, and their milk paint was slightly glossy and more pastel.[13]However, judging by the results of different recipes found through research, the consistency of the paint can be different even with the same binder. One instance of using an extender or additive in an appropriate paint was found, which was adding lime and clay or chalk to a curdled milk paint to make it more durable.[14]
As for pigments, no photographic evidence was found of successful non-conventional pigments beyond individual claims about certain materials. Some companies claim to sell "natural" or "natural earth" pigments, but there is no definitive information about what the pigments contain on the labels. Creating the pigments for the paints using all natural products can be quite difficult. In the 2007 CCAT painting project the pigments used were created mainly from ground up metal oxides or clay.[13] For example: yellow from ground up iron oxides, green from chrome oxides, and brown from clay. Pigments can be created from a variety of options. Extraction of color pigments from fruits and vegetables is a viable option. One example of this process involves mixing ground of berries with rubbing alcohol and then filtering and evaporating to leave only the pigment.[15]
Wall Maintenance in a Local Climate (Humboldt County, California USA)[edit | edit source]
Appropriate paints and clay plasters can last a years without maintenance in the right conditions. Often in a home with normal wear and tear, minor damage such as knicks and scratches can expose the wall. In humid climates, it is especially important to maintain the function of appropriate paint and protect the walls from moisture exposure. This entails frequent touch-ups and patching as damage occurs. Yearly reapplication of appropriate paints and plasters is advised.[16]
Paint Recipes[edit | edit source]
Flour[edit | edit source]
Flour paste is used as the binder in some appropriate paints. Carole Crews includes this recipe in her book Clay Culture: Plasters, Paints and Preservation.
White Flour Paste using 4 cups flour: Makes almost 6 quarts Tools: quart jar, measuring scoop, whisk, stove, 8 quart pot, plus a smaller bowl or bucket. Heat 1 gallon water in pot on stove. Pour 5 cups cold water into the empty bowl or bucket and add 4 cups of cheap white flour. Whisk in flour until smooth. When water in the pot reaches a rolling boil, whisk in flour mixture.[16] The mix will thicken and look translucent.
This white flour paste is then mixed with clay to bind together the solvent and the pigment. In this recipe Carole adds a few other ingredients for desired look:
Alis Recipe: 6-qt. batch: approx 150 Sq. ft.
Measure one gallon water into bucket. Whisk in: 5 quarts powdered kaolin clay, 2 quarts fine sand and/or whiting, 2 quarts mica (fine flakes or powder), 1 handful of chopped straw (optional), pigment as needed for color (optional), 1 quart cooked flour paste
Mix with a whisk attachment on the end of a cordless power drill. Look for the tacks of the whisk when the mix is thick enough.
Milk[edit | edit source]
These paints give off a velvety matte look. Recipes call for casein powder mixed with borax as the binder. Casein powder can be purchased or made by curdling milk.[17]
Milk paint recipe with lime added for texture change and increased durability. Includes information about extenders.[14]
Eggs[edit | edit source]
Egg Tempera Recipe:[16]
First separate yolk from white. Then you can separate the yolk from it's yolk membrane by piercing the yolk and draining the liquid out. Add one teaspoon of water and mix well. Then add this mixture to an equal amount of pigment powder.
Clay[edit | edit source]
This is a recipe for a fine finish clay plaster that could serve the same function as appropriate paint while also patching cracks or holes that have developed in your wall.
You can separate out clay content from clay-dirt by mixing it well in water and letting it settle for a day. Ladle off the water first and then scoop the very top layer of clay that has separated out from the dirt underneath. Mix 2 parts of this clay with 1/4 part binder of your choice and 3-7 parts of different sized fine sand, whiting or marble dust.[16]Apply thinly (1/8 in) with a fine plaster trowel, let dry and seal with your choice of sealer.
Other[edit | edit source]
Urban Finish Plaster Using Paper Pulp:[16]
Soak shredded office paper overnight or longer and beat it to a pulp. Measure out 1 part squeezed out paper pulp, 1/8-1/4 part starch paste, 1 part fine clay, 0-2 parts fine sand.
This can be used to cover over cracks in the wall surface and can be applied directly over sheet rock. This makes for a good primer layer, or adhesion coat, that you can then cover with your choice of appropriate paint.
Hydraulic Lime
This type of paint is suitable for porous surfaces like cement, brick, and stone. It consists of hydraulic lime(a mixture of limestone and clay that is found as a powder) as the binder mixed with water and then mixed with a suitable pigment(alkali resistant).[17]Oil Paint
Oil-based paints are highly water resistant and can stand up to more cleaning and bumping than other paints. One recipe found uses linseed oil, natural citrus thinner, and powdered chalk.[18]
CCAT[edit | edit source]
History[edit | edit source]
In 1978, the Buck House was set to be demolished yet a group of students petitioned to have the house repositioned as an "experiment with appropriate technologies". With the backing of HSU faculty and the immediate community, the students began work towards re-appropriating the house for the necessary retrofitting and remodeling. In 1980, the CCAT house was ready for move in and over the nearly four decades since, students have learned much from continuing towards making CCAT *** net zero something or other**** someone help me finish that off please.
Purpose[edit | edit source]
Many commercial paints include chemicals that contribute to indoor air pollution.[19] While many consumers are turning to less pollution causing alternatives, there are still strides that need to be made to reduce the number of greenhouse gas emissions caused by industrial paints. Some retail stores have begun to sell milk paints but many on the market contain more ingredients than if you were to make the paint yourself. Because companies aren't required to label ingredients used in their paints,[20] we will be making our paints from scratch.
Client Criteria[edit | edit source]
The Rooms[edit | edit source]
The second floor of the CCAT building which is also the living space for the three co-directors including Austin Anderson whom will be the only returning co-director for the following year. The living room, dining room, kitchen, and hallway will be the subjected rooms.
The Process of Application[edit | edit source]
For the kitchen and dining room, which are painted a vibrant yellow and red color respectively, a primer will be used to first to achieve the desired outcome of softer colors. Once primer is finished, we will begin the process of adhering the appropriate paints to said walls. For the living room, which is already a softer color, we will directly apply new coat of paint.
The Colors Wanted[edit | edit source]
Mr. Anderson, stated that he was happy with the way the previous paints had held up through the years but expressed his desire for lighter colors to help make better use of daylight. Currently the kitchen is a bright yellow, living room has one wall greenish brown while other living room walls are light lavender almost tan color, and the dining room is a darker red. Per request of client, we will aim to go for lighter colors and try to stay away from yellow.
Timeline[edit | edit source]
Tentative timeline for the project: "Week of" entries indicate work will take place on Tu/Th/F/Sa/Su of these weeks, depending on availability of group members. (*)The schedule shown is only one possibility, where paints are made in March and painting is done at the end of March and throughout April. This is subject (and likely) to change, as the clients may prefer us to stagger the painting so that they have more time to prepare, but exact dates are unknown at this time.
| Plan | Done on/by |
|---|---|
| Meet with Lonny, go to Phoenix Ceramic Supply for pigment & clay | 2/14/2017 |
| Meet at CCAT, make flour paint swatches for pretotype | 2/16/2017 |
| Pretotype Turn-in | 2/19/2017 |
| Ingredients for other paints/pigments (donated or bought?) | 2/26/2017 |
| Budget proposal | 2/26/2017 |
| Make 2 more paint types (Tue/Thu/Fri/Weekend) | Week of 3/3/2017 |
| Project design turn-in | 3/5/2017 |
| Making paints/pigments/painting* | Week of 3/10/2017 |
| Making paints/pigments/painting* | Week of 3/17/2017 |
| Making paints/pigments/painting* | Week of 3/24/2017 |
| Natural building lab; paint day | 3/27/2017 |
| Painting/Appropedia page* | Week of 3/31/2017 |
| Painting/Appropedia page* | Week of 4/7/2017 |
| Painting/Appropedia page* | Week of 4/14/2017 |
| Draft Appropedia page | 4/16/2017 |
| Painting/Appropedia page* | Week of 4/21/2017 |
| Cutoff for painting | 4/28/2017 |
| Final Appropedia page | 5/5/2017 |
Timeline Outcome[edit | edit source]
We met the deadline of the natural building lab the end of March, but unfortunately we found our paint cracking the next day due to thickness of application and prolonged drying. This was a set back. It took us weeks to scrape the paint off and then another week to reprimer the walls. We ended up extending our final painting day until May 7th.
Cost[edit | edit source]
Initially, we were expecting to paint all of CCAT: The kitchen, the living room, and the complete downstairs area. After our first trial during the Natural building lab, our entire scope of the project changed. It was then agreed that the 2017 Natural Painting Project would only encompass the downstairs south-facing wall. Since the flour paint recipe was the one that we had the most experience with we decided to do another trial with the flour paint and conclude our research with natural paint. This outcome has allowed us the opportunity to experience some of the finer details within the consistencies of one recipe rather than a broader understanding of more recipes. Both scopes of research are important.
The wall was a total of 325 square feet. We did two coats of paint during the lab, and since the new paint bound with the old (2007 project) paint, we ended up scraping off three layers of natural paint and reprimering the entire wall with zero VOC primer. When the primer was dry we then covered the wall with a thin and subtle flour paint that pairs nicely with the existing accent walls. Overall we did three coats of paint and one coat of primer. Due to the issues we experienced, the project ended up being more expensive than we originally intended, even for just one wall.
Estimated Budget[edit | edit source]
This estimated budget is based on our experience so far with making the flour paint and the 2007 group's budget and experience with the milk paint. The two most uncertain factors are the cost of the whiting chalk and how much milk we will need, because we have not yet made quark and that process gave the 2007 group the most trouble.
Flour Paint
| Quantity | Material | Cost | Estimated # Needed | Total Cost |
|---|---|---|---|---|
| 2 lbs | Flour | $2.00 | 5 | $10.00 |
| 5 lbs | Clay | $2.95 | 4 | $11.80 |
| 0.25 lbs | Pigment | $3.50 | 2 | $7.00 |
| 1.5 lbs | Whiting | $7.00 | 1 | $7.00 |
| Total per room | $36.80 | |||
| Total for project (2 rooms) | $71.60 | |||
Milk Paint
| Quantity | Material | Cost | Estimated # Needed | Total Cost |
|---|---|---|---|---|
| 1 gal | Milk | $3.00 | 10 | $30.00 |
| 5 lbs | Clay | $2.95 | 3 | $8.85 |
| 0.25 lbs | Pigment | $3.50 | 2 | $7.00 |
| 1.5 lbs | Whiting | $7.00 | 1 | $7.00 |
| 2 qts | Vinegar | $2.00 | 1 | $2.00 |
| 1 lbs | Baking Soda | $1.00 | 1 | $1.00 |
| Total per room | $57.85 | |||
| Total for project (2 rooms) | $113.70 | |||
With four rooms, this leaves a estimated total project cost of $185.30
Final Budget[edit | edit source]
The budget changed drastically after the first wall we painted in the Natural Building Lab did not go as planned and revealed many problems with our project. The following budget contains all purchases we made for making flour paint for the north wall of the downstairs of CCAT. Our materials were mainly acquired from Phoenix Ceramic Supply in Arcata. The whiting was acquired online and the primer was bought at a hardware store.
| Quantity | Material | Cost |
|---|---|---|
| 4 lbs | Flour | $4.00 |
| 55 lbs | Gray Clay (EPK) | $23.70 |
| 25 lbs | White Clay (Grollog) | $15.90 |
| ~4 lbs | Copper carbonate (pigment) | $36.60 |
| 20 lbs | Whiting | $23.99 |
| ~10 lbs | Fine grain sand | $6.60 |
| 2 gal | Conventional primer | $77.01 |
| 4 | Sponges | $22.46 |
| Total for project (1 wall/hallway, ~325 sq ft) | $210.26 | |
Construction*[edit | edit source]
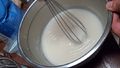
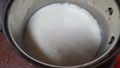
First we boiled water for the flour binder. While the water is heating we whisked the flour well with cold water to dissolve the flour evenly into a thick paste. When the water is done to a rolling boil, we added the hot water to the flour/water paste and mixed it together while the flour cooked and turned the binder more glossy than chalky cream colored. Set this aside to cook.
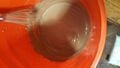
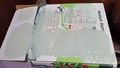
To make the paint, we measured the water into a five gallon bucket. Then we measured the clay and whisked it into the water one quart at a time. It is helpful if you can attach your whisk to and electric drill to ensure consistency. When the binder is cooled enough we added in the binder and the extenders. For extenders, we did half fine sand and half whiting (calcium carbonate). Lastly we added the pigment powder to the desired color. See these very helpful pictures of how the paint was made.
Testing[edit | edit source]
The methodology for our first round of testing was simple: we performed friction and spray tests with increasing intensity. One layer of paint on drywall was used for the tests.
For the friction tests, a known weight was attached to a barbecue brush and dragged over the paint strips with no added pressure for a set number of strokes. The weight was increased for each of the 3 stripes; the weights used were 1, 2, and 3 pounds. For the flour paint, we used double the amount of strokes as the milk paint, because the paint was not showing any damage after the number of strokes we used to damage the milk paint. The flour paint held up to the friction tests much better than the milk tests, showing almost no damage while the milk paint was almost completely removed from the drywall.
For the spray tests, a known number of sprays of equal pressure were applied to the paint strips. The number of sprays increased with each stripes. The number of sprays applied were 25, 50, and 100. The flour paint again held up better than the milk paint, but not to the same degree as it did with the friction tests.
After our first application of paint on the wall failed, we did tests on the primed wall with 3 different applicators: a sponge, a roller, and a brush. One layer was applied. The sponge and roller tests gave us the best coverage, so we decided to use a combination of the two in our final application to the wall.
-
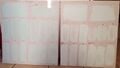
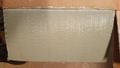
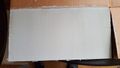
On the left is our flour paint test board and on the right is our milk paint test board. Friction and spray tests were performed on each, and as is obvious from the image, the flour paint held up better.
-
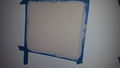
The sponge test on the primed wall.
-
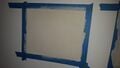
The roller test on the primed wall.
-
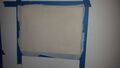
The brush test on the primed wall.


Flour Paint[edit | edit source]
-
The starch binder, made from flour mixed with cold and then boiling water, used in the flour paint.
-
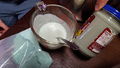
The first run of flour paint, wet with no pigment added. The pigment to be added is on the right.
-
The first run of flour paint, wet and applied with blue-green pigment added. The pigment was very vibrant, but the dark gray-brown of the clay made a paint without much saturation.
-
The first run of flour paint with pigment added, applied and dry. The clay dries to be much lighter than when wet, but most of the color saturation is still lost.
-
The first run of flour paint with pigment added, applied and dry comparison of pigmented vs. non. The non-pigmented paint dries very brown but lightens up a considerable amount. The lightening achieved with the pigment added is more noticeable because the pigment also canceled out the warm brown in the clay. Both sufficiently coat the surface and the color was not affected by the color of the application surface.
-
The second run of flour paint (right) compared to the first (left). We made the second run of the flour paint with the only change being a whiter, less dense clay. The texture is silkier and the wet product is bright white.


Milk Paint[edit | edit source]
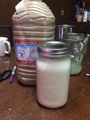
-
The curdled and screened milk (quark) used as the binder in the milk paint.
-
The first run of milk paint (center), wet with pigment added, held next to the wet pigmented flour paint (right) and the original pigment (left). Neither paint is as saturated as the original pigment, but the milk paint is more true to the pigment due to using the whiter clay.
-
The first run of milk paint with pigment added, applied and wet. We started with the patch on the upper right and slowly added clay to get more coverage in the other patches.


Operation[edit | edit source]
Missing O&M.
Conclusion[edit | edit source]
Troubleshooting[edit | edit source]
The first application to the north wall of the downstairs of CCAT happened during the Natural Building Lab. We had our entire class apply 2 layers of paint with rollers. Unfortunately, the application was not successful and was chipping off the wall the next day. We believe this to be due to the wetness and thickness of the application. The paint itself had seemed to have too watery of a consistency as we worked with it in the lab, so we added more clay, which could have contributed to the paint coming off the wall. The main contributor, we believe, was that we put a second layer on while the first was still wet. This was done in the spirit of letting everyone in the lab paint, and next time we would certainly wait for the first layer to dry before applying a second layer.
Not all of the paint came off the wall easily, and thus we spent most of April scraping off the paint by hand. The paint chips varied in thickness, but mostly the paint did pull off the layer of paint below it, and some to all of the primer beneath that layer of paint as well.
-

The original north wall of CCAT's downstairs.
-

The first layer of paint being applied during the natural building lab.
-

The second layer of paint being applied during the natural building lab.
-
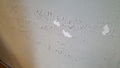
Our first application of paint chipping off the wall after it dried.
-
Another shot of the damage from the first layer. It can be seen here that while some paint is chipping off, not all of it is.
-
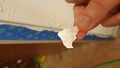
A paint chip with of the original paint and primer under it attached. Not all of the chips were consistent in how much of the previous layers they had taken off with them.
-
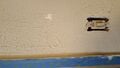
The wall after having been nearly scraped clean of paint by hand. This process took about 3.5 weeks to complete.


Results[edit | edit source]
Our final application to the wall stayed on successfully. We applied 1 layer with a combination of sponges and rollers, because the sponges did not spread the extenders out evenly but the roller did, while the roller did not provide as opaque of coverage but the sponge did.
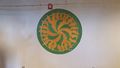
The only issue with this final application is that the color is not exactly what we planned. Previously, we had used a method of adding gray clay, white clay, and pigment gradually to achieve the color we desired. This proved more difficult with larger amounts of paints, as we determined in the natural building lab. During that lab, we had difficulties getting that much gray clay to achieve the color we wanted no matter how much pigment we added. It ended up being the correct color in the lab, but we added much more pigment than we should have had to. To try to correct this with the second application, we tried to determine the ratio of white to gray clay that we would want to achieve the color we wanted with as little pigment as possible, because including more white clay meant the mixture changed colors more easily since the white paint held the pigment better. We ended up using too much white clay, and the color was much lighter than intended. This color still achieves the goals of looking good with the logo and lightening the room, which were the reasons for choosing the original color.
-
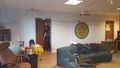
The finished north wall of CCAT. The color is more green-blue in person than it comes across in images.
-
-


Discussion & Lessons Learned[edit | edit source]
Our final product was very difficult to achieve. We were operating on the false assumption that we would be able to easily put our paint over the paint that was already on the walls, and in that we were wrong. We would advise anyone attempting to apply natural paint over old natural paint to be extremely cautious. We did not test on the wall first, which was a mistake. We also applied a second layer when the first was still wet, and added clay during the lab to make the paint thicker, both of which were mistakes. Additonally, we did not clean the wall first, and the layer of grime on the wall could have helped the new paint bind to the old paint and pull it off.
We believe the combination of the above factors are why our first application did not succeed. If we had tested on the wall and cleaned it first, we would have a better idea about what caused the first layer to chip off the wall. We would also recommend figuring out specific ratios of shades of clay and pigment with smaller amounts, so that the same ratios can be used in larger batches of paints to achieve the desired color.
Evaluating the appropriateness of the project is also difficult. With our originally projected costs for the scope of painting 4 rooms, the project seemed very appropriate, especially considering its educational value. However, with the reality of our project being only one wall and hallway newly painted, the project is certainly less appropriate than we thought. The costs were much higher than they would have been to prime and paint the same area with conventional, VOC-free paints. However, these paints are still made from petroleum byproducts despite being less polluting, and as mentioned in our literature review, they may still emit VOCs despite the label.
At CCAT, having conventional paints on the walls is absolutely not what is wanted, and one of the main goals of CCAT is to provide education about appropriate technology. So, for CCAT, the project could still be considered appropriate despite the extra cost and small scope, due to its eventually successful outcome and educational value. We learned many lessons about working with appropriate paints that we did not see anywhere else in our research, and we believe these lessons could help anyone attempting to paint with them in the future.
References[edit | edit source]
- ↑ 1.0 1.1 1.2 1.3 1.4 "Paints." The Essential Chemical Industry. March 18, 2013. Accessed January 31, 2017. http://www.essentialchemicalindustry.org/materials-and-applications/paints.html.
- ↑ 2.0 2.1 2.2 2.3 2.4 Sarrica, Stephanie M. Paints: Types, Components and Applications. New York: Nova Science Publishers, 2011.
- ↑ (http://www.essentialchemicalindustry.org/materials-and-applications/paints.html)
- ↑ "Water based vs Solvent based Paints." Paint Quality Institute. 2015. Accessed January 31, 2017. http://web.archive.org/web/20180116051512/http://www.paintquality.com:80/en/understanding-paint/water-based-vs-solvent-based.
- ↑ 5.0 5.1 "National Summary of VOC Emissions." EPA. May 24, 2016. Accessed February 01, 2017. https://www3.epa.gov/cgi-bin/broker?polchoice=VOC&_debug=0&_service=data&_program=dataprog.national_1.sas.
- ↑ 6.0 6.1 6.2 6.3 6.4 6.5 "Volatile Organic Compounds' Impact on Indoor Air Quality." EPA. December 05, 2016. Accessed January 31, 2017. https://www.epa.gov/indoor-air-quality-iaq/volatile-organic-compounds-impact-indoor-air-quality.
- ↑ 7.0 7.1 Hester, R. E., and Roy M. Harrison. Volatile Organic Compounds in the Atmosphere. Cambridge: Royal Society of Chemistry, 1995.
- ↑ "Even 'VOC-free' paint can release contaminants." Air Quality Sciences Inc.'s AirfAQS Newsletter, November 2003. Compilation of findings from various measurements of "low VOC" or "VOC free" paint. Summarizes EPA studies and has a table of measurements by Air Quality Sciences Inc.
- ↑ Penuelas, J., and J. Llusia. "Plant VOC emissions: making use of the unavoidable." Trends in Ecology & Evolution 19, no. 8 (2004): 402-04. doi:10.1016/j.tree.2004.06.002.
- ↑ "Household Hazardous Waste (HHW)." EPA. December 28, 2016. Accessed January 31, 2017. https://www.epa.gov/hw/household-hazardous-waste-hhw.
- ↑ Grubb, Geoffrey F., and Bhavik R. Bakshi. "Life Cycle of Titanium Dioxide Nanoparticle Production." Journal of Industrial Ecology 15, no. 1 (2010): 81-95. Accessed January 31, 2017. doi:10.1111/j.1530-9290.2010.00292.x.
- ↑ Sampaio, Alcínia Z., and Daniel P. Rosário. "Maintenance of painted interior walls supported on virtual environments." Journal of Civil Engineering and Construction Technology 3(8) (September 2012): 212-21. Accessed January 30, 2017. http://www.academicjournals.org/JCECT.
- ↑ 13.0 13.1 13.2 Anderson, Jill, and Andrea Lanctot. "CCAT natural paints." Appropedia: The sustainability wiki. October 21, 2016. Accessed January 31, 2017. https://www.appropedia.org/CCAT_natural_paints.
- ↑ 14.0 14.1 "Milk Paint with Lime." Earth Pigments. Accessed January 31, 2017. http://www.earthpigments.com/milk-paint-with-lime/.
- ↑ Blatti, Jillian. 2016. Colorful and Creative Chemistry: Making Simple Sustainable Paints with Natural Pigments and Binders. Journal of Chemical Education.
- ↑ 16.0 16.1 16.2 16.3 16.4 Crews, Carole. Clay Culture: Plasters, Paints and Preservation. Vermont: Gourmet Adobe Press, 2010
- ↑ 17.0 17.1 Edwards, Lynn, and Julia Lawless. The natural paint book. London: Kyle Cathie, 2002. https://books.google.com/books?id=rwkprjb5r3oC&pg=RA1-PT28&lpg=RA1-PT28&dq=egg+based+natural+paint+recipes&source=bl&ots=r1DPEtODB1&sig=GwuNkuOuvFMRbPl2HW1a94aJNkw&hl=en&sa=X&ved=0ahUKEwiI04OGi-7RAhUJ0mMKHVtBCzw4FBDoAQgfMAE#v=onepage&q=egg%20based%20natural%20paint%20recipes&f=false
- ↑ "The Secrets Of Homemade Paint." Off The Grid News. December 2012. Accessed February 01, 2017. http://www.offthegridnews.com/how-to-2/the-secrets-of-homemade-paint/.
- ↑ Baker-Laporte, Paula, Erica Elliott, and John Banta. Prescriptions For A Healthy House. Gabriola Island, B.C.: New Society Publishers, 2008. Print.
- ↑ Curtland, Chris. 2012. "Make Sure the make-Up of Your Paint is Green." Buildings 106 (8): 32. http://ezproxy.humboldt.edu/login?url=http://search.proquest.com/docview/1037052677?accountid=11532.