
Note, Part 1 can be found at [[1]].
Construction
Prep Work
The first task in actually finishing the wall was to prepare it to be coated. Here again Pennelys Goodshield provided expert advice, informing me that the wattle and daub section of the wall needed to be filed in with more cob. Cob might be a more exacting mixture in certain circumstances but for our purposes the cob recipe was simply to smother a handful of straw in a heavier than normal clay slip [Recipe in Part 1 under Materials], instead of heavy cream consistency here we are going for a thicker mud consistency. First moisten the surface to be coated to prevent it from sucking moisture out of the cob, increasing the likelihood of cracking. We'll use water for this purpose for all these materials [1]. Then, surface damp, a handful at a time you shove the cob into any loose or open spots in the wall. Eventually, you want to be able to poke the wall at any point and feel little to no give. Having already applied large amounts of cob while Myles initially built the wall, I'd guess-timate that we nearly doubled the amount. When finished the wall was rock solid and massive. It also occurred to me, that this would be the part of the job painting where I might use caulking or spackle to fill cracks between surfaces or around the edges, for instance, as appeared between either side of the wall and the wood posts on either end. The trick I devised to do this appropriately was to coat single pieces of straw in heavy slip, or a few twisted together, and lay them in the cracks between wood post and wall like a line of caulking. This seemed to work well on the spot and I can only wonder how well it worked over time. The other thing I did at this point was to get out a hack saw and take off parts of the paper-crete brick which stuck out particularly far, which there were a handful.

Installing Viewport 'Reveal' Window
About 3/4s of the way up on the front side of the wall we needed to install a window so that future students could see the wattle & daub, and paper-crete halves of the structure underneath my plaster. We had a piece of clear plastic about 1/8 inch thick by 6 inches wide by 10 inches tall to accomplish this, which Myles had already screwed into the wall. I removed the window to prepare it. The problem would be to get the plasters to stick to the plastic. The idea I devised was to cover strips of burlap about an inch wide and sized to fit the window sides in wheat-paste, [Recipe in Part 1 under Materials.]. I hoped that the glue quality of the wheat-paste would be sufficient to adhere to the plastic, and that the pasted burlap would be a suitable surface for the plasters. It did seem to be working, however, after I had already applied my adhesion coat and a coat of plaster I noticed that bugs, little flies, pincer bugs, and rolly-pollies in specific, were eating the wheat-paste. Perhaps borax in the mix would have prevented this; alas. Instead I re-cemented the edges with raw lime putty. This seemed to work well and as the wall neared completion the bugs disappeared, seemingly unable to reach their snack-food wheat-paste.
Applying Adhesion Coat
As I mentioned above, the adhesion coat is roughly analogous to a primer in commercial painting. It's a coat of material which will stick to the layers beneath, while providing a surface for the plasters to stick to [2]. Strictly speaking, I probably only needed to coat the wood end-beams and the window edges as the other materials would bond fine with the plasters. However, because this is meant to be an experiment, I decided to coat the entire surface so there would be one uniform adhesion coat throughout; I thought of this as a reduction in experimental variables. I used clay slip for my adhesion coat. I applied my slip with a four inch brush and an eight inch heavyish (about 3/4 inch) nap paint roller, first having dampened the work area with water. For ease on my back I attached the roller handle to a pole so I could stand straighter. I dipped out of a five gallon bucket, which I find to be easier to move, more voluminous, and less spill-able than a roller tray; in this case I mixed my materials in the 5gal buckets as well, making it doubly appropriate. Buckets also come in handy in that you can lid them as necessary, and I found I could keep slip on hand and workable for longer than a week this way. A tip- when dealing with water based materials left in a bucket, it is wise to skim them over with a centimeter or so of water, not enough to throw off your mix, but enough to keep it from crusting over as you leave it sitting. Check every day or two to make sure the water hasn't evaporated, and carefully poor it off or just mix it when ready to use. After the adhesion coat set up a tad but before it dried, I would scratch lines into the surface lengthwise with a metal toothed scratch tool, the teeth on this were about a quarter inch long and needn't bite all the way. This scratching of the surface provides extra Key, or edges and textures for further coats to adhere and bond into.

Applying Scratch Coat
Finally I started to apply my plasters, #'s 2, the Lime Plaster finalist, and 4.3, the Manure Plaster finalist, in four strips, one of each over each of the two sections of wall. I assumed the materials would bond better to themselves, so resisted the urge to use only three strips: manure, double-wide lime, manure, for instance. It would give the middle strip an unfair weathering advantage, another excess variable to be eliminated. So four strips it was: manure, lime, manure, lime. Notice that this arrangement made sure both plasters got to rest upon the wood end-posts as well as the plastic window. These four applications added a lot of time to the project that would be avoided in a non-experimental one plaster application. Keep that in mind if you decide to try one of these plasters yourself, it'll go easier on you. The Scratch or Key Coat is intended to be rough, providing lots of nonuniform, porous and bulbous surface for the next coat to adhere to [3]. I intentionally used too long straw pieces, regular 1-3 inchers, but some possibly as long as seven inches. Leave the straw sticking out, this too provides extra key [4]. I chose not to apply the scratch with a trowel as this would be too smooth. One traditional European method to apply lime plaster is called hurling and means throwing handfuls of plaster at the wall [5]. I did not discover in my researches how plasterers traditionally protect themselves from lime burns. remember: lime is caustic and will cause chemical burns, wear goggles at all times and keep vinegar on hand as a chemical counter-agent to treat burns.[6] As to hurling, for fear of chemical burns I found it too aggressive a method, messy as well. Instead, first moistening with water I created a similar effect by slapping handfuls of plaster onto the wall, wearing my protective gloves. This filled into previous nooks and crannies while leaving plenty for the next layer to adhere to. Aim for a thickness of 1/4 to 1/2 inch [7].
Applying Plaster Coat
This is the part of the project where I pulled out a trowel. Start by moistening the wall with water, then trowel the plasters on from bottom to top finishing one row so it provides surface on which to place the next. I had to keep to my four experimental strips though this of course will not be your problem. Work from corner to corner, or as far as you can reach without moving if the area is large. This arrangement, or so my grandfather taught, lets the plaster dry well as you work horizontally before you work vertically up over the previous still tacky plaster, so less chance of collapses; while still maintaining the efficiency of not rearranging your self and your tools as you move back and forth. For this layer aim for a thickness of about 1/4 inch [8]. Fill In nooks and crannies preparing the surface to take a smooth round finish coat. After the plaster has set a bit but before it dries be sure to used a metal toothed comb to cut key lines lengthwise into the surface, being careful not to snag on bits of straw and pull the plaster out. Straw length for this coat of plaster should be your standard 1-3 inches [9].
-
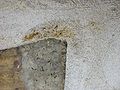
fig. a:A spot with too much straw coming out, I used a plaster mixes extra light on fiber to smooth over these for the finish.
-
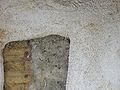
fig. b:The rough spot finished over.
-
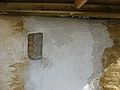
fig. c:Here you can see how the grayer material is last touches put on to create smooth flowing surfaces.
-
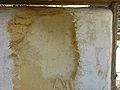
fig. d: For reasons I couldn't determine some sections broke out of this back area; not too unusual in plaster to have some not set up well, so I patched them and had no more troubles.
-
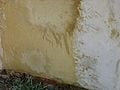
fig. e: More of the large back patch that had busted out.
-
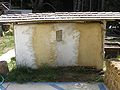
fig. f: What we looked like after the finish plaster and before the color coat. Can see the 4 strips of Lime Plaster, Manure Plaster, Lime again, and Manure again.
-
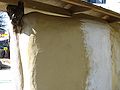
fig. g:A view of the finished plaster before color, from back and side, also the caulk before paint.


Applying Finish Coat
This third and final plaster coat is the one in which you want to achieve smooth lines that aesthetically flowing contours. To begin, I took scissors and cut any pieces of straw sticking out so they would be less than 1/2 inch long. Then came the water bath. The plaster thickness to go for here is between 1/8 to 1/4 inch, and straw should be no longer than 1 inch in this layer [10]; requiring you to amend the plaster recipe to that effect. Be sure to cover all exposed straw with plaster. Do not key this coat as no more layers of plaster will go over it. Apply like you did the previous plaster coat, with a trowel working over, then up; however take extra care to ensure high beauty as you work to smooth out rough passages and level off the surface as best you can. Remember though, part of the beauty of earthen plaster is the non-uniform shape. Don't attempt straight lines or absolutely uniform surface depth; instead, aim to create pleasantly flowing wave-like lines and surfaces. A sponge and bucket of water can be used carefully to smooth down particularly troublesome rough spots and achieve the harmoniously flowing effect we're aiming for here.
Applying Color Coat
Like the slip coat the color coat is applied with a brush and roller. I chose a lime-wash in order to use materials already at hand, and once again reduce extraneous variables from the experimental aspect of the project. Because I wanted uniform color this layer was not done in four strips but several continuous coats covering the entire surface. Work from top to bottom this time so that you can smooth over drips as you progress. Most people will probably need to use masking tape to protect the edges. With my painting experience I managed with a brush, using a bucket of water and clean rags in case I slipped up. Consistency of the lime-wash should be about that of whole milk [11]. Make sure it is well mixed so that pigments will distribute evenly throughout. Also, experiment ahead of time to get your colors right; lime bleaches out color so you probably won't get darker than a pastel, remember that the lime-wash will dry lighter than when it is wet. Be sure to use drop-cloths and protective gear as lime-wash will likely spray off the roller as you paint. Thickness of this coat will likely be less than 1/8 or even 1/16 an inch [12], don't worry as long as you cover all the area as you paint, be sure to dampen the surface with water first. You'll be able to see as you work whether or not you are getting full coverage, if not, more paint, just watch for runs. I used three coats because I had enough wash. I think two would have worked nearly as well, but just one coat did not blend my four plaster strips together color-wise; a surface with a uniform plaster could probably work with just one coat if you were not concerned with matching an exact color, (a washed or stained-type effect).
-
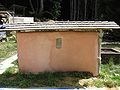
fig. a:Note how one color coat doesn't cover well over my multi-colored surface. Also, the wall is dryer on the left, note how much the lime-washes fade to pastel as they dry.
-
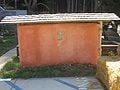
fig. b:After the second color coat still patchy, (this is a darker, still wet photo).
-
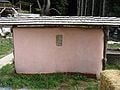
fig. c:Third coat, all dry so quite lime-bleached, but looks smooth and more solid; can't see through the color, the washed-out effect, nearly as much.


Important Note on Working with Lime
Lime plasters and washes require constant moisture over at least a few days, preferably a few weeks, to cure properly . To this end it is necessary to mist plastered and washed areas several times a day after application. This I returned between two and three times a day for three weeks to achieve; which together with Arcata mists ought to have amounted to a fair cure. At least a couple days, but up to a couple months of such a treatment will improve the lime-cure [13].
Costs
Equipment & Training
| Item and notes | Cost |
|---|---|
| 1 gallon apple cider vinegar | $3 |
| plastic float with sponge blade | $5 |
| trowel | $4 |
| plastic mud pan | $5 |
| 2 3 inch brushes | $8 |
| chemical resistant gloves | $9 |
| notched trowel | $4 |
| notched spreader | $1 |
| construction sponge | $5 |
| nice 3 inch brush for finish | $15 |
| 35 gal metal trash bin | $26 |
| organic wheat flower | $4 |
| thrift store sheets for drop cloths | $8 |
| pigments from ceramics shop | $12 |
| paint roller and 3/4 inch nap cover | donated by CCAT |
| straw bale | donated by Miles Danforth |
| 4-5 ripped bags type S hydrated lime | donated by Hensel's Supply, Eureka, CA |
| about 50 gal mixed grade construction sand | donated by Piersons Lumber, Eureka, CA |
| about 25 gal manure | donated |
| protective goggles | donated by CCAT |
| burlap, mason jars, 5 gal buckets, plastic window, screws and driver, rags, hand drill, shovels | donated by CCAT |
| chemical resistant cover-alls and jacket, previously owned, bought used (damaged from rough wear but still serviceable) | $35 |
| heavy work boots- previously owned (nearly destroyed during project) | $115 |
| gasoline for multiple supply runs | $15 |
| Sustainable Nations Natural Plaster and Paint workshops | $40 |
| Total | $313 |
Thanks also to the CCAT garden which I was invited to graze from.
Labor Hours
Construction was just over a months work for one person, not counting all the during semester research and experimentation. Many days were short because it took about 5 hours to apply a coat to one side, no time to do the rest until next day, you need to plan logical stopping places. Much time was used measuring and hand mixing plasters, etc. A cement mixer could have worked wonders, the hand drill mixer lacked enough torque to move the heavy mixes, mixing was therefor heavy bent over back taxing labor. Also spent a lot of time cleaning lime off my protective gear, stayed wet a lot and had a cold about half the project. Just doing simple prep tasks like cutting straw, cooking wheat-paste in my kitchen, and screening clay ate up days of time for one person. There were also the many 'quick' runs across town to mist the lime surfaces, following for weeks after 'completion'. Since I lacked money for gas these runs were not usually quick, though I might just be on site for 5 minutes or so. I figure it's real hard to figure how long this would take with a proper mixer and a few extra bodies, efficiencies would improve dramatically, I therefor don't feel my experience merits much discussion by way of timelines for it's too hard to guess-timate if 'done right'. Unless you are a die-hard do-it-yourselfer, take my advice and apply the team-work I could only spend my days imagining. 1 person mixing, 1 cutting straw or measuring mixes, 2 plastering would have created comparatively awesome efficiencies, for just one alternate labor formula. Having had a person with truck tasked with supply runs and off-site tasks like wheat paste cooking by itself would have saved a work week, possibly more. Didn't help that Arcata weather is often uncooperative, though as an uncontrollable factor the weather is neither here-nor-there; still, one more thing to keep in mind if planning a similar project.
Discussion
This project was an odd mix of science experiment and construction project, either end would have profited without the other, although then we'd be looking at a radically different project. Timeliness could have been seriously reduced had any teamwork, and assembly line methods been allowed to come into play. If more lime-wash is used on campus, I'd like to see a student take the materials into a lab where more exact measurements can be achieved, in order to match the color right. I feel even though I was very close, it was probably by feel as much by measurement and so unrepeatable without good luck; this should be improved upon. Similarly, it is impossible to vouch for exactly how dense the slaked lime-wash was, and if these recipes are improved upon such precision might be important.
Did the project meet its requirements? Hard to say as the number one criteria was durability and only time will tell. I'm seriously curious about how the whole thing holds up in the future. It did use all natural and some local materials, which is good. It is not too difficult to be done by an amateur, good again. Seems expensive but I really don't know the cost of doing a similar amount of say, stucco. Definitely time consuming but much of that was in the experimental phase, and the larger chunk of actual construction could have been much faster with teamwork. I think aesthetically it gets high marks, so good there. It also more-or-less met the technical requirement, my perfectionism aside, of matching the color and having a working reveal window. So I'd have to say over-all yes, requirements met, but again, durability is key and only time will tell.
References
Thanks to Pennelys Goodshield of Sustainable Nations for invaluable training and advice, as well as to, Myles Danforth and Lonny Grafman.
- ↑ Pennelys Goodshield
- ↑ Guelberth, Cedar Rose & Dan Chiras. The Natural Plaster Book: Earthen, Lime, and Gypsum Plasters for Natural Homes. Gabriola Island, BC, Canada: New Society Publishers, 2003.Of all the books I read through, only one did I find myself drawn back to over and again.... This book seemed to have, compared to others, the most agreed upon and middle-of-the-road recipes; I derived all my basic formulas from it and barely scratched the surface.
- ↑ Guelberth, Cedar Rose & Dan Chiras. The Natural Plaster Book: Earthen, Lime, and Gypsum Plasters for Natural Homes. Gabriola Island, BC, Canada: New Society Publishers, 2003.Of all the books I read through, only one did I find myself drawn back to over and again.... This book seemed to have, compared to others, the most agreed upon and middle-of-the-road recipes; I derived all my basic formulas from it and barely scratched the surface.
- ↑ Pennelys Goodshield
- ↑ "Plastering with Natural Hydraulic Lime (The How To Guide)"; Andrew Morrison; Straw Bale Innovations, LLC; 7803 Sterling Creek Road, Jacksonville, OR 97530. 2007. A video, this is 'how-to' info for the visual learners.
- ↑ http://www.jtbaker.com/msds/englishhtml/c0462.htm
- ↑ Guelberth, Cedar Rose & Dan Chiras. The Natural Plaster Book: Earthen, Lime, and Gypsum Plasters for Natural Homes. Gabriola Island, BC, Canada: New Society Publishers, 2003.Of all the books I read through, only one did I find myself drawn back to over and again.... This book seemed to have, compared to others, the most agreed upon and middle-of-the-road recipes; I derived all my basic formulas from it and barely scratched the surface.
- ↑ Guelberth, Cedar Rose & Dan Chiras. The Natural Plaster Book: Earthen, Lime, and Gypsum Plasters for Natural Homes. Gabriola Island, BC, Canada: New Society Publishers, 2003.Of all the books I read through, only one did I find myself drawn back to over and again.... This book seemed to have, compared to others, the most agreed upon and middle-of-the-road recipes; I derived all my basic formulas from it and barely scratched the surface.
- ↑ Guelberth, Cedar Rose & Dan Chiras. The Natural Plaster Book: Earthen, Lime, and Gypsum Plasters for Natural Homes. Gabriola Island, BC, Canada: New Society Publishers, 2003.Of all the books I read through, only one did I find myself drawn back to over and again.... This book seemed to have, compared to others, the most agreed upon and middle-of-the-road recipes; I derived all my basic formulas from it and barely scratched the surface.
- ↑ Guelberth, Cedar Rose & Dan Chiras. The Natural Plaster Book: Earthen, Lime, and Gypsum Plasters for Natural Homes. Gabriola Island, BC, Canada: New Society Publishers, 2003.Of all the books I read through, only one did I find myself drawn back to over and again.... This book seemed to have, compared to others, the most agreed upon and middle-of-the-road recipes; I derived all my basic formulas from it and barely scratched the surface.
- ↑ Guelberth, Cedar Rose & Dan Chiras. The Natural Plaster Book: Earthen, Lime, and Gypsum Plasters for Natural Homes. Gabriola Island, BC, Canada: New Society Publishers, 2003.Of all the books I read through, only one did I find myself drawn back to over and again.... This book seemed to have, compared to others, the most agreed upon and middle-of-the-road recipes; I derived all my basic formulas from it and barely scratched the surface.
- ↑ Guelberth, Cedar Rose & Dan Chiras. The Natural Plaster Book: Earthen, Lime, and Gypsum Plasters for Natural Homes. Gabriola Island, BC, Canada: New Society Publishers, 2003.Of all the books I read through, only one did I find myself drawn back to over and again.... This book seemed to have, compared to others, the most agreed upon and middle-of-the-road recipes; I derived all my basic formulas from it and barely scratched the surface.
- ↑ Guelberth, Cedar Rose & Dan Chiras. The Natural Plaster Book: Earthen, Lime, and Gypsum Plasters for Natural Homes. Gabriola Island, BC, Canada: New Society Publishers, 2003.Of all the books I read through, only one did I find myself drawn back to over and again.... This book seemed to have, compared to others, the most agreed upon and middle-of-the-road recipes; I derived all my basic formulas from it and barely scratched the surface.
Contact: K. Scott Perry (707) 367-2328, kscottperry@yahoo.com, serious inquiries only please.