
All living roofs encompass a growing medium and vegetation into their design. They also need to encompass a water proof barrier and sometimes a root proof barrier as well. Living roofs can greatly enhance the aesthetics of their surroundings by providing a green space where a traditional roof would not while at the same time providing many environmental benefits. The plants in a living roof can also help reduce the amount of rain water runoff by absorbing the water into the growing medium and roots. Living roof also provide an environment for micro-organisms. They provide extra garden space and help sequester carbon through photosynthesis. A living roof can be built on any scale large or small and can help create a relaxing and natural atmosphere.
This project encompassed dismantling a dysfunctional living roof and building a new one in its place. The project consisted of two parts. The first part was to take down the old living roof which was only a few months old but had many problems. The most critical problem was that the living roof was leaking water. As I was taking it apart I noticed that this living roof had a solid foundation but its flooring was made out of cut redwood branches. Above the redwood branches a layer of burlap and straw was laid to try and create a flat surface. On top of that a water proof layer of plastic was laid which covered the bottom of the roof and went to the top of the siding. The siding was made of strips of bamboo. The bamboo had already begun to rot but the reason this roof was leaking was because the redwood branches were sticking out and inch pasted the bamboo siding. Water was hitting the redwood branches and seeping along them until it hit the burlap and hay. The burlap and hay absorbed the water like a sponge and dripped from its lowest point. The drips were hitting the cob oven below and actually damaging the it. Another problem was that the plants were not growing in the soil because it was almost pure clay. So I replaced the old living roof with a new one that is much stronger, wider, longer, and more protective of the cob oven. This new roof is not as steep as the last one but still has an adequate angle to ensure excess water will drain. The layer of soil is much shallower so the roof won't become as heavy during the rainy season. This living roof is built out of recycled materials and will last much longer then the previous one. This living roof is aesthetically pleasing and was planted in a manner that will assure its vegetation takes to the soil and that the roots from the vegetation hold the soil in place while absorbing water from it.
Materials


- Note that all the wood and some of the screws used for this project was recycled. That means it was previously used in another structure. Some of the wood came from a dismantled firewood shed and the rest came from CCAT's recycled wood pile.
- 3- 7 foot 2 inch 4*4s
- 7- 6 foot 4 inch 2*4s (two of which were cut into various sizes to fill in the rafters.)
- 2- 7 foot 2 inch 2*6s* 1- 6 foot 4 inch 2*6
- 2- 7 foot 2 inch 1*4
- 1- 6 foot 4 inch 1*4
- The equivalent of 1 and a half pieces of plywood that were found cut into various dimensions.
- 4 quick ties (to secure the structure to the foundation and retaining wall)
- Two handfuls of cement (to fill in the cinder blocks in the retaining wall)
- An assortment of cement and wood screws
- 1- 7 foot by 8.5 foot section of rubber pond liner.
- 1- 1 foot by 6 foot 4 inch piece of scrap hog wire left over from an iguana cage
- 2 wheel barrels full of gravel
- 4 and 1/2 trash cans full of soil
- 8 dozen bare root Tri-Star strawberry plants
Site
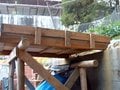
This living roof was built on the patio of Humboldt States Campus Center for Appropriate Technology. It was built directly above a cob oven to protect the cob oven from rain. Click here to view CCAT's home web page
Methods
- I dug a trench on the uphill side of the retaining wall where the living roof will drain.
- Dismantled the leaking living roof and found materials for the construction of a new living roof.
- I chipped away the rocks that were attached to the top of the retaining wall with a cob mortar to create a flat surface.
- I filled in the holes of four cinder bocks of the retaining wall with cement in the spot where I was planning on mounting the roofs support beams. I did this to create a nice flat surface that I could anchor the support beams into.
- Placed two 4*4 support beams on top of the existing foundation and a retaining wall.
- I carefully measured the distance in-between the support beams to make sure that they were perfectly parallel.
- Screwed support beams to the existing foundation and to the cement retaining wall with four metal quick ties.
- Screwed 7 rafters perpendicular that connected the support beams.
- Filled in-between the rafters with 2*4s.
- Fitted and screwed plywood on top of the rafters.
- Attached 2*6's standing on their sides for siding except for the lowest end of the roof where a 2*4 was used instead. But this 2*4 was raised of the plywood until it was flush with the 2*6's in order to allow for excess water to drain.
- The pond liner was cut a foot wider and placed on the roof so that it totally covered the roof, siding and had enough room to hang into the trench I dug on the low side of the roof.
- I used my feet and some soil to make sure that the pond liner was flat against the wood especially in the corners. This ensured that it wouldn't stretch when I applied the soil on top of it.
- Then I screwed down 1*4's over the siding, leaving the pond liner to hang out in-between the siding and 1*4's on top of it. This secured the pond liner in place and made sure that it covered the entire length and width of the living roof including the siding.
- Then I got a raiser blade and trimmed the pond liner so that it was flush with the edge of the siding.
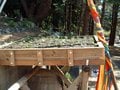
- Then I carefully cut, folded in half, and stapled a piece of hog wire to the 2*4 on the lower end of the roof. This hog wire filled in the gap in-between the pond liner and the 2*4 so that water could drain out the lower end of the roof but soil could not.
- One inch of gravel was placed on the pond liner so that water that seeped below the soil level would drain to the lower end of the roof and out the drainage gap.
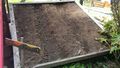
- Soil was then placed on top gravel. The soil was placed evenly through out the entire roof and was about five inches thick.
- I planted 8 dozen ever bearing Tri-Star strawberries evenly through out the soil and watered them in.
- I noticed that the roof was slightly bending in the middle so I got another support beam 4*4 and pounded it parallel the two support beams on either side of the roof. This third support was pounded right below the plywood. It was supported just like the other support beams by the existing foundation on the high side and the retaining wall on the low side. But this third support beam was positioned in the center of the roof with the purpose of stopping the roof form bending downward. It was pounded in with a sludge hammer while two people pushed upward on the bottom of the roof. It worked great. This roof is very sturdy.
- Finally I filled in the trench on the far side of the retaining wall with enough soil to pin down that edge of the pond liner to the soil on the far side of the retaining wall. This ensures that the living roof will drain on the far side of that wall.
Final Design and Construction Gallery
-
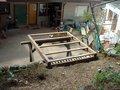
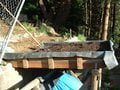
Support beams and rafters are in place and secure
-
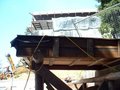
Stainless steel quick tie connects the high end of the support beam to the existing foundation
-
Quick tie also secures the low end of the support beam to the cement retaining wall
-
West side view before side supports were added
-
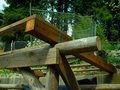
Side supports are placed where the rafters connect to support beams
-
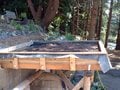
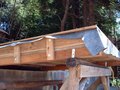
Corner view of the flat surface and siding
-
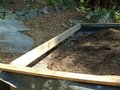
Ready for the pond liner
-
Some of the tools that were used
-

Pond liner was cut to be slightly larger then needed to make sure it would not be to small
-

Adding the water proof barrier
-
Adjusting the pond liner
-
Making sure that at least six inches of excess pond liner was present on every side in case it moved when the soil was applied
-
Adding soil to hold down the pond liner
-

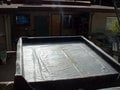
Pond liner is in place. Please note that all of this soil was later removed in order to apply the layer of gravel for better drainage
-
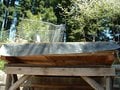
Screwing down 1*4 boards on top of the pond liner to secure it to the top of the siding
-
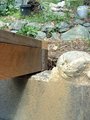
Notice the gap created on the low end of the roof for drainage. This gap was filled with hog wire to stop soil from spilling out
-
Excess pond liner on the high end of the roof
-
Excess pond liner on the corner
-
Trimming the pond liner flush with the outside edge of the siding. Notice that the 1*4 overhangs the siding so that rainwater cannot get in between the pond liner and recycled plywood.
-
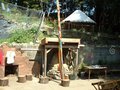
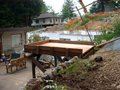
View of living roof from CCAT's back door
-
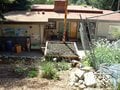
Side view of finished living roof
-

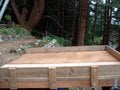
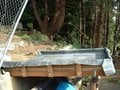
View of the low end of the living roof. Notice the drainage gap and the hog wire that is keeping the soil from falling out. Also the pond liner is buried in the ground so that the runoff from the living roof won't somehow flow down the wrong side of the retaining wall and come in contact with the cob oven.
-
View of the living roof from above
-
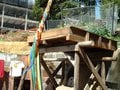
Notice the third support beam giving support to the middle


Errors to Avoid

- Make sure you leave adequate overhang in your design.
- Don't use perlight for drainage.
- Don't use clay based soil.
Commons
- Pond liner is a great waterproof barrier.
- Make sure your foundation can handle the weight of your soil during the rainy season.
- Strawberries do great in shallow soil.
- Build your foundation stronger then you think it needs to be.
- Make sure there are no seems in your waterproof barrier.
Conclusion

This living roof is just like any other appropriate technology project in the sense that it was cheap to build but it took a lot of time to construct. The total cost was just about $80.00 USD, but it took over seventy hours to gather materials and build, much longer than a similar sized traditional roof top. But the reward is what counts. The reward of this living roof is a new addition to CCATs collection of alternative constructions. This living roof also enhances their patio and landscape while providing environmental benefits at the same time. Remember that this living roof was built almost entirely out of recycled materials, thus helping to reduce the amount of virgin resources extracted from the earth. Don't forget the annual harvest of strawberries to fill CCAT's pedal powered blender throughout the summer months. What a sweet addition to CCAT's habitat.
Update October 2013
The CCAT living roof project seems to be still in tact. CCAT denizens reported no leaks or damages to its foundation and the living roof is continuing to perform as a good shelter for the Cob oven underneath. The living roof is continuing to serve as a good place to grow vegetables, and a variety of greens were recently harvested from its roof. Although its yield was not of commercial stature, the living roof project showed significance to uphold a viable representation of environmental beneficiary possibilities. Though there are no vegetables shown in the photograph, the The CCAT association has continued to and plans to plant more vegetation in the upcoming seasons to properly utilize its potential. There have been no issues with the roof, and no necessary maintenance is scheduled due to the lack of issues.
-
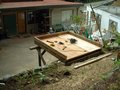
Overview of CCAT living roof
-
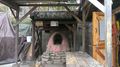
Underside view of living roof, as shelter over Cob Oven


Update October 2014
The roof is still in good shape. It is being used still with a greener looking picture this time around.
