
I have always been curious about working with natural building and earthen materials. Then as fate would have it I was given the opportunity at Cal Poly Humboldt, located in Arcata, CA, in an Engineering course called Appropriate Technology: 305. For Engineering 305 I had to choose a semester project. The co-directors of the Campus Center for Appropriate Technology were just finishing the completion of a strawbale[1] wall and needed someone to plaster the wall. Thus began my sojourn into the use of earthen plaster.
How Does It Work?
What is earthen plaster? How do you make and use earthen plaster? Earthen plaster, also known as natural plaster, is a plaster made from materials found in your own backyard, or in your neighbor's yard or elsewhere locally. It usually consists of clay, sand, and a fiber, for example, straw, manure, paper pulp, etc. For my project I used a plaster recipe of clay, paper pulp, sand and cow manure.

- The recipe I used for this project goes as follows
1 part clay 2 parts manure 3 parts sand 4 parts paper pulp
A suggestion from my earthen construction mentor Peggy to me is, anytime you are going to mix plaster it's best to put the recipe in plain view. That way no one forgets and adds too much of something and not enough of another. I made this mistake once and it wasn't much fun.
Tests
First a number of test were conducted to find the best mixture of plaster for this project. All of these materials were found locally in Arcata, California. The clay was found on HSU campus and the sand was found by a river. The paper for the pulp came form the Arcata Community Recycling Center and the cow manure came form the local farms. All of the materials were free. The importance of each material goes as follows:
Clay
an adhesive or natural glue, it is needed to bind the materials together.
Sand
a geometric structural component; it gives strength to the mixture. River sand works best because it has rough edges that gives the sand a greater ability to hold different together.
Paper pulp
a cohesive fiber that allows the plaster to remain strong because of the "lignified vessel elements that hold water are rigid". This helps with cracking.
Cow Manure
an additional fiber that helps with water resistance while allowing the plaster to breath.
Clay Slip
After the best mixture of plaster was chosen our next step was to begin the application of a clay slip, also known as an aliz, to the straw bale wall. The clay slip acts as an adhesive to the straw bale wall and the plaster. In order for the clay slip to function as it is meant to, a few things need to take place. First, the bales need to be sprayed down with water until the wall looks as though it is "sweating". Its best to apply the slip by working it into the wall. By this I mean, the clay slip needs to be kneaded into the wall, similar to a cat kneading a blanket. The straw bale wall is not smooth, the clay slip equally should not look smooth, rather it should look bumpy. Next the clay slip needs to dry, for at least three days to a week. Remember to water the wall again in order to ensure that the clay does not dry too quickly. After the clay slip is applied and allowed to dry, plaster can be mixed and applied to the wall.
-
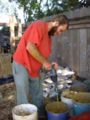
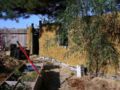
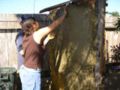
Jeff mixing the clay slip
-
putting the clay slip on the wall
-
wall covered with the slip
-
-
done


Burlap Sack
A trick to smooth out corners and fill in caps between the wood beams and the wall is to use burlap saks. The sacks were covered in the clay slip, nailed into the wood post, folded over and then smoothed onto the wall.


From my experience the burlap sacks turned out to be more frustrating then helpful. When I was applying the plaster the burlap seemed to hinder rather than help. By this I mean, the plaster would not stay on the burlap, it kept sliding off. This did not happen in every spot the burlap had been nailed, but it happen enough to frustrate me.
Next, the plaster was put onto the wall by simply taking a hand full, throwing it onto the wall and smoothing it out using a trough. After many return visits to the wall and more help from friends, the wall was completed; at least the plastering was completed.
Natural Paint
Natural paint is mixed without the use of harsh chemicals and does not act as a vapor barrier. Natural paint can consist of milk curds, lime, sand, clay, flour paste, etc. Once again a group was gathered and a number of tests were done to find different mixtures. For this project I used a recipe mixture that was a combination of flour paste, clay, sand, and water. Add a natural pigment, such as Yellow Oxide or in my case I used Spanish Red Iron. The recipe I chose to use came from a nice woman who had painter the interior of home with the ingredients list below.
- Jenny's Natural Paint Recipe
3 parts powdered clay (potters clay)
3 parts sand (fine)
6 cups flour paste
1 gallon water
I changed the ingredients of the recipe because I wanted to use the materials I had available to me. I used the same clay and sand that I used for the plaster.
My Natural Paint Recipe (modified Jenny's version)
3 parts wet clay
3 parts river sand
6 cups flour paste
1 gallon water
- For the flour paste
- boil six (6) parts water
- bring to a rolling boil
- add 1 part flour to 2 parts water
- whisk until there are no lumps
- add the flour/water mixture to the boiled water and turn off stove
- should thicken to look like glue
- add 1-2 Tablespoons borax to prevent rot
There were a few cracks in my wall, which I have been told is to be expected. In order to fill in the gaps, I could have applied another coat of plaster or simply reapply the paint. Since the caps were rather large in some spots, I made an additional batch of paint that had extra sand mixed into it. I used this batch of paint with the extra sand to fill in the gaps in the plaster, the sand goes into the cracks, hardens in the gaps, acting as filler. Since it is the same color as the paint it was rather easy to then paint over with another layer.
The End
After a semester of working on this project, I was (finally) finished with painting on December 4th Year? -Lonny 04:07, 23 April 2007 (PDT). This experience was rewarding, educational, and fun! I was able to tap into the culture of Appropriate Technology through the medium of earthen plaster and natural paint. My curiosity has been more than piqued, and it has certainly not been satisfied. Not only was this a rewarding experience for me, additionally it offered an opportunity for many. From Engineering 305 to the CCAT Co-directors to my friend Dania, all of us (I hope) were able to acquire some kind of knowledge and practical experience. I am thankful for the help from my classmates and friends. I would encourage any and all whom are interested in working with natural materials to pursuer their interest - if for no other reason than, it's fun to get dirty!!!
-
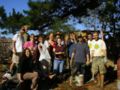
Engineering 305
-
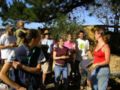
Engineering 305
-
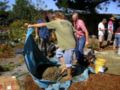
Mixing it up
-
Spreading the plaster
-
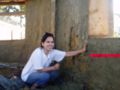
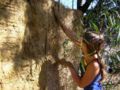
Dania fixing a rough spot


Bottoms Strawbale Earthen Plaster Update April 2007
The Strawbale wall was updated in April 2007. The goal of the April update to the wall was to finish applying a new coat of natural paint and to sand away the excess cob/paint that had collected on the wood frames around the walls windows. Other updates that have occurred to the wall since its original completed were noted as well. The following is what was noted and completed on the wall since its completion:
- Since its completion, additions to the wall include a new coat of paint and new cob used to fill in cracks and gaps near the roof and alongside the windows (see fig. 1). Unfortunately the cob that was added most recently appears to be of low quality. It peels easily from the wall and has many cracks in it (this is the same cob in fig 1.). This lower quality cob is located mostly near the top of the wall between the roof and windows (see concerns section for more info).
- New paint was recently applied to the wall to replace the old paint (see figs. 2, 3). The original paint recipe found on this page was used. Spots where new cob was applied have also been painted. A small section on the back of the wall has been left unpainted in order to show the development of the wall and its original texture without paint. The unpainted section of the wall was left intentionally to show off the different styles of cob used by different groups working on the wall since its conception (see figure 4).
-
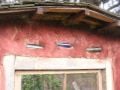
Figure 1: Paint on New Cob
-
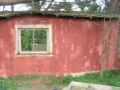
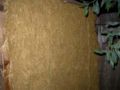
Figure 2: Painted Wall
-
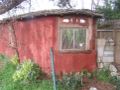
Figure 3: Painted Wall 2
-
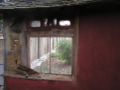
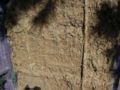
Figure 4: Unpainted Section
-
Figure 5: Unpainted Section 2
-

Figure 6: Brittle Cob


- The wood around the windows and along the boarders of the wall was scraped and sanded to remove paint and cob that had become smeared on it.
- A small section near the roof on the back of the wall was left unpainted. See figure 5.
Concerns
While the wall is in great condition as of the writing of this update, there are a few concerns that were noted during the repainting. The concerns are as follows:
- As noted earlier, the most recent batch of cob is fairly poor and brittle and will probably have to be replaced sooner than would be hoped. The cob has been painted recently, which hopefully will help protect it from the weather and increase its lifespan.
- A section of the good and bad cob was left unpainted to show the different stages of the wall. The bad cob is viewable around the edges of the original cob in figure 6.
Future Plans
After repainting the wall a few additional touchups were planned for the future, otherwise the whole wall has been repainted.