(→Design) |
(→Design) |
||
| Line 20: | Line 20: | ||
File:Waterheater.JPG|Image 3 | File:Waterheater.JPG|Image 3 | ||
File:HeatexchangeImage.jpg | File:HeatexchangeImage.jpg|Image 4 | ||
</gallery> | </gallery> | ||
Image 1. This photo shows the 8 separate loops that flow directly to the heat exchanger. Then it goes to the ½ HP pump to go back to the driveway. It also shows the pipes coming from the water heater that flows to the heat exchanger and back through the ½ HP pump. Underneath the evaporator is the plate heat exchanger. | Image 1. This photo shows the 8 separate loops that flow directly to the heat exchanger. Then it goes to the ½ HP pump to go back to the driveway. It also shows the pipes coming from the water heater that flows to the heat exchanger and back through the ½ HP pump. Underneath the evaporator is the plate heat exchanger. | ||
| Line 27: | Line 27: | ||
Image 3.The water in the tankless water heater is pumped from this box to the heat exchanger then the cold water get pumped back to the water heater creating a cycle. | Image 3.The water in the tankless water heater is pumped from this box to the heat exchanger then the cold water get pumped back to the water heater creating a cycle. | ||
Image 4. Another view | |||
=== Issues === | === Issues === | ||
Revision as of 18:40, 28 April 2015

Design
The heated drive way has 2 closed loops. One loop has water the other loop has glycol (antifreeze type stuff that has a very very low freezing point). The water loop goes through a water heater or boiler and a small pump of1/2 HP pushes the hot water through a heat exchanger. Another small pump pushes the glycol through the heat exchanger but the water and glycol do not mix because they are separated by tubes or plates creating chambers. As the hot water passes through the exchanger it warms the glycol and the water gets cooled. The water and glycol continue the heating and cooling exchange until they reach the desired temperature. The warm glycol exchanges its heat with the icy concrete driveway which warms and melts the snow.
- Sample gallery
-
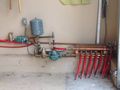
Image 1
-
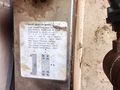
Image 2
-
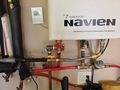
Image 3
-
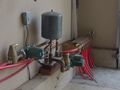
Image 4


Image 1. This photo shows the 8 separate loops that flow directly to the heat exchanger. Then it goes to the ½ HP pump to go back to the driveway. It also shows the pipes coming from the water heater that flows to the heat exchanger and back through the ½ HP pump. Underneath the evaporator is the plate heat exchanger.
Image 2. This is a 20 plate heat exchanger made of steel. It is 12”X4 ¼” X 2” X9 ¾” x 2 1/8”. The max pressure is 435 psi. its max Temperature 437 of. and minimum temperature of -256 of.
Image 3.The water in the tankless water heater is pumped from this box to the heat exchanger then the cold water get pumped back to the water heater creating a cycle.
Image 4. Another view
Issues
The major issue with this project was the installation of 800 ft. tube under the driveway concrete which the glycol would travel through. The issue with too much tube in one continuous loop is that it causes friction. There are two way to fix the issue, one is to install a larger pump and the other is to break the tubes into smaller 8 loops about 100 ft. long each. The project went with 8 smaller 100 ft. long loops because the home owner didn’t want a larger and louder pump. Think about using your mouth as a small pump blowing water thru a garden hose. Easy to blow water out of a 25 ft hose, harder to blow water thru a 100 ft hose, impossible to blow water through 800 ft of hose! So we intercepted the tubes along one side of the driveway and broke the one loop into 8 loops of approximately 100 ft each. The 8 loops come together into a manifold just before they go into the heat exchanger.
Discussion
This current system is hooked up to the grid for power. The next step for this system to be more efficient is to either connect the water heater to solar power or to a Heat_pump for lower operations cost.
Conclusions
Hire a contractor that knows what he is doing. The contractor that first installed the system did not do his homework and installed too long of tubing under the drive way. And second more knowledgeable contractor had to come in after concrete was poured and had to demo part of the brand new driveway to get access to the tubes to cut them to proper length and into 8 new loops. Then had to repair the concrete driveway.