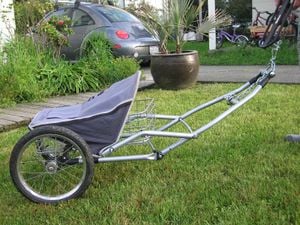
I decided to construct a bike trailer for personal use. Since I am an Arcata resident, I find to easy and enjoyable to bike everywhere except when I have to move around things that don't fit into by backpack. Thus, a bike trailer would be the logical solution to my problem. It will allow me to be self reliant. A rain flap will be incorporated into the design for usage in foul weather, since it tends to rain quite often here.
Project Requirements[edit | edit source]
Criteria[edit | edit source]
- Cost (less than 50 dollars)
- Weight (Weight=8)
- Simplicity (easier to assemble the better. Most inportantly, the easier to attach and take off the better)(Weight=8)
- Durability of the material (more rain proof the better) (Weight=7)
- Amount of movable parts (the less the better) (Weight=3)
- Availability of material locally (closer to Arcata the better) (Weight=5)
Proposed time line[edit | edit source]
- March 13, 09: Final project design completed
- March 15, 09: Finished buying all materials
- March 22, 09: Finished building the trailer, assembling all parts and attaching it to the bicycle
- March 30, 09: Finished all trouble shooting, final product complete
- April 16, 09: Finished writing the final report and complete the website
Design[edit | edit source]
An Instep baby jogger/stroller was found at the Arcata Angles of Hope thrift store. It was purchased for $ 20.00. The stroller was disassembled and a bicycle trailer was constructed from the parts.
The tongue of the trailer:
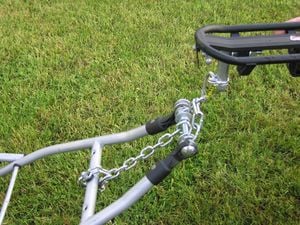
The front portion of the stroller originally holding the front wheel was converted into the front portion of the trailer "tongue" that hooks onto the rear bike rack (figure 1).
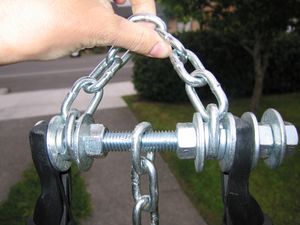
I took the front wheel bracket and installed a 6inch by 5/8ths inch bolt to it. Washers were used to hold the bolt in place. Then a 1 1/4th inch chain was slipped onto the bolt and help in place by 4 washers and 2 nuts. So there are 6 total washers, to brace the towing chain. 4 nuts total were used (Figure 2).
Then a safety chain was added from the shaft of the bolt to the brace of the frame (figure 1). The chain is held in place by a bolt screwed through the brace. Rubber washers were placed between the brace and the chain, and then a washer and then a nut were added to secure it in place (figure 1).
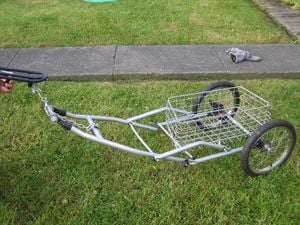
The frame leading form the rear axle to the tongue was already attached, To turn it into the trailer, it was flipped upside-down with the wheels remaining attached. Then a supporting "L" shaped beam was a added to fix the position of the tongue and frame (Figure 3). First holes were drilled with a high speed drill bit (1/4 inch).
Then a screw was inserted into the hole to hold it together. Rubber washers were placed between the screw head and the metal frame, and on the other side, between the metal frame and the nut holding the screw on.
The basket was attached to the frame via three u brackets, 1 in the front and two in the rear, and two hook support screws, one on either side (Figure 3).
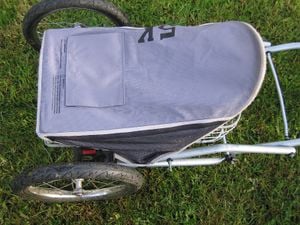
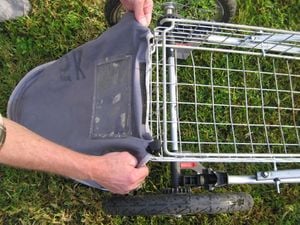
The rain fly from the jogger was taken and attached to the basket with four Velcro straps (Figures 4 and 5).
Costs[edit | edit source]
| Frame | Hardware |
|---|---|
| $50.00 | $25.00 |
I did not have to spend the entire budget. Only $20.00 was spent on the frame of the trailer. The entire $25.00 dollars was spent on the hardware. Hardware included bolts, nuts, washers and chain.
Conclusions[edit | edit source]
Overall, the project was a success. Converting the Instep baby jogger/stroller was strait forward. Only 2 holes needed to be drilled and there was no welding required. It can hold at least 200 pounds applied directly onto the basket area, while the trailer is static.
The design criteria were met. The trailer cost less than $ 50.00 out of pocket. Since the trailer was converted from the jogger, it is inherently light, durable and light. The Jogger was purchased at a local thrift store, so the material was available locally.
One disadvantage for this design is a rear bike rack is required to hitch the trailer onto, and the bike rack itself had to be modified for easy removal of the trailer.
When bicycling uphill pulling a load of 20 lbs, there was a lag between the trailer and the bike. Consequently the trailer pulls back slightly.I found that a simple bungie cord eliminates this problem. Unfortunately it caused the trailer to hit the rear tire, which was not previously a problem. Thus, I removed the bungie cord and am still trouble shooting ideas to prevent the lag.
The rain fly was tested by leaving the trailer outside for 12 hours while it was raining. An object was placed in the basket beneath the rain fly. When I checked the object after 12 hours, I found that it was not even damp. Thus, I will have to conclude the rain fly is a sucess.
Literature review[edit | edit source]
- Ayre, Michael. (1986). "The design of bicycle trailers." Intermediate Technology Publications Ltd. 9 King Street, London WC2 8HW, UK. - An excellent resource for a novice bike trailer beginner. Covers everything needed to design and build your own trailer including, design, hitch mechanism, load, frame, wheels, and use.
- Ballantine, Richard, Richard Grant. (1992). "Richards' ultimate bicycle book." Dorling Kindersley, INC. New York. - Refer to for basic bicycle maintenance and repair.
- Carrell, Al. (1973). "The super handyman's big bike book." Prentice –Hall Inc,. Englewood Cliffs, New Jersey. - Good reference for bike parts, tools and maintenance.
- Krieg, Martin. Help map the national bicycle greenway. Plans, Community bike cart designs and Instructables. http://www.bikeroute.com/WhyTrailer.php - In you follow the Community bike cart designs link you will be able to find several design plans for the different cart options. More plans can be found under the Instructables link.