|[[File:athena_hexagon_tools.JPG|thumb|400px|alt=Tools for assembly|Necessary tools.]]
{|class="wikitable" style="margin:auto"
|+Tools
|-
|Short piece of 1.75mm filament
|-
|1.5mm Hex key
|-
|}
|}
==Note==
* These instructions assume the Hexagon hot end has been partially assembled, i.e. the heat sink, aluminum heater block and nozzle have been assembled and tightened, and the cartridge heater set screw is in place. It is recommended that these components be tightened while HOT (>200 degrees C) to insure that they stay tight upon heating.
* These instructions assume the Hexagon hot end has been partially assembled, i.e. the heat sink, aluminum heater block and nozzle have been assembled and tightened, and the cartridge heater set screw is in place. It is recommended that these components be tightened while HOT (>200 degrees C) to insure that they stay tight upon heating.
* A 30W cartridge heater is generally used, but they come in different voltages. Insure that the voltage of the cartridge heater matches your printer power supply. A 24V power supply is now recommended.
* A 30W cartridge heater is generally used, but they come in different voltages. Insure that the voltage of the cartridge heater matches your printer power supply. A 24V power supply is now recommended.
==Procedure==
== Procedure ==
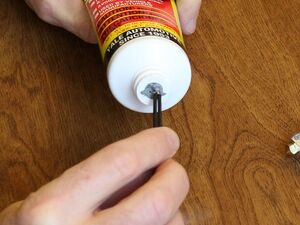
# [[File:athena_hexagon_thermister_mudding.JPG|thumb|right|Push muffler cement into the thermistor pocket in the aluminum heater block.]]Using the piece of filament, force muffler cement down into the thermistor pocket in the aluminum heater block.{{clear}}
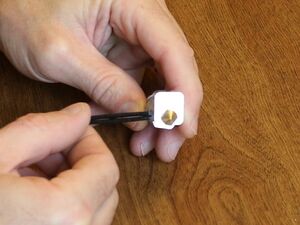
# [[File:athena_hexagon_insert_thermister.JPG|thumb|right|Insert wetted thermistor into its pocket.]]Wet the thermistor bead with muffler cement and insert it into its pocket in the aluminum heater block.{{clear}}
# [[File:Athena hexagon thermister mudding.JPG|thumb|Push muffler cement into the thermistor pocket in the aluminum heater block.]]Using the piece of filament, force muffler cement down into the thermistor pocket in the aluminum heater block.{{Clear}}
# [[File:Athena hexagon insert thermister.JPG|thumb|Insert wetted thermistor into its pocket.]]Wet the thermistor bead with muffler cement and insert it into its pocket in the aluminum heater block.{{Clear}}
# Set the hot end aside to let the muffler cement set for more than an hour.
# Set the hot end aside to let the muffler cement set for more than an hour.
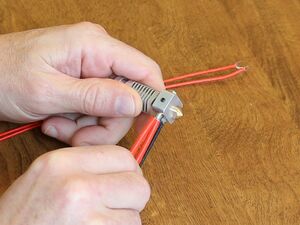
# [[File:athena_hexagon_insert_cartridge.JPG|thumb|right|Insert cartridge heater into its pocket.]]Insure the cartridge heater set screw is clear of the hole into which the heater slides. Insert the cartridge heater in the hole oriented so that the wires are parallel when looking down from the top to facilitate bending the wires up towards the top of the hot end. The wires should also exit from the same side the thermistor is on. Tighten the cartridge heater set screw with the 1.5mm hex key.{{clear}}
# [[File:Athena hexagon insert cartridge.JPG|thumb|Insert cartridge heater into its pocket.]]Insure the cartridge heater set screw is clear of the hole into which the heater slides. Insert the cartridge heater in the hole oriented so that the wires are parallel when looking down from the top to facilitate bending the wires up towards the top of the hot end. The wires should also exit from the same side the thermistor is on. Tighten the cartridge heater set screw with the 1.5mm hex key.{{Clear}}
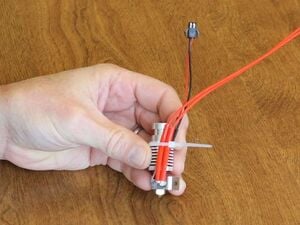
# [[File:athena_hexagon_secure_wires.JPG|thumb|right|Secure the wires to the heat sink.]]Bend the wires towards the entry of the hot end and secure in place with a small wire tie. Tighten the wire tie on the hexagonal portion just off the smooth round portion of the heat sink.{{clear}}
# [[File:Athena hexagon secure wires.JPG|thumb|Secure the wires to the heat sink.]]Bend the wires towards the entry of the hot end and secure in place with a small wire tie. Tighten the wire tie on the hexagonal portion just off the smooth round portion of the heat sink.{{Clear}}
[[File:athena_hexagon_completed_hot_end.JPG|thumb|400px|center|alt=Assembled Hexagon hot end|Assembled Hexagon hot end]]
These instructions assume the Hexagon hot end has been partially assembled, i.e. the heat sink, aluminum heater block and nozzle have been assembled and tightened, and the cartridge heater set screw is in place. It is recommended that these components be tightened while HOT (>200 degrees C) to insure that they stay tight upon heating.
A 30W cartridge heater is generally used, but they come in different voltages. Insure that the voltage of the cartridge heater matches your printer power supply. A 24V power supply is now recommended.
Push muffler cement into the thermistor pocket in the aluminum heater block.Using the piece of filament, force muffler cement down into the thermistor pocket in the aluminum heater block.
Insert wetted thermistor into its pocket.Wet the thermistor bead with muffler cement and insert it into its pocket in the aluminum heater block.
Set the hot end aside to let the muffler cement set for more than an hour.
Insert cartridge heater into its pocket.Insure the cartridge heater set screw is clear of the hole into which the heater slides. Insert the cartridge heater in the hole oriented so that the wires are parallel when looking down from the top to facilitate bending the wires up towards the top of the hot end. The wires should also exit from the same side the thermistor is on. Tighten the cartridge heater set screw with the 1.5mm hex key.
Secure the wires to the heat sink.Bend the wires towards the entry of the hot end and secure in place with a small wire tie. Tighten the wire tie on the hexagonal portion just off the smooth round portion of the heat sink.