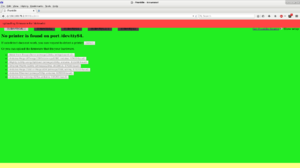
# [[File:Franklin_initial_screen.png|thumb|right|The initial setup screen will be displayed.]] Right click on http://192.168.76.2:8000/admin and select "Open Link in New Tab". Note "admin" at the end of the address - Franklin has different pages allowing different levels of access to features.{{clear}}
# [[File:Franklin_initial_screen.png|thumb|right|The initial setup screen will be displayed.]] Right click on http://192.168.76.2:8000/admin and select "Open Link in New Tab". Note "admin" at the end of the address - Franklin has different pages allowing different levels of access to features.{{clear}}
# [[File:Franklin_setup_checkbox.png|thumb|right|Activate setup check box.]] Activate the setup check box as shown in the picture.{{clear}}
# [[File:Franklin_setup_checkbox.png|thumb|right|Activate setup check box.]] Activate the setup check box as shown in the picture.{{clear}}
# [[File:Franklin_firmware_upload_initial.JPG|thumb|right|The firmware upload screen will be displayed.]] A screen filled with buttons will be displayed. Because Franklin works with multiple different machines and connections, a variety of choices is available.{{clear}}
# [[File:Franklin_firmware_upload_initial.png|thumb|right|The firmware upload screen will be displayed.]] A screen filled with buttons will be displayed. Because Franklin works with multiple different machines and connections, a variety of choices is available.{{clear}}
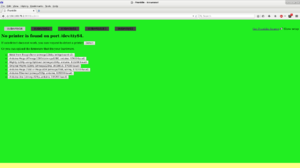
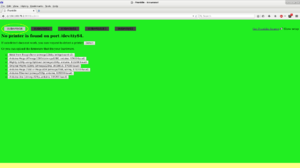
# [[File:Franklin_ttyS4.JPG|thumb|right|Select the port - ttyS4.]] Select the port over which communication will take place, for Athena with the second generation bridge board, it's ttyS4.{{clear}}
# [[File:Franklin_ttyS4.png|thumb|right|Select the port - ttyS4.]] Select the port over which communication will take place, for Athena with the second generation bridge board, it's ttyS4.{{clear}}
# [[File:Franklin_melzi_bbb.JPG|thumb|right|Select Melzi from Beaglebone.]] Select the "Melzi from Beaglebone..." button.{{clear}}
# [[File:Franklin_melzi_bbb.png|thumb|right|Select Melzi from Beaglebone.]] Select the "Melzi from Beaglebone..." button.{{clear}}
# [[File:Franklin_firmware_upload.JPG|thumb|right|Red bar across top indicating firmware is uploading.]] A red bar will appear at the top of the screen indicating that firmware is uploading.{{clear}}
# [[File:Franklin_firmware_upload.png|thumb|right|Red bar across top indicating firmware is uploading.]] A red bar will appear at the top of the screen indicating that firmware is uploading.{{clear}}
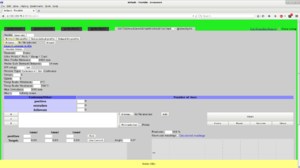
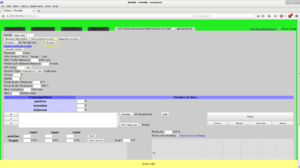
# [[File:Franklin_empty_profile.JPG|thumb|right|Firmware with no profile.]] Franklin will display its admin page with no profile for the newly attached printer. Profiles permit saving different settings for different functions (Athena can do a lot more than just print 3-D objects).{{clear}}
# [[File:Franklin_empty_profile.png|thumb|right|Firmware with no profile.]] Franklin will display its admin page with no profile for the newly attached printer. Profiles permit saving different settings for different functions (Athena can do a lot more than just print 3-D objects).{{clear}}
# Right click on https://raw.githubusercontent.com/mtu-most/franklin/master/calibrate/Athena.ini. Save the page (File>Save Page As...) to a logical and memorable location on your hard disk.{{clear}}
# Right click on https://raw.githubusercontent.com/mtu-most/franklin/master/calibrate/Athena.ini. Save the page (File>Save Page As...) to a logical and memorable location on your hard disk.{{clear}}
# [[File:Franklin_upload_profile.JPG|thumb|right|Click on the Browse button.]] Click on the Browse button (near top, right of screen) and navigate to the location of the just-saved profile. Select the profile and click Open.{{clear}}
# [[File:Franklin_upload_profile.png|thumb|right|Click on the Browse button.]] After downloading the initial profile from github, click on the Browse button (near top, right of screen) and navigate to the location of the just-saved profile. Select the profile and click Open.{{clear}}
# [[File:Franklin_upload_profile2.JPG|thumb|right|Click on the Upload button.]] Click the Upload button. Franklin will upload the profile and populate all the values for Athena's various settings.{{clear}}
# [[File:Franklin_upload_profile2.png|thumb|right|Click on the Upload button.]] Click the Upload button. Franklin will upload the profile and populate all the values for Athena's various settings.{{clear}}
'''The firmware is now loaded, but the printer is uncalibrated and will not print properly.''' Follow the calibration procedure, below, to complete setup.
==Calibration==
Revision as of 09:47, 3 May 2016
Franklin
Franklin is software designed to work with all 3-D personal manufacturing robots like Athena. It is both server and firmware, exposing all settings and controls on a web page served by the host computer, which in the case of Athena, is the Beaglebone Green.
Initial Setup
The initial setup screen will be displayed. Right click on http://192.168.76.2:8000/admin and select "Open Link in New Tab". Note "admin" at the end of the address - Franklin has different pages allowing different levels of access to features.
Activate setup check box. Activate the setup check box as shown in the picture.
The firmware upload screen will be displayed. A screen filled with buttons will be displayed. Because Franklin works with multiple different machines and connections, a variety of choices is available.
Select the port - ttyS4. Select the port over which communication will take place, for Athena with the second generation bridge board, it's ttyS4.
Select Melzi from Beaglebone. Select the "Melzi from Beaglebone..." button.
Red bar across top indicating firmware is uploading. A red bar will appear at the top of the screen indicating that firmware is uploading.
Firmware with no profile. Franklin will display its admin page with no profile for the newly attached printer. Profiles permit saving different settings for different functions (Athena can do a lot more than just print 3-D objects).
Click on the Browse button. After downloading the initial profile from github, click on the Browse button (near top, right of screen) and navigate to the location of the just-saved profile. Select the profile and click Open.
Click on the Upload button. Click the Upload button. Franklin will upload the profile and populate all the values for Athena's various settings.
The firmware is now loaded, but the printer is uncalibrated and will not print properly. Follow the calibration procedure, below, to complete setup.