
This photovoltaic project was designed to provide electricity to light a home at a natural building institute in Central Argentina. There will be six lightbulbs used, four inside the home and 2 outside of the home. This home will be constructed by Kleiwerks and the lighting will provide an example for the community to see how photovoltaic systems work, focusing on how energy is drawn from sunlight and converted into electricity to power their homes. This will be the first of many photovoltaic systems in this community.
This system is to operate loads at night or during cloudy weather. This PV systems will use batteries as a means of storing electrical energy. System loads can be powered by batteries at any time, regardless of weather. The size and configuration of a battery bank depends on the operating voltage and the amount of nighttime usage. The number of modules must be adequate to recharge the batteries during the day. It is very important not to let the batteries discharge or overcharge as either situation will damage them severely. A charge controller will disconnect the module from charging once the battery has fully loaded. Some charge controllers can also prevent the batteries from discharging too much by stopping the supply of power to the DC load. The DC system’s basic components include a PV module, charge controller, storage batteries, and the system's electrical load. Since you are using an inverter you should mention that the lights are AC. --Aonny
Method
Imperative to the success of building such a system, the following steps are specific to folks who are working on an international project as well as students whom are first-time photovoltaic builders. These steps are ones that I formulated during the process, but was unable to complete in this order during my project. When you read the discussion below, you will understand how my process was a little less organized and functional. Much of the time, I was trying to figure out what each part of the system was, how it worked, and why it was important. The material was foriegn to me, and so the majority of my work was spent reading and talking to others. If I would have had previous experience even putting together an engineering project such as this, my current project would be taken out in the following steps.
Steps:
- Who/What/Where/When/Why/How
- Who are you building the project for? I am building my project for a home located in San Luis del Monte de Oro, Argentina.
- What is required of the system? A system that can power four lightbulbs inside and two lightbulbs outside.
- Where are you building the system? On or near the house where the lighting will be installed.
- When does the system need to be completed? The system needs to be completed by April, 2006.
- Why are they utilizing solar? They wish to display solar electricity in their central natural building home for a community which will be based on appropriate technology.
- How is it going to be funded? The project will be funded through HSU's CCAT (Campus Center for Appropriate Technology).
- Communication
- Once you figure out the basics, communicate with your site and let them know you are taking on the project. Ask any questions that might help you in the initial planning process.
- Design a Timeline
- Though this will often change during the trial/error process, make a tentative timeline and try to stick to it. Keep a journal and record all progress and include a communication log with your site. Remember that things will always take longer than you think - so get started EARLY!
- Buy a Book
- I recommend purchasing "Photovoltaics: Design and Installation Manual" and make it your new best friend. If you are new at photovoltaics, and have never worked with electricity before, you may require many nights of book-bonding in order to make sense of pv systems.
- Contact Locals
- Finding people in town who can help you answer questions will assist you in your learning process, and may also be available to help you during the construction of your project.
- Draw a Preliminary Design
- Make sure you've figured out how to set up the whole entire system with all the parts. Draw out the system and label everything to make sure you've got every part labeled that you will need.
- Gather site data
- Calculate load estimates
- Determine number of PV panels
- Determine how to wire PV panels together (series/parellel)
- Determine how the system will be mounted
- Determine battery type, sizing and wiring configurations
- Determine controller type, sizing
- AC or DC - Determine if you need an inverter
- Determine how much wire your system will require based on distances of equipment
- Make sure you've figured out how to set up the whole entire system with all the parts. Draw out the system and label everything to make sure you've got every part labeled that you will need.
- Write a Budget
- Figure out where you are purchasing all your materials (make sure they have it in stock), how much each will cost, and what the total price will be for the project.
- Get Funding
- Turn in your budget to be approved for funding. Discuss with them how you will go about purchasing the materials. (i.e. are they giving you money upfront, are you to purchase and get reimbursed, etc.)
- Gather Electrical Materials
- Practice Wiring your PV System
- I found it was very helpful to sit with my materials and wire everything together before trying to really "build" the system. Just hook up all your electrical materials and make sure that your loads are operating. Use the voltage meter to see where your electricity is being pulled from if you are using an AC system.
- Gather Mounting Materials
- Think about how you need to set up your system. Are you building it on a roof? Are you buidling your own mount on the ground somewhere? Gather some materials from local junkyards to construct the mount for the system. I collected most of my mounting materials from the metal junk yard and from a resale lumber yard.
- Build the System
- I made an "A-Frame" mount for my photovoltaic system that I designed myself based on where the weight distribution would need to be supported the most.
- Test the system
- The best way to test the system is by re-wiring the system to make sure that all your connections are secure and that you have reevaluated all the parts to make sure that they are doing their job properly within the system.
- Draw Diagrams
- This will help you in the presentation process, as well as those who are trying to understand why and how everything works the way in which it does. It will also help you organize your thoughts so that you can review all the information - ultimately re-learning the logistics of the system design.
- Write up a report
- Include any difficulties or problems you encountered during the learning process. This will also be good to review the next time you are interested in working on a similar project. A report serves as a guideline for those whom are also interested in working on a similar project.
- Teach somebody
- If you don't have a class to present your project to, teach your friends/family/neighbors/roommates. Teaching someone will solidify your knowledge of photovoltaics, as well as introduce you to some new questions you may not have thought of on your own. THIS IS KEY!
Great steps. Please tell us how, not just what? For example, how do you Determine number of PV panels?--Lonny
Electicity Materials

- 3 - 50 Watt/12 Volt Photovoltaic Panels
- 1 - Solar Charge Controller
- 1 - 12 Volt Battery
- 1 - 400 Watt/110 Volt Mod-Sine Inverter
- 6 - 15 Watt Compact Flourescent Lightbulbs
- 6 - Light Sockets
- 1 - Light Switch
- Wires
- Colored Electrical Tape
Wiring the PV System
Once I had bought all of my materials for the Photovoltaic System, I sat them all out infront of me on the floor in my home. I put the parts in chronological order (PV panels - charge controller - battery - inverter - light switch - lightbulbs). I had my wire cutters, wire nuts, and wire. I made sure that I knew where all the positive leads connected to the next positive lead and negative to the negative since I was wiring my panels in parallel. I then cut around the tip of the wire to remove the protectant layer, exposing the tip of the wire. This allows me to make the connection strong between the wires I am putting together. Once I had two exposed ends of the wire, I connected them together using the wire nut. First, I connected the positive lead of the PV panel to the positive lead of the charge controller. Then I connected the negative lead of the PV panel to the negative lead of the charge controller. Keeping the positive connections to the next positive, and the negative to negative, I then connected the wires to the battery. From the battery, the wires connect to the inverter. Since the inverter had two plug outlets on the side of it instead of a place to connect raw wires, I made my own plugs by connecting the wires directly to the plug heads and wiring them into the system. I was then able to "plug in" the lights instead of having them permanently attached to the system. The lightbulbs directly plug into the inverter, and hence, are controllable by direct manipulation. There are six lightbulbs, wired in sets of three, totaling two plugs into the inverter.
Something that I was really excited about when building the system was the discovery that the charge controller actually told me where it was pulling electricity from - the panels or the battery. The charge controller also indicates how much charge the battery is currently holding and when it is adding charge to the battery from the solar electricity produced.
The inverter has a switch on the side of it to turn it on/off, which illuminates when operating.
I put a light switch between the lightbulbs and the inverter so that the clients could operate the system via a wall-plug or by switching on/off the inverter. the switch should be between the inverter and the loads--Lonny
Mounting Materials

- Plywood
- Supports 2x4
- Nails/Screws
- Hinges
- Measuring Tape
- Hammer
- Screwdriver
- Electric Drill
- Wire Cutters
Mounting the PV System
Clients/Site
Clients: San Francisco del Monte de Oro, Argentina.
Site: The Photovoltaic System was constructed in Arcata, California at the designers home. Later, it will be transported to the community in Argentina.
Costs
| Quantity | Materials | Source | Cost $ | Total: |
|---|---|---|---|---|
| 3 | 50 Watt/12 Volt Photovoltaic Panel | Alternative Energy Engineering | 285.00 | 855.00 |
| 1 | Solar Charge Controller | Alternative Energy Engineering | 60.00 | 60.00 |
| 1 | 12 Volt Battery (Damaged frame) | Alternative Energy Engineering | 100.00 | 100.00 |
| 1 | 400 Watt/110 Volt Mod-Sine Inverter | Alternative Energy Engineering | 42.31 | 42.31 |
| 6 | 15 Watt Compact Flourescent Lightbulbs | Ace Hardware | 20.00 | 120.00 |
| 1 | Light Sockets | Ace Hardware | 10.00 | 10.00 |
| 1 | Wire | Ace Hardware | 10.00 | 10.00 |
| Colored Electrical Tape | Ace Hardware | 4.00 | 4.00 | |
| Wood for mount | Resale Lumber Yard | 30.00 | 30.00 | |
| 8 | Hinges | Metal Scrap Yard | FREE | 00.00 |
| 1 | Lightswitch | Ace Hardware | 2.00 | 2.00 |
| 8 | Wheels | Ace Hardware | 10.00 | 10.00 |
| Nails/Screws | Ace Hardware | 10.00 | 10.00 | |
| Total Cost= | 1253.31 |
Funding
All funding was through Hunboldt State University's Campus Center for Appropriate Technology (CCAT).
Final Design
After collecting all of my electrical and mounting materials, testing the wiring, and designing a mount, I began building the system in my front yard. To complete the building process took 5 days of labour, working about 5 hours each day (which includes making lots of trips to gather missing materials/equipment/tools). After collecting materials from the re-sale lumber yard and the junk metal shop, I began constructing the "A-frame" that I designed. I made a design that would fold into itself. My first problem with this was that I was unable to find matching wood widths. My second problem was figuring out where to properly install the hinges so that it would fold and still allow room for supports underneath each piece of wood.
-
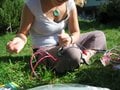
Fig 1:
-
Fig 1a:


Once I was able to complete the original design I had in mind, the frame folded very nicely onto itself - and it even has wheels so that I can roll the equipment around!
-
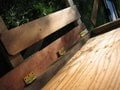
Fig 1b:
-
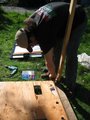
Fig 1c:
-
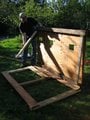
Fig 1d:


After building the "A-frame", I drilled holes into the large piece of plywood and attached all the parts so that they could be easily seen. Once this laborious process was complete, I was able to wire the system. After the wiring, I made diagrams for the entire system so that anyone who was interested could easily understand how the wiring was completed. Each wire is labeled and the entire back part of the plywood is accesible so that viewers can look on both sides - to see the "outer shell" of what the system will look like ontop of a mount, and what is going on behind the scenes with all the wiring - ultimately making the system easy to understand to even those who have no previous background in photovoltaics. (I tested it on a friend!) please include these diagrams on this page--Lonny
Discussion/Conclusion
This was an excellent project to work on! I have gained an invaluable amount of knowledge during this process. This project forced me to think about electricity, building/mounting designs, international communication, and mostly, challenged me to constantly analyse my efforts. The largest challenge for me was learning and comprehending the material on photovoltaics. I have had NO previous experience working with electricity. I will be the first to admit, I did not even know what the word 'photovoltaic' meant when I first became aware of this possibility. When I found out it was solar electricity, I immediately yearned for the opportunity - as I felt it was the best reason for me to learn and grow with a project that would be above and beyond challenging. I felt supported in that I had a class, a professor, and a knowledgable community to ask for help when I would need it. It was the one project I was skeptical of teaching myself.
Upon beginning the project, I had enormous frustrations with the material. I would read and read and read. The more I read, the more I felt lost and confused. But persistence pays off eventually, and soon enough - the material sunk in and CLICKED! It was a thrilling moment in my education, as I had to come to grips with it on my own, no matter how much or how little help I was given. It took months before I actually bought the materials, as I wanted to be sure that I knew I was not wrong in my understandings, logic and design. I also wanted to get all the materials in one swoop, so that I would not have to travel far for more than one trip. Once I obtained the materials, I sat alone in a house for four days and tried wiring the parts together. That was my next challenge! I was really concerned about connecting the wires together as I had no idea even how to attach them! In desperation, I had a friend come and show me how to put them together. The system was in place, wires connected - and the moment I plugged in a lamp - tears conjured in my eyes! I had produced a system that was conducting electricity! It was a moment I will never forget.
A couple of weekends later I drew up my final mounting design, bought my parts and started sawing away. The mount took about five days to build, including placing all the parts into the mount and wiring the system together on the mount. I must say, it sure is heavy - but it looks magnificent. It is really a treasure to have invested the work I have into this project - as the rewards are insurmountable!
Links and References
- Energy Efficiency and Renewable Energy Network - www.eren.doe.gov/pv/ : Information on how a solar cell works complete with animation.
- Komp, Richard J. - Practical Photovoltaics: Electricity from Solar Cells :
- Solar Energy International. - Photovoltaics: Design and Installation Manual : A very thurough resource for those whom are at a beginner level or are advanced in their knowledge of pv. I would not attempt a project without this book as a companaign.