
The objective of this project was to create and implement a system that sealed the existing holes in the gutters of Zane Middle School and prevent future clogging. The solution, Fix the Flow, involved cutting the edge of the existing gutter and building pieces that patched the hole and created an angled slope and wider surface area for the water to fall into from the gutter on the roof. This will simultaneously solve the leaking problem and prevent the gutter from clogging and overflowing.
Background[edit | edit source]
The gutters at Zane Middle School, located in Eureka, CA, were experiencing problems with clogging and overflow, so the ends had been cut off. This alteration caused water to spill out onto the quad in large amounts during periods of heavy rainfall. In the Spring of 2016, Zane Middle School contacted Engineering 215 students at Cal Poly Humboldt to find a solution this problem. The Sustainability Tsunami Squad, consisting of Lowen Hobbs, Casey Peterson, Mario Kaluhiokalani, and Annie Roberts teamed up with Trevor Hammons and Zane Middle School to build an addition to the existing gutter system that fixed the holes in the current gutters and prevented future clogging.
-
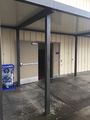
Figure 1: Broken Gutter (Photo by Mario Kaluhiokalani)
-
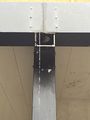
Figure 2: Closeup of Broken Gutter (Photo by Mario Kaluhiokalani)


Problem statement and criteria[edit | edit source]
The rain gutter system in the quad at Zane Middle School had been cut open due to previous clogging, but this alteration was causing large amounts of water to be dumped into the quad during rainfall. The objective of this project was to provide a solution to this problem that not only ensured the safety of the students, but was durable enough to withstand wear from weather and also the young students who attend Zane Middle School.
| Criteria | Weight | Constraints |
|---|---|---|
| Safety | 10 | The design must not be able to injure students in any way |
| Durability | 9 | Students and/or weather must not be able to do destroy the structure |
| Duplication Ability | 9 | The design must be fairly simple so that it is easy to duplicate |
| Maintenance | 8 | The structure must be able to be easily maintained by maintenance crew |
| Cost | 7 | The total cost must be less than $400 |
| Aesthetics | 6 | The design must benefit the aesthetics of the school campus |
Description of final project[edit | edit source]
Two attachments were designed for each side of the downspout in order to create a more gradual path for the water and debris to travel through. The AutoCAD drawing in Figure 3 shows a schematic of the proposed design. The bottom portion of the horizontal component of the gutter was cut eight inches on each side of the downspout, which is up to the cut-off end on the front side, and the connected vertical components were cut off 11 inches down on the front side. The attachments consist of two eight by 11 inch 90 degree triangles and a rectangle to connect them by their hypotenuses. One inch flaps are attached to each side of the rectangle so that it is able to be attached to the current system as well as the triangles, and one inch flaps are also connected to the other two sides of the triangles which are used to connect to the current system. A small rectangle bracket is also used to cover the previously cut-off end of the gutter which is connected by using one inch flaps on each side as well. Finally, sealant is applied at every connecting area in order to prevent any leaks. Only the front part of the design was approved by maintenance, which can be seen in Figure 4 and is discussed more thoroughly in the Discussion and Next Steps section.
-
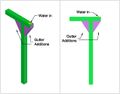
Figure 3: AutoCAD drawing of Fix the Flow (by Annie Roberts)
-
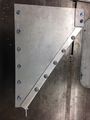
Figure 4: Assembled gutter attachment (Photo by Annie Roberts)

Maintenance should be minimal, and should only include an infrequent, if any, removal of debris from the gutter.
Costs[edit | edit source]
The costs throughout the project are categorized into Materials Costs and Design Costs. Materials Costs include the price of all materials used in building the design and can be seen in the table below. Design Costs are the total hours spent on the project split up by project section, and are displayed in the pie chart in Figure 4.

| Quantity | Material | Source | Cost ($) |
|---|---|---|---|
| 1 | 8-in-1 Multi Tool | Ace Hardware | 8.99 |
| 1 gallon | Paint Remover | Ace Hardware | 29.99 |
| 2 | Paintbrushes | Ace Hardware | 8.98 |
| 1 quart | Paint Thinner | Almquist Lumber | 6.53 |
| 8 ounces | Rags | Almquist Lumber | 2.18 |
| 1 pair | Gloves | Almquist Lumber | 0.39 |
| 4 | Aluminum Signs | Arcata Scrap and Salvage | 50.00 |
| 60 | Screws | Ace Hardware | 11.99 |
| 60 | Washers | Ace Hardware | 8.99 |
| 6 | Steel Wool Scouring Pads | Ace Hardware | 5.99 |
| 6 pairs | Gloves | Ace Hardware | 3.99 |
| 5 | Sand Disks | Ace Hardware | 22.99 |
| 5.5 ounces | Lexel Sealant | Ace Hardware | 7.49 |
| Reimbursement from Zane Middle School | - $100 | ||
| Total Cost (with Tax) | $78.81 | ||
Testing Results[edit | edit source]
When water is poured through Fix the Flow, no leakage occurs on any of the three gutters. The design has not yet been implemented at Zane Middle School, but when the same sealant is applied to the cracks between Fix the Flow and the current gutters at Zane Middle School, there should be no issues with leakage. The portion of the gutter addition that prevents water from falling onto the quad is the same dimensions as the existing hole, so the entire hole will be covered. This will prevent the students from getting wet, which was the main goal of the design.
How to build[edit | edit source]
Assembly instructions for Fix the Flow.

Collect aluminum road signs.

Clean off signs using turpentine and a scouring pad until all paint is removed, then use a sander to smooth surfaces.

Cut triangular pieces out of metal that will be used as the side of the gutter additions.

Cut rectangular pieces that will be used along the hypotenuse of the triangular pieces. Bend at a 90 degree angle along the length of the pieces. At the top of the front piece, bend to the correct angle to match the angle of the triangular pieces. At the bottom, bend the metal piece to be flush with the current gutter. See photo.

Apply Lexel sealant along the length of the rectangular pieces.

Secure the triangular pieces to the rectangular pieces using nuts and bolts. Ensure that sealant covers the entire length and fills all holes.

Cut a small rectangular piece and bend at a 90 degree angle to use as a bracket to hold the newly sealed pieces together. Apply sealant along any cracks between any of the metal pieces, but leave holes in the brackets open.

Cut small triangular pieces into the existing gutter on the top and side to allow water to flow through.

Paint to the correct color, then use Hex Washer Head Sheet Metal Screws to fasten the gutter additions to the gutter. Apply sealant to any hole before inserting the screw, and along the side and bottom of any part of the addition that sits flush to the existing gutter.
Discussion and next steps[edit | edit source]

In the end, the full design was not intended to be implemented onto the Zane Middle School gutter system. All criterias were adequately met except for safety. The reason for this was because the design was not approved by the Zane Middle School maintenance crew when asked to drill two holes into each side of downspout for which the water would flow through. The maintenance crew of Zane Middle School believed the holes in the downspout would compromise the downspout's ability to hold up the awning that rested on the top of it. If in fact the pole were to give way under the tremendous weight of the awning due to the two holes in the downspout, this could cause extreme structural damage and endanger the lives of the students and staff of Zane Middle School.
A compromise was made to only allow one hole to be drilled into the downspout. Fix the Flow was modified to only the front half it's original design. The front part of the design would be applied to cover the existing hole in the downspout plus the additional hole that would be drilled into the side of the downspout. Figure 5 shows an AutoCAD drawing of the modified design solution. In conclusion, the modified design met all the design criterion and displayed no risk to the structure or the safety of the Zane Middle School students and staff.
Video[edit | edit source]

References[edit | edit source]
- B. (2013). "Rain Chains, Do they Really Work?" AskARoofer.com,<http://web.archive.org/web/20200926140549/https://www.askaroofer.com/what-is-a-rain-chain> (Feb. 21, 2016).
- Barr, J. (2012). "About Rain Chains." Tijeras Rain Barrels,<http://web.archive.org/web/20160414193518/https://www.tijerasrainbarrels.com/rc-about.html> (Feb. 21, 2016).
- Beall, G. (2001). "What is a Rain Chain?" rainchains.com, <http://rainchains.com/aboutrainchains.html>(Feb. 21, 2016).
- CEES (Center for Earth and Environmental Studies). (2015) "Center for Earth andEnvironmental Studies." Climate Parameters <http://web.archive.org/web/20170118211653/http://cees.tamiu.edu:80/cees/weather/parameters.html> (Feb 21, 2016).
- CSSC (California Seismic Safety Committee). (2004). Findings and Recommendations onSeismic Safety Policies and Requirements for Public, Private, and Charter Schools, CSSC, Sacramento, CA, 13–15.
- Cuenca, R. (1989). Irrigation System Design: An Engineering Approach. Prentice-Hall,Englewood Cliffs, New Jersey, Open Channel Flow, 464-465
- David, V. (2008). "About Downspouts." eHow, Demand Media,<http://web.archive.org/web/20150901143232/http://www.ehow.com:80/about_4607692_downspouts.html> (Feb. 21, 2016).
- Davis, W., Taplin, F., Beck, H., Johnson, S., and Ollivier, L. (2013). Strategic Plan January2014, Eureka City School District, <http://www.eurekacityschools.org/index.php?option=com_remository&Itemid=150&func=fileinfo&id=2023> (Feb. 21, 2016).
- Dictionary.com (2016). "Downspout." Dictionary.com, Random House Inc.,<http://dictionary.reference.com/browse/downspout> (Feb. 21, 2016).
- EPA (Environmental Protection Agency). (2015). "Changing Rain and Snow Patterns." ClimateChange <http://www3.epa.gov/climatechange/kids/impacts/signs/precip-patterns.html> (Feb 21, 2016).
- "Eureka, CA Weather." (2016). USA.com, World Media Group, LLC, <http://www.usa.com/eureka-ca-weather.htm> (Apr. 9, 2016).
- "Fiber-Tech, Inc." (2016). FiberTech Inc RSS, <http://web.archive.org/web/20200722174812/http://www.fiber-techinc.com:80/capabilities/extras/fiberglass-benefits/> (Feb. 23, 2016).
- Fletcher, L., Moss, C., and Woodside, T. (2005) "CISTA: Rainwater Harvesting Concept." MOSS SUND and Figlforty.
- Gazlay, J. M. (2013) "Patents; "Downspout Extension Ground Support" in Patent Application Approval Process." Politics & Government Week,, 871.
- Goryacheva, A., Seredkin, A., Polyanskova, E., Proshin, I., and Dyar'kin, R. (2015). "Production and Ecological Solutions for Utilizing Synthetic Rubber Waste as Ready-Made Waterproof Materials" Chemical and Petroleum Engineering, <http://link.springer.com/article/10.1007/s10556-015-0025-0/fulltext.html> (Feb. 22, 2016).
- Graber, S. (2013). "Numerical Investigation of Flow in Triangular Gutters." J. Irrig. Drain Eng., 10.1061/ (ASCE)IR.1943-4774.0000524, 165-172.
- Kundig, K. (2016). "Gutters and Downspouts: Downspouts."Architectural Details: Gutters and Downspouts, Copper Development Association Inc., <http://www.copper.org/applications/architecture/arch_dhb/arch-details/gutters_downspouts/downspouts.html> (Feb. 21, 2016).
- Marks, K. (2003). "Is A Rain Chain Right for Your Home? - Articles." Networx, Disqus, <http://www.networx.com/article/is-a-rain-chain-right-for-your-home> (Feb. 21, 2016).
- McCarty, D. (2016). "Downspout Planters." Philadelphia Water, Philadelphia Water, <http://web.archive.org/web/20211118181454/http://archive.phillywatersheds.org/whats_in_it_for_you/residents/downspout-planters> (Feb. 22, 2016).
- McFarland, M. L., Provin, T. L., and Boellstorff, D. E. (2012). "Drinking Water Problems: Corrosion." Texas A&M AgriLife Communications, 1–3.
- MPCA (Minnesota Pollution Control Agency). (2009). "Capturing Rainwater and Preventing Runoff." Living Green, <https://www.pca.state.mn.us/living-green/capturing-rainwater-and-preventing-runoff> (Feb. 21, 2016).
- NOAA (National Oceanic and Atmospheric Administration). (2014). "National Weather Service Forecast Office: Eureka, California." Climate, <http://w2.weather.gov/climate/index.php?wfo=eka> (Feb 21, 2016).
- Novak, C. A., Giesen, E. V., and DeBusk, K. M. (2014) Designing Rainwater Harvesting Systems: Integrating Rainwater into Building Systems.John Wiley & Sons, Incorporated.
- Plunkert, P. A. (2006). Aluminum Recycling in the United States in 2000. Reston, Va.: U.S. Department of the Interior, U.S. Geological Survey.
- "Recycling." (2008). Recycling (Feb. 23, 2016).
- Rivers, A., and Gale, J. T. (2003). "What are the Different Types of Waterproof Sealant?" WiseGeek, Conjecture, <http://www.wisegeek.com/what-are-the-different-types-of-waterproof-sealant.htm> (Feb. 23, 2016).
- USDI (U.S. Department of the Interior). (2015). "Water Properties and Measurements." Water Properties, U.S. Geological Survey Water Science School, USDI, <https://water.usgs.gov/edu/waterproperties.html> (Feb. 21, 2016).
- Woodruff, L. (2015). "Everything You Need to Know about Downspouts." GutterSupply, Guttersupply.com and Rain Trade Corporation, <http://www.guttersupply.com/blog/category/water/> (Feb. 21, 2016).