
Unsafe drinking water is one of the leading causes of sickness in the world. According to the World Health Organization's 2004 figures, around 1.8 million people die each year from diarrhea. In addition, 88% of these disease cases are caused by unsafe drinking water or a lack of hygiene and sanitation. They also estimate that 35-39% of diarrhea cases could be eliminated simply through water treatment at the household level.[1]
Many people today advocate the use of boiled water for sanitation purposes, however, contrary to popular belief, many of the disease causing agents within water are killed far below the boiling point (100ºC), at about 65ºC.[2] Solar pasteurization works by using energy from the sun to heat water to a high enough temperature, for a long enough time, that it becomes potable. This method is not effective in eliminating solid or inorganic waste from water but will vastly eliminate water-born diseases.
Objective[edit | edit source]
This project is designed to provide a large household or small community with safe drinking water through solar pasteurization. We estimate that in less developed areas, each person needs around 4 gallons of water per day. Our design is intended to be able to meet these needs. The water used in the system will be collected by members of the community from local sources to then be treated for pathogens and bacteria. We aim to create a workable system that is easy to use, durable, and relatively inexpensive.
Criteria for project success[edit | edit source]
| Criteria | Weight (0-10 highest) |
|---|---|
| Total cost of construction is less than 100 dollars | 9 |
| System has a buyback time of less than 1 year | 8 |
| High mobility and ease of transportation | 6 |
| Uses local resources | 6 |
| Meets pasteurization temperature requirements | 10 |
| Easy for the user to maintain and operate | 9 |
| Meets water demand of a household or small community | 8 |
| Materials used are non-toxic and will not harm the drinker | 10 |
Initial Design Plan[edit | edit source]
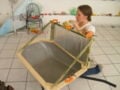
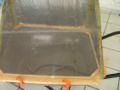
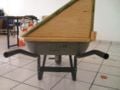
After much thought, we decided that a wheel barrow would be the most suitable base for our pasteurizer. It is movable, has a built in water trough, and is shallow enough to speed up the water heating process. We are also combining the ideas of cold frame greenhouses and solar cookers to create the frame. The frame will be made of bamboo, a local renewable (and moderately light) material, with reflective siding on the back and sides and transparent plastic on the front.
For better water purification, we are adding a slow sand filter, made of multiple layers of different sized sand, which is effective in eliminating many of the solid contaminants and metals in the water. In addition, a cotton cloth filter will be attached to the exit spout of the pasteurizer for further filtration.
The indicator by which the user knows the water is safe to drink is a simple devise of wax within a glass tube. The most common WAPI indicators are made with soybean wax that melts at precisely the temperature of complete water pasteurization. However, due to our remote location we are planning on experimenting with a mixture of beeswax and carnuba wax, which has been found to melt at around 70ºC, a local wax made of a desert plant, or a mixture of the desert wax and beeswax to see which works best. The tube is held down within the water by washers at the deepest end of the wheel barrow, which is where water pasteuerizes last. The tube is suspended with the solid wax pointing up and as it heats the wax melts and sinks to the bottom of the tube, indicating that pasteurization is complete.
-
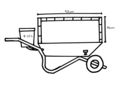
Front view
-
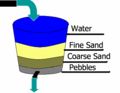
Sand filter example
-
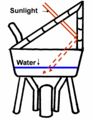
Side view with ray diagram
-
![Water pasteurization indicator[3]](/w/images/thumb/4/4f/Water_Pasteruization_indicator.jpg/120px-Water_Pasteruization_indicator.jpg)
Water pasteurization indicator[3]


![Water pasteurization indicator[3]](/File:Water_Pasteruization_indicator.jpg)
Building Process[edit | edit source]
07/13/2008[edit | edit source]
The first and no doubt biggest hurdle was finding the necessary materials. We began with the easiest and most important parts of our project, the wheelbarrow and bamboo. We traveled out to a local huerta (farm) owned by a Parras friend of ours who allowed us to cut down some of his bamboo. He later dropped us off and we went and bought our wheelbarrow and some wood to build the bottom of our frame with.
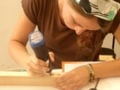
In addition, construction finally began and we built a big part of the frame which the cold frame will be built on. We used our 2"x1" board and made the base which follows the basic shape of the wheelbarrow. We pre-drilled holes in the boards and, because of the angles of the joints sank in the heads of our screws. For this we used a larger drill bit to make a rough hole which we later smoothed with the Dremel. We finished most of the connections on this day but the batteries on our tools eventually ran out, something that would be a major handicap to our progress throughout the building process.
-
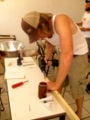
Sean drilling the frame.
-
Ryndie dremmeling out sinks.


07/14/2008[edit | edit source]
The frame for the wheelbarrow is nearly complete at this point. We had a minor error with using the wrong drill bit for our screws and though they still screwed in we reinforced the joints with wood glue for extra stability.
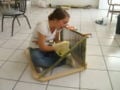
We also began cutting bamboo for the cold frame. Our lack of common tools led us to use string, wire, and drawings on the walls to make sure that everything was the right length and level. We decided that rather than building the frame square with itself we built it square with the ground which means the front pieces of bamboo are much shorter then the back ones. It is our belief that this creates a better and more efficient surface for the solar rays to enter into.
We also began thinking about how to attach the bamboo together using bolts/nails/etc.
07/15-17/2008[edit | edit source]
After talking with our instructor, our ideas about bamboo attachment switched from a more "modern" style with bolts, etc. to a more "traditional" style of lashing with cord or wire. This made a lot more work for us because it meant individually dremeling out grooves that fit the bamboo pieces together and wiring them by hand. This was slow work because we were still learning about which Dremel bits are better for different materials.
- Tip 1: Using a saw on a pocket knife is much quicker, much more efficient, rather precise, and can be touched up with a Dremel if necessary.
To fit the back pieces of a cold frame together we pre-drilled holes, which is important to avoid splitting the bamboo, and wired the pieces together.
-

Shaping the bamboo joints.
-
Drilling out wire holes.


07/18/2008[edit | edit source]
We ran into some shrinking issues with the bamboo over the previous few days as the very green bamboo continues to dry out. This is easily remedied when the pieces are wired together because fixing it simply means tightening the wires a bit.
- Tip 2: Let your bamboo dry out for at least a week or two before construction to avoid issues with shrinking.
Today we also figured out how to connect the back of the cold frame to the wooden frame. It was difficult because we had to avoid the existing screws in the wood but we found a way to attach small left over blocks to the back of the frame which we then used to bolt the bamboo against.
We also began cutting and dremeling the angled pieces that go from the back of the cold frame and down to the front.
- Tip 3: When cutting or drilling bamboo, wrap the area you will be cutting/drilling through with masking tape to avoid breaking and peeling of the outside fibers.
-
Wiring the back frame together.
-

Wiring on the angled bamboo pieces.


07/19-21/2008[edit | edit source]
Sean began cutting out what we need from the plastic using a cutting bit on the dremel. It is long hard work and the dremel keeps losing charge so in the mean time we also cut out sides and backing for the cold frame out of the plywood.
- Tip 4: Using a scoring and bending technique with the plastic considerably lessened the amount of time necessary to cut out the shapes...as well as the amount of Dremel recharges necessary.
The plywood is cut to lay as flush as possible against the bamboo frame. When at the store looking for materials we also stumbled across a reflective screen for the windshield made of mylar bubble wrap. We stenciled and cut out corresponding pieces of the screen to attach to the side and back pieces. We used staples to attach the bubble wrap to the pieces, another adventure. We searched all over Parras to find staples (unsuccessfully) before we asked the bus company of Sean's mom who gifted us some staples. Once we had those, we finished attaching the pieces and could begin placing them on the cold frame. After some thought, we decided to use silicone sealant to affix the plywood to the bamboo.
-
Sean cutting plastic.
-
Affixing the back to the frame.
-
More siliconing.


07/22/2008[edit | edit source]
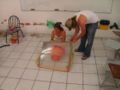
Once the plastic had been cut to size, we were able to start attaching that as well. Due to the size restraints of the scavenged plastic pieces we ended up using two sheets for the front of the cold frame. We laid the plastic on the floor and placed silicone at the joint between the two pieces because connecting them on the cold frame would have been very difficult. We also cut a plastic piece to cover the gap at the front of the wheelbarrow that is not covered by the cold frame. This is just a little bit of added light and prevented having a dark area of the pasteurizer.
-
Attaching the plastic.
-
The dremeled hole, Ryndie's handiwork.
-
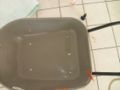
Inside the wheelbarrow, notice the flange.
-
The gate-valve we used as a spout.


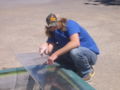
On this day, we also began work on the water exit point. We marked a circle where the pipe should be and drilled a hole through the bottom of the wheelbarrow which was then widened out with a dremel. Once that was complete we put on the fixtures, a flange on the inside of the wheelbarrow, several washers and a gate valve on the outside of the wheelbarrow through which the clean water can be removed from the basin.
07/23-25/2008[edit | edit source]
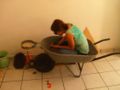
Now it was time to think about what we had been putting off for a while, how to attach the sand filter to the frame of the wheelbarrow. We had changed our design to place the filter on the front of the wheelbarrow, out of the way of the user and where its considerable weight would be less felt.
-
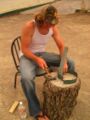
Sean letting his inner blacksmith out.
-
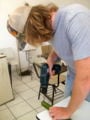
Ryndie dremeling the hole for the filter hose.


Upon looking through the junk piles at the UTC, we scavenged some metal strips off of old desks to uses as a stand and braces. We also found a weird piece of bluish metal in an old classroom that we placed around the bucket. The metal strips were cut to size with the dremel and hammered out to get rid of the curves. We used one long piece as the stand which the filter would rest on which attached vertically to the front curve of the wheel well using bolts. Two smaller pieces were used as braces that attached with bolts to the existing bolts of the wheelbarrow. These smaller strips also connected to the blue metal circle made for the wheelbarrow in the bottom holes while in the top holes we placed a large bolt with a butterfly nut to tighten the circle around the bucket. All holes in the metal strips were drilled with a metal bit and then dremeled out to the right size.
In addition, we built a wooden base for the bucket out of two pieces of ply wood that attached to the upright support of the stand with bolts.
07/26/2008[edit | edit source]
Initial temperature testing began today!
07/27-29/2008[edit | edit source]
These days were a long nightmare of looking for usable sand and rocks. The rocks we found in multiple piles around campus and at the working sites of our peers. The hard part was figuring out how to wash them. We ended up doing what seemed to be an endless cycle of sifting out dirt, rinsing, straining, washing, rinsing, straining, washing, etc.
- Tip 5: Sift out the dirt before getting the rocks wet. Also, once ready to begin washing, place rocks in a bucket and allow them to soak, occasionally stirring the water, for quite a while before straining and rinsing them.
We also tried soaking in a soapy solution and although that helped a bit, it ended up being about as difficult to get rid of the soap as it was the dirt.
Sand however, was the most difficult thing to find in Parras. We walked around for many hours in the hot sun, on multiple days, to no avail. Eventually, a UTC student friend of ours saw us struggling to clean the rocks, heard we needed sand and informed us he had a bottle of sand from Mazatlan in his room...its always about who you know in Parras.
07/30/2008[edit | edit source]
The last and final thing we needed to do was make a hole in the bottom of the bucket through which we could attach the hose for the water. The sand filter was then assembled with a mesh screen on the bottom, rocks over that, pebbles in the middle, and the sand on the top plus a removable mesh screen which filters out leaves and such.
-
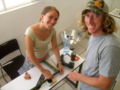
The hose works!
Budget[edit | edit source]
| Material | Quantity | Total Cost (Pesos) |
|---|---|---|
| Wood (2"x1") | 2 meters | 36 |
| plywood (3 ply) | 1/2 square meter | 71 |
| Screws | 19 | 9.5 |
| C-Clamps (Small) | 4 | 109 |
| 2.5 Gallon Bucket w/ Lid | 1 | Free (Donated) |
| Plastic Sheets | ~1/2 square meter | Free (Scavenged) |
| Bamboo | 203 centimeters | Free (Donated) |
| Wheelbarrow | 1 | 620 |
| Hose | 1 | 26.50 |
| Metal Strips | 3 | Free (Scavenged desk parts) |
| Mylar Bubble Wrap (Car Window Shade) | 1 | 20 |
| Bolts w/ Nuts | 8 pairs | 12 |
| Wire | 1.5 meters | Free (Donated) |
| Rubber Gasket | 3 meters | 30 |
| Sand, Pebbles, and Rocks | 2 gallons | Free (Donated and Found) |
| Silicone Sealant | 3 tubes | 45 |
| Large Bolt w/ Butterfly Nut | 1 pair | 18 |
| Flange | 3 | 2 |
| Washers | 4 | 8 |
| Teflon Tape | 1 | 3 |
| Staples | 1 stick | Free (Donated) |
| Total | 1,118 |
Testing and Results[edit | edit source]
After completing the construction of our solar water pasteurizer we began testing to see if our system could reach the desired pasteurization temperature of 65º C(149º F). For our first run the pasteurizer reached a maximum temperature of 52º C after 2hrs and remained at this temperature for the next two hours. At this point we had a fairly good seal between the cold frame construction and the wheelbarrow so we predicted that the problem was related to lack of light entering the system or a lack of insulation. The excessive condensation that formed on the plastic face of the pasteurizer concerned us because more light would be diffracted and resulting in less light entering the system. The pan of our wheelbarrow base is made of metal and we were concerned that this may have been the source of excessive heat loss. Since we had already secured the plastic face to the cold frame construction, we decided to work towards insulating the pan of the wheelbarrow. We first insulated by placing a black-tarp skirt around the the edge of the wheel barrow that reached the ground. This method yielded a higher temperature of 58º C which told us that heat loss through the pan due insufficient insulation was a major factor. Next we acquired several cardboard boxes and cut and adhered them to the bottom of the wheel barrow pan. The next time we tested, the water only reached a 52º C after 4hrs. We then noticed that the gasket we had fixed to the top of the wheel barrow to provide a seal between the cold frame and the wheel barrow had begun to fall off. We had used silicon to adhere the gasket initially and this did not hold. We finally decided to fix the gasket to the top of the wheel barrow using small screws. We also proceeded to add a second layer of cardboard insulation. After both of these tasks were completed we tested again. This run yielded our highest temperature of 62º C. According to Dr. Bob Metcalf, a leader in solar water pasteurization research, 60º C is sufficient to kill all of the diarrhea causing bacteria and rotaviruses and 90 percent of Hepatitus A virus after 2 minutes. After this final testing day we had several days of clouds and thunderstorms. Our highest subsequent temperature reached 60ºC with other recorded temperatures below 55º C.
Problems and Recommendations[edit | edit source]
The toughest part about completing this project was finding and buying the materials. Every hardware store in Parras, Mexico carries different materials and nothing was ever easy to find. The best way to get things done in Mexico is to make friends and utilizing every contact. Often we had to adapt our design to utilize the available materials. We had to make this compromise when we purchased a grey wheel barrow when black would have been a more effective color choice.
Another problem we had with the proper functioning of this system, aside from the insulation issues, was with the condensation buildup on the plastic face of the cold frame construction. We settled on a 30º angle for the face of the frame to minimize the height of the pasteurizer, when a greater angle would have facilitated the runoff of the condensation. By reducing the amount of condensation on the face of the frame we would have increased the amount of light entering the system. More light entering the system would have resulted in both a higher internal temperature and a higher water temperature.
We chose to use bamboo to construct the frame of this system to utilize a local renewable material. This turned out decreasing the appropriateness of this system. Due to the irregularities of the bamboo we needed to use a great deal of silicone to fill the gaps between the bamboo frame, the plywood sides, and the plastic face of the cold frame construction. By only using the plywood to construct the cold frame construction we would have greatly reduced the amount of silicone needed.
Finally, insulation is paramount to the success of this system. Even with the two layers of cardboard insulation, heat was still being lost through the bottom of the pan. A better, more weather resistant solution, would be a two pan system with insulation in between. This could be achieved by placing insulation in the pan of the wheel barrow and placing a second wheel barrow pan on top. Although this would increase the weight of the system, which is presently extremely well balanced, it would be worth it to assist in yielding the higher temperature needed to more quickly pasteurize water (65º C).
Conclusions[edit | edit source]
Most of the problems we encountered while constructing the solar water pasteurizer were related to difficulties acquiring materials and a lack of suitable tools. We originally thought that our plan was simple and straightforward. All of the materials required were familiar to us and easily found at most hardware stores in the United States. However, when we began searching for materials in Parras, Mexico, it became apparent that not all of our planned materials were available or easy to find. For example, we were originally planning to use a type of weather stripping to provide a seal between the cold frame construction and the wheelbarrow but this was not easy to find. Other items that were difficult to find were the plastic front for the angled face of the cold frame construction and a reflective material other than low grade aluminum foil to line the inside walls of the frame. The most difficult materials to obtain were a 2.5 gallon bucket, a thermometer and the most difficult, fine sand. We spent a total of approximately 6hrs searching for the fine sand in the hot Parras sun. After we had finally given up, a local friend informed us that he had a container of sand from Mazatlan in his house that we could use. We were very pleased and realized once again that the most efficient way to get things done in Mexico is by making friends and utilizing contacts. By doing this we were able to eventually find all of the components necessary for the completion of our solar water pasteurizer.
Our group succeeded in designing and completing an operational prototype for a transportable solar water pasteurizer. However, higher temperatures would be more desirable so modifications are necessary for a quicker, more effective pasteurization system. If one were to attempt to replicate such a system we would encourage them to consider our recommendations.