Executive Summary: The non-profit organization OLPC (One Laptop Per Child) is looking for a cheap and effective way to power their laptops. One of the ways to obtain this power is though solar power. About 15 watts of power must be outputted through a solar panel that is connected to the laptop, and this solar panel cannot be more than $80 in price, nor can it be too large to comfortably carry around with the laptop. It would also be beneficial for the solar powered laptop to also be durable, functional, and energy efficient.
The problem is that this laptop is to be distributed to children in 3rd world countries who do not have a lot of money. Many of them do not have the wealth to continuously maintain electricity throughout their homes, nor do they have the ability to access any sort of electricity at any time, which is why if it was solar powered this would be of much help to them.
The solution, therefore, is to create a solar panel that can be connected to the laptop. This way it can use the solar energy of the sun and convert it into electricity to run the laptop, and this would take out the necessity of charging it though a plug-in.
The final product turned out to be a 9 watt solar panel that is surrounded in a casing of PVC to protect the solar panel from accidental damages and other harm such as water damage. It is connected to legs which adjust the solar panel so the rays of the sun can hit it at the optimum angle in order to give it its maximum power output.
The budget comes out to $76.00. It costs $64.00 to acquire the laptop and ship it out to our location, $2.00 for the plug to charge it, $10.00 for the PVC casing, and $10.00 for the wires, hinges, and legs. This is slightly over the projected budget of $80.00, but if the solar panel was to be mass produced then this would decrease the cost of it, therefore putting the limit under $80.00.
Group Number: 213C
Cody Boutilier
Brendan Graham
Qaseem Jiwani
Faculty Sponsor: Dr. Pearce
Project Manager: Nabeil Alazzam
Community Sponsor: Queen's Applied Sustainability Research Group
Introduction[edit | edit source]
The XO Laptop is a $100 subnotebook computer, and it is meant to be distributed to children around the world in developing countries. The point of doing this is to give them opportunities that they may not have had before. It can also connect to the internet, which gives them a great chance to expand their knowledge. It is small, which is convenient because children sometimes have to walk large distances to get to school. This laptop is inexpensive, which is important because many individuals in developing world countries do not have lots of money. It is also very durable, energy efficient, and is readable under direct sunlight for children who go to school outdoors. An important aspect of research into this laptop was that it takes approximately 15 watts of power to run, which is important when determining the right solar panel to use for it.
A solar cell is a device that creates electricity by converting the energy of sunlight directly into electricity. Groups of these solar cells are used to make solar panels. Energy created this way is called solar power. Most solar panel models use wafer-based crystalline silicon. There are silicon parts of the cell, with electrons filling up most of the holes in between them to balance out the charge. Right at the junction, the free electrons mix and form a barrier, making it difficult for electrons on one side to cross over onto the other side. Eventually equilibrium is reached, and this causes an electric field to separate both sides. The electric field acts like a diode, and it lets electrons to flow from one side to the other, but not vice versa. When photons of light hit a solar cell, its energy frees electron-hole pairs. This causes a disruption of electrical equilibrium, and if an external current path is provided, electrons will flow through the path to their original side to join with holes that the electric field sent there, doing work along the way. The electron flow provides the current, and the cell's electric field causes a voltage. Because this contains current and voltage, power is also obtained (because it is the product of the two).
Using this information obtained about the laptop and solar cell, it is now possible to proceed with the project. The XO Laptop needs to be powered using solar power, but the panel used to power the laptop cannot cost more than $80, nor can it be fragile or bulky.
Problem Formulation[edit | edit source]
The $100 XO Laptop is a low-cost subnotebook computer with a plan to be given to children developing countries around the globe. This will provide them with access to knowledge and information which was previously unavailable to them, and also give them opportunities to learn and benefit through the internet. The XO laptop is perfect for the children in third world countries because it offers sophisticated technology for little cost. The XO brings a whole new level of technology to the developing world with its energy efficient and durable design able to withstand some of the most extreme weather conditions. There is only one flaw in the design of the XO laptop, its energy source. In the third world, children have little to no access to electricity. The task is to design solar powered system to charge and run this laptop. The system must be reliable enough so the children do not have to concern themselves about how long they can use the computer for. Many of these clients in third world countries do not have access to any electricity and will also be using this laptop as a main source of light in the night. Therefore we need to have the laptop solar powered system so that it can be used in remote locations without direct access to power and that will be able to hold a charge for a fair amount of time. The solar powered system for the laptop must not only be reliable but also durable, because if something goes wrong it could be expensive to fix. Since the laptop will be used by children in the developing world, the solar powered system must be able to survive taking a fall and even some harsh weather like rain and extreme heat. These aspects must be taken into consideration while designing a solution for the solar powered XO laptop. The XO laptop is designed to be an inexpensive piece of technology so that people in 3rd world countries can afford them.
Design Plan[edit | edit source]
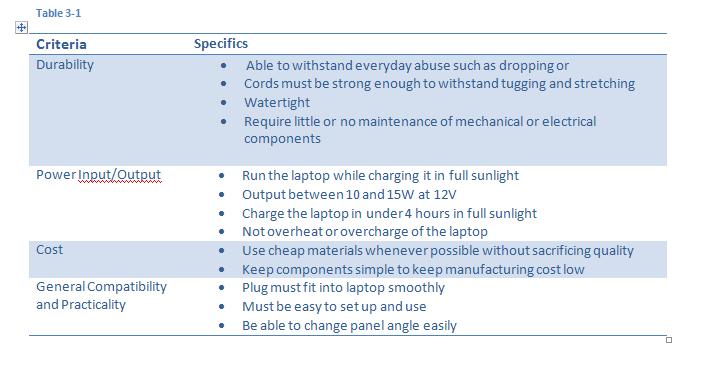
Design Specifications Criteria[edit | edit source]
Laptop Specifications[edit | edit source]
- DC power: 6mm (1.65mm center pin) connector; 11 to 18 V input usable, –32 to 40 V input tolerated; power draw limited to 15 W;
- Pack type: 2 or 4 cells LiFePO4; or 5 cells NiMH, approximately 6V series configuration;
- Capacity: 22.8 Watt-hours (LiFePO4); 16.5 Watt-hours (NiMH);
- Fully-enclosed "hard" case; user removable;
- Electronics integrated with pack provide:
- Identification;
- Battery charge and capacity information;
- Thermal and over-current sensors along with cut-off switch to protect battery;
- Minimum 2,000 charge/discharge cycles (to 50% capacity of new);
- Power management will be critical.
Possible Design Solutions[edit | edit source]
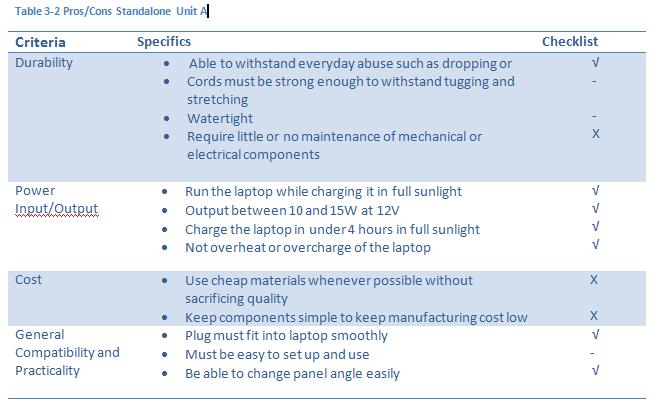
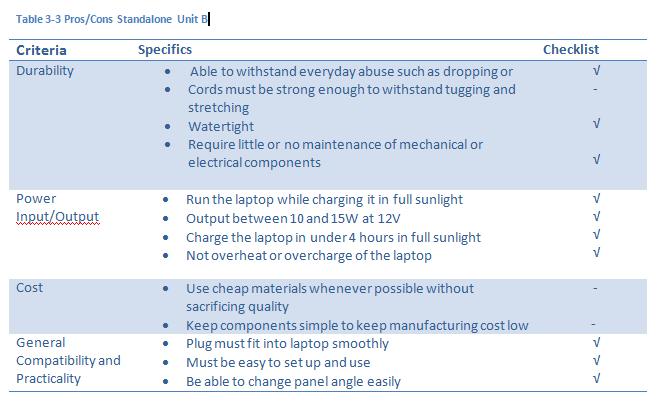
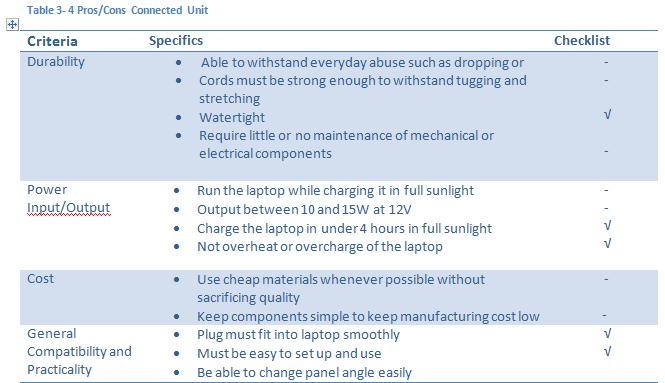
All three design solutions included here are planned to produce similar wattage, voltage and current. The differences are in the aesthetics, practicality, the method of connection to the laptop, and whether they are physically touching the laptop or not. The checklists on the right hand side of Tables 3-2, 3-3 and 3-4, are ranked by a '√' for positive attribute, 'X' for a negative attribute, and a '-'for an attribute that is neutral towards the design criteria.
Standalone Unit A[edit | edit source]
Standalone Unit A, as seen in Figure 2, consists of a two folding solar panels mounted on a tripod. This design is intended to be the most practical unit, but the drawbacks associated with the construction and manufacturing costs may outweigh the benefits.
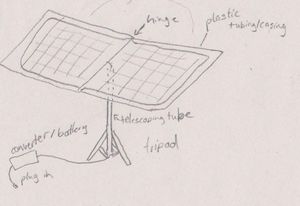
This design received 'X's in the maintenance portion because of the complex tripod setup at its base. Furthermore, 'X's were given in the cost section because of the manufacturing costs associated with building the tripod setup, and because of how lightweight the solar cell must be to be supported by just a light frame.
Standalone Unit B[edit | edit source]
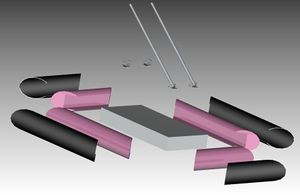
Standalone Unit B, as seen in Figure 3, consists of one or two larger solar panels wired in sequence, with two legs to prop it up. This early design includes a folding hinge in the middle, telescoping legs, and a clip that would allow for attachment to the laptop.
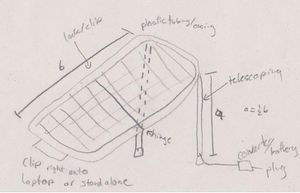
This design received good marks based on the simplicity, but the only drawbacks to the design may be the hinge and clip onto the laptop. These would require the solar unit to be in the two correct sizes, and to be very light.
Design C[edit | edit source]
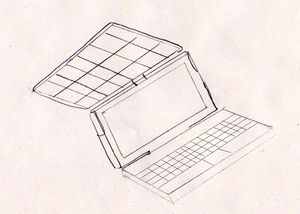
The connected unit, as seen in Figure, 4 allows for the solar cells to be directly clipped onto the laptop. This is designed for convenience, but the user would have to be in direct sunlight to work. The drawback of this design is that the solar cell itself would have to be either incredibly efficient, or much larger than the laptop itself and extremely light. This makes the design unfeasible because the cost would be far too high.
Chosen Design[edit | edit source]
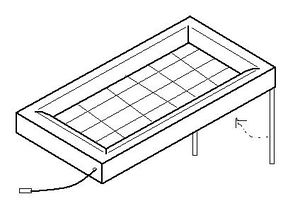
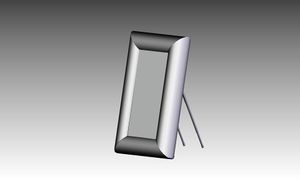
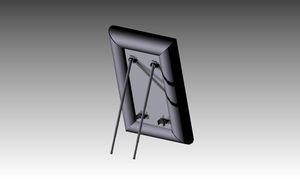
After analysing each solution, the best design for the laptop is Standalone Unit B. A simplified version of the design, as shown in Figure 5, will improve on the drawbacks, reducing costs and manufacturing prices, without sacrificing too much in terms of practicality. The hinge in the middle has been removed. Overall, this design could work because it is simple enough to keep costs low, while maintaining its durable exterior and practicality.
Budget[edit | edit source]
Angle of Solar Panel[edit | edit source]
The optimum angle for the solar panels were researched, and it was discovered that multiple angles of the would be required. Therefore, telescoping legs are required to account for the range of angles required. The most important factor in determining solar angle is the latitude of the location. Generally, in the spring and summer, the optimum angle is the Latitude Minus 2.5°. In the winter, the angle is the Latitude *0.9 +29°. The laptop is supposed to be accessible to people all around the world, and so multiple accessible angles are required to make the product effective. That being said, the legs will be able to telescope and lock at any given angle between 0 and 60 degrees. This will allow the panel to be used at almost any location on the globe.
Design Implementation[edit | edit source]
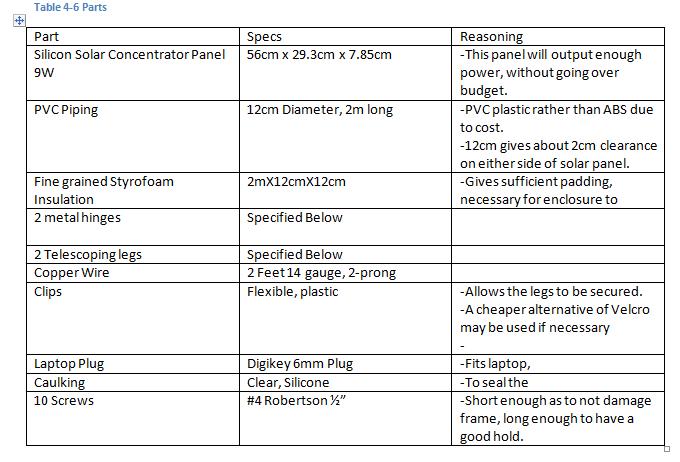
Materials and Parts Specs[edit | edit source]
Tools[edit | edit source]
Recommended:
Drill with ¼" Bit
Screwdriver
Mitre Saw
Sandpaper
Soldering gun + Solder
Electrical tape
Sufficient:
Hand drill with ¼" bit
Screwdriver
Hand Saw
Sandpaper
Soldering gun + Solder
Electrical Tape
Construction of Individual Parts[edit | edit source]
PVC Piping and Inner Tubes[edit | edit source]
- Using Mitre saw, cut PVC into 4 sections: 2 X 440mm, 2X 705mm.
- Next, cut at 45° from the corner of the pipe inwards, creating a trapezoid shape from the top view.
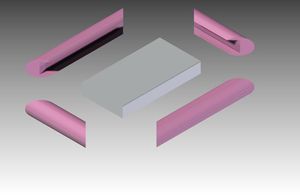
- Next, mark and cut out a rectangle 29.3cm x 7.85cm on the two smaller PVC sections, and 56cm X 7.85cm on the two larger PVC sections, as shown in Figure 6. Polyurethane Inner Tube.
- Using the PVC pipe as a guide, cut out cylindrical models that fit inside snugly.
- Next, cut at 45° from the corner of the pipe inwards.
- Next cut out the rectangular prisms according to Figure 7, allowing the inner tube to connect tightly to the solar panel.
- Slide into the PVC, with the rectangular prism cut-out facing out.
Wiring and Plug[edit | edit source]
- Solder the 10 gauge wire to the Digikey plug, at the positive and negative ends, and seal with electrical tape.
- Drill a ¼" hole into the PVC and inner tube according to the location of the wire attachment of the solar panel.
- Next, feed the unattached end of the wire through the hole you drilled.
- Solder the unsoldered end to the solar panel attachments.
Attaching Casing[edit | edit source]
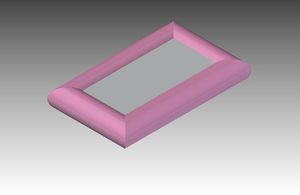
As seen in figure 9, the inner tubes will be attached to the solar cell using a silicone adhesive on the inner part of the tubes and the 45 degree angle part as well.
The PVC pipe section with the power cable will need to be on the inner tube part during this step.
The silicone adhesive must also be
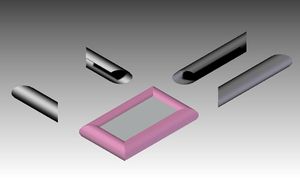
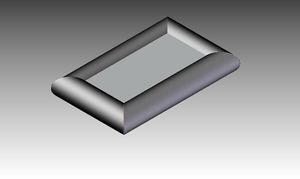
- Apply adhesive to inner PVC tubes
- Slide tubes into place according to diagram
- Seal all edges of PVC to solar cell.
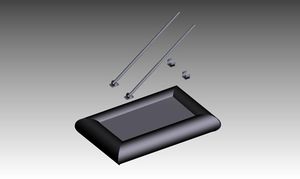
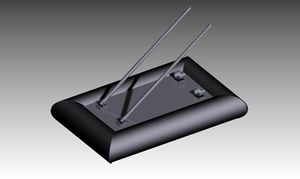
- Apply adhesive to base of hinges and clamps.
- Screw in hinges.
- Attach clamps.


Experimental Testing[edit | edit source]
After building the prototype, some tests would need to be done in order to determine if it meets specified requirements.
The first test would be to find out how many volts the solar panel will produce under various amounts of sunlight. This would require connecting the solar panel to a multi-meter and then varying the amount of sunlight hitting the solar panel. The tests would be in full sunlight, half sunlight, and a low amount of sunlight, and then determining if the solar panel will still produce the minimum amount of volts needed to power the laptop. Also it is necessary to know if the solar panel will overheat the laptop. This is not likely due to the wattage of our solar panel, but it needs to be determined before plugging the solar panel into the laptop.
Another test would be the wiring test, which is simply making sure that the solar panel is correctly connected to the laptop. This will require the laptop to be turned on and running solely on the power of the solar panel.
The next test would be to drop the solar panel from different heights and see if it is able to withstand the drop. The drops would be from 0.5m, 1.0m, 1.5m, and 2m. This would make sure that the casing is protective enough so that if someone were to accidentally drop the laptop that the solar panels could still function properly. Instead of using the actual solar panel for this test, glass panels of weaker breaking strength would be used. First, the glass panel itself will be dropped from each height to gauge its breaking strength. Next the glass will be dropped in the PVC/Styrofoam enclosure, proving that the enclosure provides additional strength and stability.
Another test is the water test, because the solar panels may be out in the rain or accidentally spilled on, so it is imperative that the casing is waterproof. This is more a test of the sealant itself, but the sealant will be applied to the PVC casing and glass with a similar roughness to the solar cell. This enclosure will be placed underwater with a liquid test strip inside. This will determine if the solar panel will be waterproof.
The solar panel should be able to run for long periods of time, so this can be tested by keeping the solar panel charging and continuously have the laptop running for 10 hours, 15 hours, and 20 hours. This is important to make sure no overheating or anything goes wrong with the solar panel.
One more test is to see how long it takes to charge, which would simply require one to plug in the solar panel and time how long it takes to fully charge.
Discussion[edit | edit source]
The design outlined in previous sections was not built because of a mix up in the ordering of parts. The solar panel that was originally chosen was deemed unacceptable as it had to be shipped from the United States of America. Thus an alternate panel was substituted which then required a collection of three panels to provide equal output of the original design for $25.00 extra. This new part being shipped from Toronto, Ontario would have little to no shipping and handling fees. The collection of three solar panels an equally acceptable design. Unfortunately the new solar panels where not ordered correctly so the parts have not yet arrived.
The final design was based on the original solar panel chosen. This is due to the fact that the overall dimensions are smaller and it was less expensive and produced slightly more power. In terms of overall dimensions, this allows not only for easier transportation but also decreases the cost of the material needed for the casing of the solar panel.
Economic Analysis[edit | edit source]
In designing the solar powered system for the XO laptop cost must be taken into consideration. The point of the XO laptop is to put advanced forms of technology into children's hands that normally do not get the opportunity because of financial troubles. The less expensive the solar powered system is the more feasible solution it will be.
The construction of the prototype should come in under eighty dollars. While being inexpensive the solution also has to be functional and reliable. Research has shown that these previous attempts were unsuccessful with more resources and expertise at the disposal of the designers.
Solar cells have dropped dramatically in price over recent years. The average solar panel will cost about five dollars a watt and with the XO laptop running at 15 watts the price will escalate quite quickly. After extensive research, it was concluded that may be feasible to construct a solar powered system on the prototype scale for less than eighty dollars. With no real potential income with this project, cost will be a large factor in all major decisions.
In mass production, all costs will decrease significantly. This solution is not feasible at the cost of $85.00 per unit. To make this a real solution to the problem of powering the XO Laptop, the price of the solar unit itself would need to drop down to below $30.00 for everything. The cost could be lowered by purchasing the solar panels in bulk. Typically the price per unit drops significantly when the quantity is increased to for example, 1,000, or 10,000 units.
Another solution would be to actually manufacture and sell the solar panels at cost for this project. Also, the materials, such as the PVC piping or fine-grained Styrofoam could be created from raw materials rather than purchasing to lower cost. Instead of buying a laptop plug from a 3rd party, the plug could likely be produced for much less per unit. All of these possibilities could make this solution a reality by lowering the overall cost to the point where the overall design does not cost more than $30.00
Conclusions[edit | edit source]
This project had an overall efficient and useful design that would be successful if the parts were available. The solar panels were to be attached to an XO Laptop, which is a small and energy efficient laptop which is to be given to children of 3rd world countries around the world. The XO laptop needs a way to be charged without the use of electrical outputs, which is why the solar panels are needed to run the laptop. They could also not cost over $80, nor can they be too bulky or inefficient. The final design included a 9 watt solar panel that was encased in PVC and silicon to protect the solar panel from accidental damages and other harm such as water damage. It is connected to legs which adjust the solar panel so the sun rays can hit it at the optimum angle in order to give it its maximum power output.
The final budget came out to $86.00. The cost was $64.00 to get the laptop and ship it out to our location, $2.00 for the plug to be able to charge it, $10.00 for the PVC casing, and $10.00 for the wires, hinges, and legs (the miscellaneous items needed to keep the solar panel safe and allow it to run effectively). This is slightly over the projected budget of $80.00, but if the solar panel was to be mass produced then this would decrease the cost of it, therefore putting the limit under $80.00. If there is a possibility for this design to be put to practical use in the future, it is certain that it would be able to run well, and it would definitely be a start in letting the XO Laptop run on solar power.
Recommendations and Further Considerations[edit | edit source]
The Design outlined in previous sections should be implemented because although the cost per unit is unreasonable, this is based on a prototyping scale not a mass production scale. The cost per unit will greatly decrease in mass production because of the law of distribution of labour. This design should be chosen because it should be durable enough to withstand accidental dropping, reliable enough to run the laptop effectively, as well as it will have a sleek design which will allow for no hassle transport.
This design was unable to be tested in the allotted time period due to a mix up in parts ordering. This design should be tested by future groups to see if it is indeed plausible. Some things that should be looked into before testing however could be the coefficient of temperature for the solar cell. This is to see at what temperature the solar cell is most efficient. This information would help to determine whether or not the Styrofoam inner tube would help or just cause problems.
References[edit | edit source]
Solar Power Store. [Online] [Cited: October 14, 2009.] http://www.solarpowerstore.com/canada/info.htm.
Aldous, Scott. How Solar Cells Work. How Stuff Works. [Online] [Cited: October 17, 2009.] www.howstuffworks.com/solar-cell.htm.
Landau, Charles R. 2008. Optimum Orientation of Solar Panels. [Online] December 23, 2008. [Cited: November 21, 2009.] http://www.macslab.com:80/optsolar.html.
2009. Solar Panels Using Broken Cells. [Online] June 6, 2009. [Cited: October 7, 2009.] http://www.discovercircuits.com/H-Corner/brokensp.htm.
XO Laptop Hardware Specification. XO Laptop (OLPC). [Online] [Cited: October 7, 2009.]
2009. XO Solar Laptop. Wikipedia. [Online] June 4, 2009. [Cited: October 8, 2009.] http://wiki.laptop.org/go/XO_Solar.
Individual Contributions[edit | edit source]
Qaseem Jiwani
In this project I have helped in researching about the background information about the solar panel. I have helped make sure that we have met our deadlines and that we have not fallen behind schedule. I also contributed to creating some of the possible designs of the solar panel. In the presentation I explained about what the XO Laptop was and what the goals of the OLPC organization were. I wrote the executive summary, as well as the introduction and the conclusion of this proposal report. On the final report, I wrote the discussion, conclusion, and testing.
Brendan Graham
In this project, I have come up with many design solutions for the solar panel, as well as determining the pro's and con's of each one. I have tried to manage meetings to make them more time-effective, and collected information from the group to submit to our project manager. In the presentation, I discussed the method which we took to determine our design, as well as the pros and cons of each possible solution. In this report, I wrote section 3, Design Plan, and created images for each possible solution. Furthermore, I formatted the document to the specifications outlined in the course manual, including creating the table of contents and table of figures and tables. I also proofread the entire document, and combined group member's sections and finalised the document. On the final report, I created all diagrams using Solid Edge, wrote the design section, as well as researched all possible materials solutions. Again, I posted the report onto Appropedia, and finalized the report.
Cody Boutilier
In this Project, I have been helping in the booking times of where and when we can meet. With the Proposal presentation I was in charge of outlining the Problem and our task as well as the cost analysis and the recommendations. As for the Proposal report, I was in charge of both the problem formulation and the Economic analysis. I also helped in formatting and editing the report. For the final report, I was in charge of revising my parts from the proposal, as well writing the recommendations and further suggestions section. As for the final presentation I discussed our economic situation as well as our recommendations for future projects.
Attached Below is a copy of the midterm proposal report.
Proposal Report:
