
Designer[edit | edit source]
Felix A. Epp' Aalto University, Department of Computer Science
Project[edit | edit source]
This project was performed as a final project of the L3999 course Spring 2018.
Motivation[edit | edit source]
In Human-computer Interaction, the field of wearable technology is a growing field. A lot of this technology will be worn by users on their body. In the design of products and experimental prototypes the common procedure is either to produce highly customised prototypes based on specialised hardware, like micro-controllers and sensors embedded into textiles or bulky prototypes that are hard to attach to the subjects.
Especially during design and development a lot of iterations and trial and error is necessary, but the common procedure makes this hard. Therefore a method to easily attach and detach standard prototyping hardware to the body would reduce development time immensely.
Other available body mount systems aim for durability or stability, because they often are derived from extreme sports. Hence, the main requirement for this project is to make the process of detaching and attaching possible with only one hand, so even the developer can try it on himself, without being dependent on another pair of hands, if the hardware would be attached to the arm for example.
Concept[edit | edit source]

The snap mount system is based on the Klickfast System, which is mainly used in work environment, like law enforcement, to easily mount equipment to the body.
As stated before the primary requirement was, the attachment and detachment being possible with only one hand. Therefore various commercial solution were compared. The Klickfast system is the best option, as it not only offers a lot of flexibility and good ergonomics, but because it can be printed with standard 3d printer and filament and works right away, without any extra parts, like magnets or screws.
The basic mechanics use a flexible overhang, that bends, when the holder is inserted into the mount and secures it through a small nub. The inlet where the tip of the holder rests, does not need a rail, because the flexible protrusion presses it in place. This also guarantees that the mount does not move freely. When a bit force is applied the device can be twisted into a different angle. When twisted about 180 degrees the device can be removed from the mount just by sliding.
The mount itself has holes to attach to a harness or strap, which would stay on the subject and can easily be customised to attach to other mounting systems.
Model[edit | edit source]
See Snap Mount for one-handed attachment of devices like Arduino or breadboard OpenSCAD on Thingiverse
Parts[edit | edit source]
The mount is complete new design roughly based on the tip's dimensions.
The tip is based on "Klickfast baofeng mk 2" by callumrt93
The Arduino holder and Breadboard holder are based on pre-existing designs combined with the tip and some support structure:
Half-Size Breadboard Base by stemworkbench Arduino OpenSCAD mounting library (v2.0) by kellyegan
Bill of Materials[edit | edit source]
- Strap
- Snap Mount
- Arduino / breadboard holder
- Additionally: a harness or flexible straps (e.g. Flexible Multipurpose Strap - Rounded Remix)
Estimated Cost[edit | edit source]
- Snap Mount ~9g / $0.225
- Arduino holder ~10g / $0.25
- Breadboard holder ~13g / $0.325
The costs have been calculated using a price of $25 per 1 kg for PLA [1] and the respective PLA consumption (estimated by Cura slicer).
Directions[edit | edit source]
1) Download the scad and stl files from https://www.thingiverse.com/thing:2860886.
2a) Use the provided STL files to print mount and holder.
2b) Customize your own casing or holder for the microconrtoller, gadget or device you need, by just attaching the small tip to a existing casing/holder model. The mount can be customised in all dimension by changing the corresponding variables in the openscad file. For example, the holes for attaching a band or straps can be changed to fit the exact dimension of your equipment.
3) Printing: A mount and holder easily fit the bed of a smaller printer e.g LulzBot Mini. Printing of a single piece took approximately one hour using a standard print speed of 25 mm/s with PolyLite PLA and LulzBot Mini. Recommended Cura settings and support structures should be used.
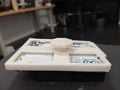
Final Prints[edit | edit source]
All components have been printed using LulzBot Mini and PolyLite PLA material.
-
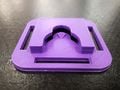
mount - front
-
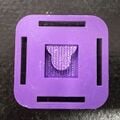
mount - back
-

breadboard case
-
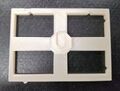
breadboard case - back
-
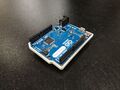
Arduiono Case
-
Arduino case - back


