A water catchment system is a system used to capture clean water from rainfall and direct it into a storage container. It is an easy method of obtaining potable water and storing it for future use.
One of the requirements of a water catchment system is that they require a large exposed surface to collect water. Undoubtedly this large surface will be prone to collecting pollutants such as fecal coliforms, heavy metals (Zn, Pb, Cu, Cd, Cr, Ni), ammonia (NH4+), particulates, and other organic debris due to its direct exposure to the climate, heat, moisture, animals, etc. As the whole purpose of these RRCS's is to deliver potable water to developing communities, it is crucial to reduce the level of these pollutants in the water before it is put into storage. Polluted water can be very dangerous in communities where health care and sanity are generally neglected. Contaminated water can cause serious illness; acute affects range from diarrhea, nausea, vomiting and lung irritation, and chronic affects include cancer, birth defects and organ damage. Pollutants accumulate on the runoff surfaces over periods of no or little rain. This is why it is especially important to get rid of the pollutant build-up before the start of heavy rainfall or rainy season. In order to accomplish this effectively and inexpensively, the "first-flush" method is widely used.
This method uses rainwater to wash away materials accumulated on the collection surface before the run-off water is put into storage for potable use. The first water collected can be used to fertilize the land, but should not be consumed. There are a variety of factors which may affect the amount of pollutants that build up on the collection surface, and thus affect how much run-off water needs to be disposed of before being collected. Climate and geographic location play a large role in this, as this affects temperature, humidity, weather patterns, flora and fauna, etc. Generally there is greater ability for pollution built up in warm, tropical climates, as they are better breeding grounds for bacteria and organic debris. Geographic location, proximity to large pollution cities, can also affect the pH level of rain-water, and acid rain may react with the roof material and displace heavy metals into the water.
Rainfall intensity and frequency are also very important factors to examine when trying to determine first flush requirements. The harder it rains, the greater the force and thus it is easier to displace and flush away pollutants stuck to the collection surface. In addition, if it rains frequently, there is less chance for pollutants to build up on the surface between rainfalls. The material used for the collection surface is also very important. Metal roofs are more prone to heavy metal leakage when exposed to acid rain – however they are generally rather smooth and as such accumulate fewer particulate pollutants. Tile roofs have a coarser surface and tend to gather more pollutants. Due to these different possibilities, roof rainwater catchment systems need to be evaluated on a case by case basis.
Water Catchment[edit | edit source]
Every water catchment system has three basic parts:
- The collection surface
- The collection basin
- The gutter system
The design of this optimized water catchment system focuses on the design of a first-flush system, which primarily encompasses the gutter system, and somewhat of the collection basin. The collection surface is briefly looked at, but the focus is on the requirements for a first-flush system.
It should also be noted that although a first-flush system is a great method of diverting the large contaminants from the main collection basin, there will still be some smaller contaminants that need to be filtered out before the water can be considered potable. To do this, a filtration device is required.
Collection Surfaces[edit | edit source]
Collection surfaces must have minimal opportunities for contamination, inert or essentially inert materials, a large surface area, and a design which ensures maximum water flow. Essentially, any roof that is not made of organic material can be used in a rainwater catchment system.[1]
Collection Basins[edit | edit source]
The only difference for a collection basin in a first flush system is that a second, smaller basin is needed for the diverted, non-potable water. The selection of the main storage basin is not important to making a first flush system work. However, there are many other considerations for choosing/designing a collection basin. The only purpose of a collection basin is to provide a container in which to store water for a significant amount of time. The additional factors to consider are whether the basin is above or below ground, and the shape. The most common collection basin is an above ground cylindrical basin.[2]
Gutter Systems[edit | edit source]
The gutter system is the most important aspect of a water catchment system that uses a first-flush approach to decontamination. The gutter system must direct the water from the collection surface to the collection basin. In a first-flush approach, the gutter system is also responsible for directing the non-potable water from the first rainfall to a separate collection basin.
The Proposed Design[edit | edit source]
The design of this water catchment system using the first-flush method of primary decontamination is relatively simple.

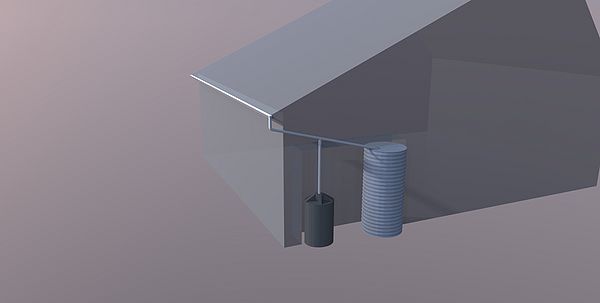
An overview of the system can be seen above. The materials used in this depiction are for the sole purpose of demonstrating the layout of the system.
In this design, the water being collected on the roof of the building flows into the gutter, then proceeds down the pipe into the first, smaller collection basin. The size of this basin is based on the surface area of the roof, and the amount of water required to wash the majority of the buildup on the collection surface (and is further described in the sections below).
The key to this design is to seal the smaller collection basin after it has filled with the contaminated water from the roof. In order to do this, a flotation device within the vertical pipe may be used. This flotation device can be anything that floats in water, but should be as spherical as possible to ensure the best seal is made. At the base of the vertical pipe, and directly above the small collection basin, a mesh cross section must be in place to house the flotation device as the basin is filling. Once the water reaches the level of the flotation device, it will lift the device with it as it travels up the height of the pipe. At the top of this vertical section of pipe is a smaller section of pipe jammed inside the first pipe, creating a smaller inner diameter that must be smaller than the flotation device. When the device reaches this smaller diameter pipe, a seal is created, and all the water that is collected from this point onwards is directed to the large, second collection basin, which houses the potable water.
The design of this system depends on the location (and the amount of precipitation per year) and the surface area of the collection system. These factors will affect the volumes of both collection basins, and the required diameter of the pipes.
Regional Considerations[edit | edit source]
The location in which this design is implemented will be a determining factor in how to size the system, and with what materials the system can be built. To narrow the scope of this project, only regions in Africa and South America were considered.
The size of the system depends on the amount of annual rainfall in a region. Following are links to precipitation maps of both Africa and South America.
map-centre/7 1 entire-range/thematic-maps/annual rainfall Africa.gif Precipitation Map of Africa
Precipitation Map of South America
The following section outlines different tables to help size a water catchment system based on different levels of annual precipitation.
Please refer to Table 1 in the following section of your location corresponds to either:
- The dark blue areas in the precipitation map of Africa; or
- The green or blue areas in the precipitation map of South America
Please refer to Table 2 in the following section if your location corresponds to either:
- The medium blue areas in the precipitation map of Africa; or
- The yellow areas in the precipitation map of South America
Please refer to Table 3 in the following section if your location corresponds to either:
- The light blue areas in the precipitation map of Africa; or
- The orange or red areas in the precipitation map of South America
Optimized System Volumes[edit | edit source]
In order to optimize system volumes, several factors were taken into account. The location determines the amount of annual rainfall, which is a factor in determining the volume of the collection basin for potable water. The projected area of the roof (not the actual surface area, but the area on which rain will fall) is a factor in determining the volume of the collection basins for both potable and non-potable water, and the minimum diameter of the pipe to direct the water from the gutters to the basins.
In order to perform these calculations, several assumptions were made. First, it was assumed that 80% of the annual rainfall occurs during the wet season, which lasts on average 7 months of the year.[3] Second, it was assumed that the maximum precipitation rate for any location is 50mm per hour.[4] Third, it was assumed that the velocity of water along the length of the pipe is approximately 1m/s.[5]
TABLE 1: Sized for a Max Rainfall of 2500mm/year
| Projected Area of Roof [m2] | Volume of Collection Basin (Potable) [L] |
|---|---|
| 5 | 1428 |
| 6 | 1714 |
| 7 | 2000 |
| 8 | 2286 |
| 9 | 2571 |
| 10 | 2857 |
| 11 | 3143 |
| 12 | 3429 |
| 13 | 3714 |
| 14 | 4000 |
| 15 | 4286 |
TABLE 2: Sized for a Max Rainfall of 1000mm/year
| Projected Area of Roof [m2] | Volume of Collection Basin (Potable) [L] |
|---|---|
| 5 | 571 |
| 6 | 686 |
| 7 | 800 |
| 8 | 914.3 |
| 9 | 1029 |
| 10 | 1143 |
| 11 | 1257 |
| 12 | 1371 |
| 13 | 1486 |
| 14 | 1600 |
| 15 | 1714 |
TABLE 3: Sized for a Max Rainfall of 500mm/year
| Projected Area of Roof [m2] | Volume of Collection Basin (Potable) [L] |
|---|---|
| 5 | 286 |
| 6 | 343 |
| 7 | 400 |
| 8 | 457 |
| 9 | 514 |
| 10 | 571 |
| 11 | 629 |
| 12 | 686 |
| 13 | 743 |
| 14 | 800 |
| 15 | 857 |
TABLE 4: Other Dimensions for any Rainfall
| Projected Area of Roof [m2] | Volume of Collection Basin (Non-Potable) [L] | Minimum Pipe Diameter [mm] |
|---|---|---|
| 5 | 75 | 9.4 |
| 6 | 90 | 10.3 |
| 7 | 105 | 11.1 |
| 8 | 120 | 11.9 |
| 9 | 135 | 12.6 |
| 10 | 150 | 13.3 |
| 11 | 165 | 13.9 |
| 12 | 180 | 14.6 |
| 13 | 195 | 15.2 |
| 14 | 210 | 15.7 |
| 15 | 225 | 16.3 |
To put the roof sizes into perspective, a roof with a projected area of 4m2 is about the same size as taking two large steps along the size of a square building.
In the above table, the minimum pipe diameter was calculated using the following equation:
Area = Volumetric Flow of Water / Velocity of Water
Proof of Concept[edit | edit source]
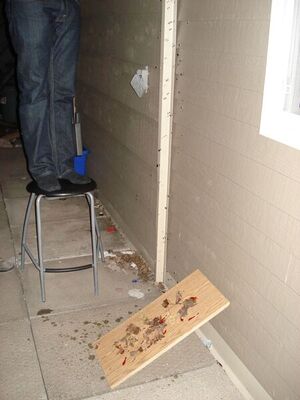
One of the main issues with this design was determining the amount of rainwater required to adequately perform a first-flush of the collection surface. Since there is no empirical data on this topic, a proof of concept test was carried out.
In this test, a plank of smooth wood of 1m2 (simulating the collection surface) was covered in compressed banana (to simulate sticky fecal matter), ketchup (to simulate sticky particles), and dried leaves.
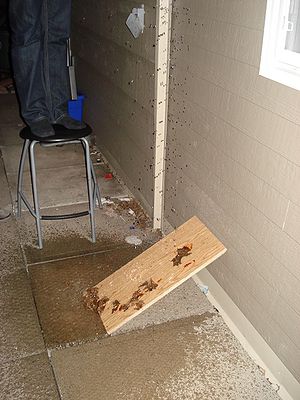
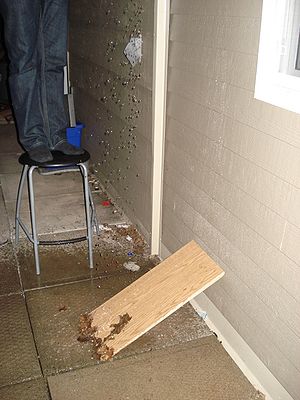
The purpose of the test was to determine the required volume of rainwater to wash the majority of this debris from the plank of wood. To simulate rainwater, pitcher of water was poured through a strainer from a height of two metres. This test was conservative in simulating the velocity of the rain water, as from a height of two metres it could not reach its terminal velocity, and the testing occurred with no wind. It can be assumed that real rain would hit the collection surface harder than in the simulation, therefore washing debris off quicker.
This test proved that a reasonable amount of water provided adequate rinsing to wash most of the debris from the roof. The following three pictures show the test at three stages: just as the water began to fall, at 0.3L of water used and at 1L of water used.


Materials[edit | edit source]
One of the green design principles is to minimize material diversity, therefore for this project the suggested material for the guttering system and pipes is bamboo. It should be noted that this is merely a suggestion, and the choice is up to the craftsman, who must take ownership of the design.
Bamboo is a natural material found on both continents of Africa and South America. It can be used as the material for both the gutter and the pipe. Since it is cylindrical in shape, it acts as a natural pipe. If cut in half, it makes a perfect gutter.
The flotation device to create the seal can be any almost spherical object that floats in water. Many large seeds would serve this purpose.
In order to create the seal for the flotation device, a pipe of smaller diameter is required. A bamboo shoot of smaller diameter could work for this application.
Finally, material to hold the bamboo together at the seams is necessary. Since bamboo does not have a smooth shape, but is set with ridges, ties could be used to hold shoots of bamboo together. This would not create a tight seal, however, between shoots. In order to create the seal, a sticky material is required, such as tree sap or clay.
In order to put together this design, the only tool that is required is a sharp blade with which to cut the bamboo. Some suggestions for this tool are a saw, a hatchet or a machete.
How to Build It[edit | edit source]
The tricky part about building this first flush system is the tee that diverts the non-potable water away from the potable collection basin. The rest of the catchment system is straight forward (installing gutters, connecting pipes, etc.).
To build this tee using only bamboo, the following procedure is suggested:
- Have available three different pieces of bamboo, two with roughly the same diameter (for the horizontal components), and one with a diameter small enough to fit inside the others (for the vertical component). The smallest diameter should not be smaller than the width of two fingers to allow for adequate water flow.
- Cut semicircles in the edges of the two large-diameter bamboo shoots, so that the third piece fits snugly between them.
- Place the small diameter bamboo shoot between the two semi-circles, but ensure that the small diameter shoot does not extend into the inner diameter of the larger shoots, so as to create a ridge. If a ridge is formed, it will prevent water from traveling down this 'pipe'. Fill in gaps with clay, or another compacting filler.
- Take another piece of bamboo approximately the same diameter as the large diameter shoots, and force over top the small diameter bamboo shoot. This will be the basis for the seal, and will extend vertically to the collection basin for the non-potable water.
- Place a seed in the inside of the last shoot of bamboo, and ensure that the seed does not fit through the small diameter bamboo, but moves easily along the large diameter bamboo shoot.
- Create a mesh layer that can be stretched over the bottom opening of the last bamboo shoot, between the bamboo and the non-potable water collection basin. This mesh can be woven bamboo leaves, vines, etc. The purpose of the mesh is to stop the seed from falling into the collection basin, but allow water and smaller particles to pass through.
Associated Costs and Skills[edit | edit source]
The design for this first-flush water catchment system is based on the assumption that all materials will be locally available. In that sense, there is no material cost for this project.
However, time to build the system could be the associated cost with this design, due to the involvement of creating this type of water catchment system. The skills required to produce this design are fairly basic. The craftsman must be able to roughly measure the size of their building's roof, and be able to size and fit pieces together (such as pipes) relatively well. The skill of fairly precise cutting is also required to ensure the pieces of the system fit well together.
The time to build this system could take anywhere from 8 hours to days, depending on the size of the system, but the material costs should be zero.
Mistakes to Avoid[edit | edit source]
One of the major areas of concern for the construction of this design centre around sealing the 'pipes' (bamboo shoots), specifically at the tee described above. It is imperative that as good a seal as possible be created to minimize the amount of leakage. Make sure to find a sticky substance (i.e. tree sap or clay), and apply liberally to the connection points between bamboo shoots.
The tee described in the section above is also a point of concern. If there is any ridge at the connection point where the smaller diameter bamboo shoot enters the inner diameter of the larger two, any small volume of water that flows along these pipes will divert around the smaller diameter vertical bamboo shoot and continue on to the potable water storage tank. There must be NO ridge at this connection point. To ensure this doesn't occur, use a compacting filler such as clay to fill a larger than normal gap at this connection. It is more important at this point to have a little leakage rather than the contaminated water travel directly to the potable water collection basin.
Finally, and perhaps most importantly, it should be once again noted that this first-flush method of diverting contaminated water from a collection surface is not enough to create potable water. Although the large collection basin is referred to as a "potable water collection basin" throughout this page, it cannot be considered potable until a filter is applied. To find out how to make a simple filter, click [[[Slow sand filtration water treatment plants|here]]].
Notes and references[edit | edit source]
- ↑ Domestic Roofwater Harvesting, Very-Low-Cost Domestic Roofwater Harvesting in the Humid Tropics. January, 2002.
- ↑ Domestic Roofwater Harvesting, Very-Low-Cost Domestic Roofwater Harvesting in the Humid Tropics. January, 2002.
- ↑ Allmetstat Weather, Climate of Different Regions Online, Accessed: Apr/12/2010. http://web.archive.org/web/20160321110525/http://en.allmetsat.com/climate/brazil.php?code=83228
- ↑ Wikipedia, Rain Online, Accessed: Apr/12/2010. http://en.wikipedia.org/wiki/Rain#cite_note-UKint-96M
- ↑ Yalin, M.S., River Engineering (An Outline of Principles). 1985