
Abstract[edit | edit source]
Background[edit | edit source]
Students from Cal Poly Humboldt in the class Engineering 305: Appropriate Technology during the Spring 2018 semester will be working on transforming a front yard lawn into a community garden in Eureka, California, USA with the local organization Cooperation Humboldt.
Cooperation Humboldt's Mission Statement: "Cooperation Humboldt exists to help develop a solidarity economy across the North Coast. We identify, support and nurture cooperative economic efforts that help people meet their needs without exploiting or oppressing anyone, without being exploited or oppressed by anyone, and without destroying Mother Earth."
Problem statement[edit | edit source]
The objective of this project is to provide the surrounding community with access to local, freshly grown food. The goal is to provide access to fresh food by making a front lawn into a food garden for all to enjoy.
Project Evaluation Criteria[edit | edit source]
The following criteria will be used when considering the most desirable design for the project. This criteria was developed by the Engineering 305 students in collaboration with Cooperation Humboldt. The weight scale (1-10) represents the importance level of meeting the constraint of each listed criteria.
| Criteria | Constraints | Weight |
|---|---|---|
| Usability | Must sufficiently produce edible plants for the community. | 10 |
| Maintainability | Must be easy to maintain, water, and harvest plants. | 9 |
| Educational | Must provide educational value to the community about the benefits of planting edibles and the benefits of having such available resources. | 9 |
| Aesthetics | Must look pleasing to the eye. | 8 |
| Cost | Must be economically friendly and not exceed budget. | 7 |
| Sustainability | Must have native pollinators to keep the plants healthy and its own source of water. | 7 |
Literature Review[edit | edit source]
The following is a review of the available literature pertinent to the components and details of implementing a community garden along with the addition of a potential simple rainwater catchment system.
Native Plants[edit | edit source]
When doing agriculture to any extent, from a large farm to an apartment window garden, it's a good idea to remember the plants (and their associated pollinators)that have evolved to live in your area. These native flowering plants can attract native pollinators, which is a method we and Cooperation Humboldt want to use to improve the yield of the garden. (Salisbury 2015)[1] Per our criteria, we want to prioritize low maintenance perennials where we can. To that end, some California natives that could suit our uses:
Yarrow (Achillea millefolium[edit | edit source]
Yarrow is a low-maintenance, drought tolerant flowering plant that is good for borders and flowers from late spring to early summer. Fully grown it is 1 to 2 feet tall, spreading 2 to 3 feet, and likes sunny conditions and is adaptable to many soils. (Schmidt 2012[2]).
Woodland Strawberry (Fragaria vesca)[edit | edit source]
Woodland Strawberry is a native to California that doesn't produce as large fruit as the varieties commonly used by industrial agriculture circa 2012, but is a native groundcover. It prefers full sun to partial shade and does well placed between shrubs. It is adaptable to many soils. Its small fruits ripen in summer. (Schmidt 2012[2]).
Redwood Sorrel (Oxalis oregana)[edit | edit source]
Redwood Sorrel is a groundcover native to Humboldt county that prefers occasional to moderate water, is adaptable to any soil and is perennial. It doesn't flower to a great enough extent to attract pollinators. It is adaptable to any soil and grows 4 to 8 inches tall, and spreads as a groundcover. It requires shade. (Schmidt 2012[2]).
Western Azalea (Rhododendron occidentale)[edit | edit source]
Western Azalea is a tall shrub from 3 to 5 meters tall that is native to Humboldt County. It flowers in spring, and prefers shade and can tolerate acidic soils. It requires a lot of water but is easy to take care of, needing water perhaps once a week in some climates. (CNRS 2012)[3]
Below are images of the plants that were discussed in this section.
-
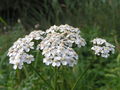
Yarrow "Achillea millefolium" image by Pethan
-

Woodland Strawberry "Fragaria vesca" image by H. Zell
-

Redwood Sorrel "Oxalis oregana" image by Doug Sherman
-
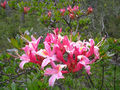
Western Azalea "Rhododendron occidentale" image by Jenny Moore


Cold withstanding edible plants[edit | edit source]
A few vegetables that can withstand cold weathers include hardy vegetables, half hardy vegetables, and tender plants. Hardy vegetables are good at withstanding cold frost and can be planted in Spring. Some hardy vegetables are spinach, kale, mustard, turnips, onions and peas. Half hardy vegetables can be planted two weeks before a frost is over, and some vegetables include carrots, beets, parsnips, celery, and lettuce. Tender plants can grow in areas with cold weather if transplanted. Tender plants include cucumbers, beans, sweetcorn, pumpkin, squashes, tomatoes, and some pepper plants (Singh and Davidson 2016[4]).
Local Soil[edit | edit source]
Soil series in the area of the Eureka, California neighborhood we are working in is quite acidic, around 5.0 to 4.5 pH, some kind of clay loam moderately well drained to poorly drained. (UC Davis | NCRS SoilWeb[5]). This should inform our choices of edible and native plants, because soil is the source of the plant. This information is very specific to the neighborhood we are working with, and others using this as a reference should utilize the same tool if the project is located in most of the United States, also referenced here[5] to get a general idea of the soil type without expensive testing.
Designing a replicable garden[edit | edit source]
Sprouting Education, a 2011 group of students from the Engr 215 course at Cal Poly Humboldt, worked with Locally Delicious to create a garden that is functional and can be easily replicated at other schools. The final design included a rainwater catchment system, kiddie pool gardens, and a pallet garden with a greenhouse top.
The pallet garden with the greenhouse top was a success in this project. Children were able to easily access the plants without having to remove the top. Sprouting Education used clamps and a wooden dowel into the design to easily roll up the top and make the plants accessible. For the rainwater catchment system, Sprouting Education used a barrel for the storage, a spigot and hose to access water, and a cut out window screen for filtering out large debris (Appropedia | Locally Delicious 2011[6]).
Climate[edit | edit source]
For oceanic regions on the west side of continents are that of a maritime climate. Since Eureka is a part of this climate, it has a set of temperatures it experiences throughout the year. This area also experiences a lot of humidity throughout the year. The rainy season for Eureka starts in October and goes through to April which accounts for about 90% of the annual precipitation for the area (Horstmeyer, 2011[7]). Even during the dry season, a majority of the time there is fog or heavy cloud cover.
Types of Wood[edit | edit source]
During the process, raised garden beds may need to be installed. The benefits of raised beds include more control over your growing medium, and being able to garden in a larger space than container gardening without having to till into the existing soil. Wood is a cheap and readily available resource in most areas, and some is more locally available than others.
Longevity[edit | edit source]
Redwood has been shown to be one of the best building materials available for raised beds, because it is naturally resistant to rot and mold (Wolford 2016).[8] This material is readily available in certain areas of the West coast of America. While it is generally more expensive than other woods, its longevity pays for itself by having a longer replacement interval and is aesthetically pleasing. Cedar is another excellent choice for its beauty and mold resistant properties. Pine, while generally being one of the least expensive woods, is a viable option but will need to be replaced more frequently.
Health[edit | edit source]
It is ill advised to use certain recycled materials such as pallets for food gardening. Pallets can be pressure treated or sprayed with harmful chemicals such as formaldehyde, which poses obvious risks to human health (DIY Projects 2017).[9] Other materials such as OSB or particle board can also leech toxic wood glues into the surrounding soil. These types of materials should be avoided as much as possible.
Easy maintenance and garden design[edit | edit source]
Edible garden design has an art behind it that includes accent, association, color, composition, structure, etc of the landscaped area (Kourik, 2004[10])). In order for an edible garden to be as low maintenance as possible, the edibles have to be specifically chosen for the area. As well as to start the vegetable area small and in a rectangular shape. Having a low maintenance garden would also need low care ornamental plants for ground cover while the edible plants grow. Ornamental plant gardens tend to be less maintenance than edibles, so the garden should be about half and half of each plant type.
Rainwater Catchment[edit | edit source]
Rainwater catchment is often used as an effective supplement to irrigation by natural rainfall. (Grafman 2017[11]) A simple, gravity fed system, assuming an average rainfall of 3 inches per month, a catchment area of 200 square feet, and an efficiency of 80% would yield roughly 25 to 30 gallons of rainwater in a month with that rainfall. The catchment volume will change depending on rainfall conditions. We found that the difficulties involved in building a rainwater catchment system would add too much to this project if we wanted to accomplish it this semester, so we recommend building the garden first, then adding a rainwater catchment system if it is appropriate. Irrigation lines or another system would need to be put in place to utilize the water, further showing the need for building the garden, then the water system. If there is time to build a rainwater catchment system, then it will be helpful to know and include the different components. The components necessary for a rainwater catchment system include a catchment surface, conveyance, screens, a first-flush, storage, purification, and an end use. Below are each of the components described separately.
Catchment surface[edit | edit source]
A catchment surface is where the rainwater will fall on first to be captured. Catchment surfaces, especially for a system that is going to be built (uses mechanical means to capture the rain), are usually roofs. The catchment surface is going to determine how much rainwater can be captured and how that water can be used, depending on the material made up of the roof. Some roof materials provide different levels of water safety (Grafman 2017[11]).
Conveyance[edit | edit source]
Conveyance are usually gutters and downspouts that will transport the rainwater. The conveyance will transport the rainwater from the catchment surface to the filtration and then to the storage. There are different materials that can be used as conveyance, some include: bamboo, PVC, and others (Grafman 2017[11]). Each type of material has pros and cons, such as cost, availability, and durability. Cost and availability will depend on the geographic region.
Filtration[edit | edit source]
Filtration is important in keeping a rainwater catchment system clean. By including filtration, usually a screen, the storage will not have to be cleaned as often to get rid of larger particles that are brought down from the roof. Screens are used for preventing large debris from entering either the storage tank or conveyance which includes gutters or downspouts (Grafman 2017[11]). There are multiple types of materials, shapes, and sizes that can be used for the screen. A few are included below.
Expanded metal sheet screen[edit | edit source]
Expanded metal sheet usually comes with openings in the shape of diamonds. It is economically friendly and has a strong structure since the metal is stretched instead of having holes punched through (Adame 2013[12]). This type of metal sheet can be difficult to handle and install.
Wire Mesh screen (welded)[edit | edit source]
Made from different alloys such as steel, stainless steel, brass, and copper. This type of screen comes in all shapes and sizes allowing for versatility. This type of mesh is easy to handle and install, but can be costly (Metal Supermarkets 2016[13]).
Wire Mesh screen (woven)[edit | edit source]
Woven wire mesh screen can be made from steel, stainless steel, brass, copper. Woven wire mesh gets its name from the wire threads it has that are woven at right angles. This type of wire mesh is easy to handle and install, and durable. The woven type of wire mesh can be costly, but easy to maintain (Metal Supermarkets 2016[13]).
Perforated sheet metal screen[edit | edit source]
Perforated sheet metal comes in different shapes and sizes making it versatile. Made from sheet steel with round holes punched through. The outer area of the sheet is not surrounded with punched holes so it can retain stability. Its structure is not as strong as that of expanded metal sheet (Adame 2013[12]). Sheet metal screens with punched larger holes cost more than the ones with small holes.
First-flush[edit | edit source]
A first-flush flushes the first and dirtiest part of rainwater. The catchment surface collects debris, bird droppings, and other pollutants when there is a time of no rain. Once it starts raining again, all that debris and pollutants gets washed down into the conveyance and can go through the filtration. The first-flush prevents this dirty portion of water from being included in the storage. There are two types of first-flush methods: the floating ball first-flush and the tipping method (Grafman 2017[11]).
The floating ball[edit | edit source]
The floating ball method is more durable than the tipping method and will usually last longer. In this method, as the dirtiest portion of water is diverted into the volume that is chosen, a ball that is located inside will rise. The ball will eventually rise to the top and close the first-flush off from the system. The cleaner portion of the collected water will then be able to travel down toward the storage. A small hole is made towards the bottom so that the dirty water can slowly flush out (Grafman 2017[11]).
Storage[edit | edit source]
Having storage is important so that water can be kept/stored in a volume until needed. There are different types of storage like 55-gallon drums, plastic storage tanks, and commercial rainwater tanks (Grafman 2017[11]). The type of storage to use depends on how much water you want to catch and how much you'll be needing. It is important to consider including an overflow pipe in areas that have high precipitation. This becomes helpful also in case you do not want to store all the water caught.
Purification[edit | edit source]
Water purification helps to further clean the rainwater. This is especially important if the water is going to be used for drinking. In our case, our water will be used for gardening, so we would not need to add purification. Some types of purification include activated carbon filters, slow-sand filters, bioremediation, ceramic filters, UV, chlorination, and more(Grafman 2017[11]). All these types of treatments have pros and cons. Some can purify the water to a higher degree than others. Also, some will be costlier than others.
End Use[edit | edit source]
An end use means having a purpose for the water being caught. Some end uses include water for drinking, gardening, cleaning, or for other purposes. There is some pressure needed for some end uses. Drip irrigation, which may later be implemented to this particular project, would not need as much pressure.
Low Pressure Irrigation[edit | edit source]
While creating a garden space in a flat, urban environment using a rain water catchment system, it is important to realize that there is a limiting factor in regards to water pressure. Having a tank be vertically close to the garden being watered is a difficult hurdle and must be compensated for in the design process, unless a water pump is being used. Water achieves only 0.43 PSI of pressure per vertical foot (Grafman 2017),[11] which is problematic when comparing it to standard household water pressure of 40-45 PSI. To compensate for this, drip irrigation must be used. Whenever possible, adjustable or low pressure drip emitters must be installed to compensate for lack or pressure and ensure the garden remains properly watered (Valipour 2012).<ref>Valipour, Mohammad. "Sprinkle and Trickle Irrigation System Design Using Tapered Pipes for Pressure Loss Adjusting." Journal of Agricultural Science, vol. 4, no. 12, 2012, doi:10.5539/jas.v4n12p125.<ref>This can be coupled with a "Low pressure water timer" for ease of use. The timers are generally standard garden hose thread and allow water to flow on a schedule, without the requirement of pressure like most modern water timers.
Prototyping[edit | edit source]
Here are some of our initial designs for the project. We utilized a process of creating designs, examining them, refining them, and came to the final choice that we found most appropriate for our situation and our client. We eventually decided after research, consulting the client, and analysis of our timeline that a rainwater catchment system added too many extra steps to the process, so we focused on building the garden; to which rainwater catchment could later be added.
First Iteration - "Many Boxes"[edit | edit source]
Our initial idea was based around the simple goals of accessibility to the food bearing garden and maximizing used garden area while maximizing ease of use and ease of maintenance. We designed around the concept of "planter boxes" which are simple structures often of four walls of wood around a bed of soil which can be used to plant many species of crop. There would have been paths around each of the planter boxes so that any one planter box could be reached by a person at least five feet tall and of able body.
We brought this initial prototype to our client for review. What we didn't know was that our client, Cooperation Humboldt, also had some great ideas to bring to the table.
Second Iteration - "Rivers of Soil"[edit | edit source]
After review with the client, this was the design idea that came to mind. Area was given up in the front of the garden for room for seating and a food pantry box. These were secondary interests that came up in the course of discussion that seemed useful to the community and would make the garden more attractive. The final height of the front wall was decided at 24 inches tall, and long grass paths were added with in-ground beds replacing the "planter box" concept. This reduced the maintenance need because planter boxes would require wood, which has a tendency to break down over time in the wet climate of Eureka, California.
Third Iteration - "One Big Terrace"[edit | edit source]
During the building process, a "living design" process was used. Living design is a method of coming up with ideas as a part of the process of construction. In this phase of our prototype, we came to the conclusion that we could save a lot of concrete bricks by building the whole garden flat, as opposed to the three terrace design in the second iteration. This allowed us to save blocks and simplify the look of the garden, improving aesthetics. The pantry was moved to the center seating area, which was made wider by removing the cart area on the right hand side. The path at the top third was connected to the path at the bottom third of the garden to improve accessibility.
Construction[edit | edit source]
In this section, the students have provided a step by step how to construct a similar garden, a cost table,and a timeline used to complete the project.
Timeline[edit | edit source]
Below is a timeline used to plan and construct the community garden.
| Task | Completion Date |
|---|---|
| Review materials to be used/cost of materials | March 10 |
| Gather all materials together | March 23 |
| Dig up front lawn, build wall structure | April 1 |
| Remove last sections of sod and add soil | April 6 |
| Add mulch, wood chips, and plant edibles/natives/pollinators | April 23 |
| Complete project update to Appropedia | May 4 |
| Create a video explaining garden components | May 4 |
| Garden and pantry testing | May 4 |
How to Build a Community Garden[edit | edit source]
The following is a table with a step by step process on how the community garden was built, and how you could do it yourself.

Remove the sod, leaving some behind for later to become one of the paths. You can often reuse this sod later as fill behind your retaining wall. Apply and make level a preliminary test of retaining blocks. Be sure to account for the slope of the lawn.

Remove excess dirt where your bench and community pantry will go. Level the dirt around the edges where the blocks will be set. Fill the edges with sand or another cheap fill where needed to improve leveling.

Add sand where the blocks will be set, then put in first full layer of blocks around the edges of the lawn. Make sure this first layer of blocks is aligned well accounting for the slope because it serves as support for the next two layers. Then add in the other two layers on top of your first layer.

Add in edging where your paths will go. Hammer wooden stakes behind the edging then screw the edging to the stakes for support.

Add cardboard, then manure compost over the exposed dirt where your garden beds will placed to prevent weeds from growing through.

Add in mulch, then the top nutrient rich soil. Then add plants.
Add signage and pantry so neighbors and any other visitors know they can take any of the available goods.
Costs[edit | edit source]
Below is a very initial cost estimate table including purchases made for the project. All final materials were purchased by Cooperation Humboldt. Materials that are donated or reclaimed will be helpful in lowering the total cost.
| Quantity | Material | Source | Cost ($) | Total ($) |
|---|---|---|---|---|
| 1 | Seed starter | ACE Hardware | 10.00 | 10.00 |
| 20 | Bags of soil | Store | 7.00 | 140.00 |
| 2 | Lumber | Donated | 75.00 | 0.00 |
| 1 | Irrigation supplies | ACE Hardware | 50.00 | 50.00 |
| 1 | Pack of screws | Donated | 7.00 | 0.00 |
| 1 | Tank | Donated | 45.00 | 00.00 |
| 1 | Miscellaneous | ACE Hardware | 60.00 | 60.00 |
| Total Cost | $260.00 | |||
Video[edit | edit source]
Below is a video of a brief explanation of the community garden components.

Operation[edit | edit source]
Below is useful information on when and how to maintain the community garden.
Maintenance[edit | edit source]
The following includes a schedule of maintenance that should be considered for keeping the community garden effectively growing and healthy.
Schedule[edit | edit source]
This is a rough layout of the timing of some of the tasks needed to maintain the garden.
- Weekly
- Water the garden weekly or once every 4 days if necessary according to weather, climate, and your plantings. This will vary depending on the area where the garden is built. The native pollinators do not to be watered, unless necessary.
- Monthly
- Check the plots for invasive plant species and "weeds" and compost them as necessary, as well as composting the edibles that you need to rotate out.
- Plant in new species where desirable, and try to keep in mind nitrogen fixation rotations and other nutrients.
- Yearly
- Check ornamental structures, structures that people touch or move a lot like gates and pantry boxes for normal wear.
- Consider a planting plan for the next few seasons out.
- Every 5 years
- Check in to see if the signage has not worn down with weathering.
- Check any retaining walls or larger structural details for wear, warping or major fail points.
Conclusion[edit | edit source]
Testing results[edit | edit source]
Testing including asking people walking by for input or waiting to see if they would say anything about the garden and pantry. A comment received was "this is a great idea!" A test subject was also brought by and he was thrilled about the garden. He interacted with the plants in the garden and checked out the pantry. Also, the food pantry has been actively used by neighbors.
Another test included having one of the student's dog walk by to see if the height and width of the wall would prevent dogs from going over or peeing on the edibles. Below are images of this test subject interacting with the garden.
The tests were to check whether the community garden would be inviting enough for people, and to determine whether the food pantry would be used by others. Also, to determine how effective the wall is on dogs.

Discussion[edit | edit source]
Since most of the vegetables and other edible plants are not ready to harvest yet, the students were not able to test whether people would go into the garden and pick them. Cooperation Humboldt did put a few items in the pantry and once people noticed these items, they began taking them. Others began participating by putting in items of their own in the pantry.
Reports from the homeowners indicate that the neighborhood has given a lot of positive feedback, saying that they think that it's a wonderful idea. The pantry box is very widely used, with contributions from many different families. We think this suggests that the garden will continue to be a success into the harvest season.
Reportedly, the negative concerns of neighbors were limited to worries that the garden would attract rough sleepers to the neighborhood. We have no evidence that this has been the case, and it is the opinion of this group that those concerns lack scope of the wider issues surrounding houselessness.
Lessons learned[edit | edit source]
Building a garden is a technically simple idea in many places. We made ours a little more complicated by combating the natural slope of the original lawn area by building an eighteen inch retaining wall to flatten out the planting area. Doing this created a need to fill the space from the wall to the middle-back of the garden with fill and soil. We initially thought that we would need much more fill than we turned out to need, because all of the sod that we pulled up from the garden turned out to be viable to re-purpose as fill for the garden.
Next steps[edit | edit source]
Steps that will be taken to make the community garden more inviting include: building a pantry where the edible plants can be placed for easy picking, and a bench to make the space more welcoming for visitors. Including a rainwater-catchment-irrigation system will reduce the need for using bought water to water the garden, as well as improving the overall "appropriateness" of the garden.
Update September 2018[edit | edit source]
Success: There have been previous concerns about houslessness and loitering, but recently there have been no experiences with such problems. Nearly all plants transplanted were successful, about six months later. Local pollinators were successful. There have been no problems reported with pests, including slugs, snails, raccoons, gophers and deer.
Improvements: Clear signage with harvest crops. More mulch (straw/wood chip) is needed to increase water retention and weed suppression. More appealing vegetable selection to create familiarity with the public. Alternative irrigation system. Compost to decrease cost of fertilizer. Labor efficiency with watering and weeding (three times per week).
Suggestible Solutions: Obvious conventional vegetables/fruits should be at forefront of garden to be instantly recognized. Signage should include picture/drawing of what freshly harvested vegetable/fruit looks like. Crops with small root systems and quick harvest rates, should be densely planted to increase production.
Looking Forward: Most important implementation includes clear signage, that autonomously educates individuals how to correctly harvest crops. Second goal includes a rain water catchment system, paired with a drip irrigation system, cutting down on cost and labor. A third goal, is to focus on overall success of production.
Update September 2019[edit | edit source]
It has been about a year since this community garden has been built. It is full of various perennial plants, succulents, flowers, and some fruit and vegetable yielding plants. The quality and production of these plants may not be in tip-top shape, it appears that slugs, snails, and insects have been thoroughly enjoying the crop.
Tamara, the lady who oversees the garden, has pointed out that people have not been recently picking from it. This could be because many of the plants out front do not have much appeal to the community. Tamara has said that other plants will have more demand such as strawberries or blueberries, but they are not yet mature and will take a year or two to develop fully and produce fruit. Native plants and pollinators have been planted by Tamara to promote a healthy growing environment for the plants. She has since added Lupin, yellow flower, and monkeyflower to the mix, even collecting the seeds of non-self pollinating plants.
The garden has remained low maintenance with practically no issues other than growing plants that can produce more fruits and vegetables. To address these issues, perhaps putting more appealing plants in the garden to draw more publicity and like-minded people together could be helpful. Growing a few roots may be a good alternative to less purposeful plants who take up space. This garden could become quite a hit in a few years once the plants fully develop into crop yielding sources of food. We just have to be patient for the trend to catch on as the generations go by.
Troubleshooting[edit | edit source]
The following is a table with suggestions to any problems that arise for the community garden:
| Problem | Suggestion |
|---|---|
| Plants not growing | Check soil ph, nutrients like nitrogen and phosphorous, moisture, and compaction. |
| Signage is worn down | Check to see if it can be salvaged, repainted, repaired or purchase a new one if necessary. |
| Animals are eating your edibles | Consider fencing where appropriate, observe what animals are encroaching on the edibles and replant with edibles that are less favorable to them; e.g. fruit trees in areas with lots of rabbits. |
Team[edit | edit source]
The Appropriate Tech Team members include:
References[edit | edit source]
- ↑ Salisbury, A., Armitage, J., Bostock, H., Perry, J., Tatchell, M., and Thompson, K. (Salisbury 2015). "EDITORS CHOICE: Enhancing gardens as habitats for flower-visiting aerial insects (pollinators): should we plant native or exotic species?" Journal of Applied Ecology, 52(5), 1156–1164.
- ↑ 2.0 2.1 2.2 Schmidt, M. G., and Greenberg, K. L. (Schmidt 2012). Growing California native plants. University of California Press, Berkeley, CA.
- ↑ Calscape.org. (n.d.). "Western Azalea, Rhododendron occidentale." Calscape, CNPS, <http://calscape.org/Rhododendron-occidentale-(Western-Azalea)?srchcr=sc5a84e63962e19> (Feb. 18, 2018).
- ↑ Singh, D. J., and Davidson, J. (2016). Growing Vegetables in Your Garden - Tips for Planting Vegetable Crops Outside. Mendon Cottage Books.
- ↑ 5.0 5.1 "SoilWeb." (n.d.). SoilWeb: An Online Soil Survey Browser | California Soil Resource Lab, <https://casoilresource.lawr.ucdavis.edu/gmap/#> (Feb. 19, 2018).
- ↑ Sprouting Education. (2011). "Locally Delicious school garden." Locally Delicious school garden - Appropedia: The sustainability wiki, <https://www.appropedia.org/Locally_Delicious_school_garden> (Feb. 16, 2018).
- ↑ Horstmeyer, S. L. (2011). The weather almanac: a reference guide to weather, climate, and related issues in the United States and its key cities. John Wiley & Sons Inc., Hoboken, NJ.
- ↑ Wolford, DaNelle, et al. "The Best Material for Raised Garden Boxes." Weed 'Em & Reap, 15 Sept. 2016, www.weedemandreap.com/best-material-for-raised-garden-boxes/.
- ↑ Contributor. "How to Know If A Pallet Is Safe to Use DIY Projects Craft Ideas & How To's for Home Decor with Videos." DIY Projects Craft Ideas & How To's for Home Decor with Videos, 13 Mar. 2017, diyprojects.com/know-safe-use-pallet/.
- ↑ Kourik, Robert, and Mark Kane. 2004. Designing and maintaining your edible landscape naturally. East Meon, Hampshire, UK: Permanent Publications.
- ↑ 11.0 11.1 11.2 11.3 11.4 11.5 11.6 11.7 11.8 Grafman, L. (2017). To Catch the Rain. Cal Poly Humboldt Press, Arcata, CA.
- ↑ 12.0 12.1 Adame, E. (2013). "What's The Difference Between Expanded Metal And Perforated Metal?." ADAME Expanded Metal Solutions, <http://web.archive.org/web/20180716230443/http://www.adameemsolutions.com:80/News-Events/whats-the-difference-between-expanded-metal-and-perforated-metal.html> (Feb. 17, 2018).
- ↑ 13.0 13.1 Metal Supermarkets (2016). "Difference Between Perforated Metal, Expanded Metal and Wire Mesh." Metal Supermarkets - Steel, Aluminum, Stainless, Hot-Rolled, Cold-Rolled, Alloy, Carbon, Galvanized, Brass, Bronze, Copper, <https://www.metalsupermarkets.com/difference-between-perforated-metal-expanded-metal-and-wire-mesh/> (Feb. 18, 2018)