The Campus Center for Appropriate Technology (C.C.A.T.) has been around for over 30 years, promoting the practice and implementation of various sustainable technologies and renewable resources. To continue in CCAT's tradition of demonstrating sustainable practices and appropriate design, a "Green Shed" was inspired, designed, and built. The tool shed idea was conceived in 2007 because of CCAT's need for an appropriate place to store their tools. The "Green Shed" was built using various natural building techniques, assisted by a few modern construction processes. Although CCAT has had tool shed's in the past, this was built with more durable and permanent intentions.
This report is meant to be a summary of the project, discussing the various methods, materials, processes, problems, and future considerations in relation to the "Green Shed" project at CCAT. It is meant to serve as a reference, guide, and history of the project to be stored in CCAT's filing system and be shared with the world abroad through internet resources.
Criteria for Green Shed[edit | edit source]
| Criteria | Constraints | Weight |
|---|---|---|
| Maintainability | Repairs expected less than once per year. | 7 |
| Serve as Workshop Space | Can accept at least one shelf and work bench | 9 |
| Locally produced materials and services | Most materials produced in Humboldt bay region | 8 |
| Demonstrate Appropriate Technology to students and community | CCATs mission statement needs to be fulfilled | 10 |
| Efficient storage of Tools | Needs to be big enough to fit most of CCATs tools | 10 |
| Insulation | R-value comparable to standard construction | 6 |
| Durability | Can withstand minor abuse | 7 |
| Use of recycled materials | Natural Building and Recycled materials prefered | 9 |
Timeline[edit | edit source]
The initial idea of building a shed for CCAT started in the fall of 2008. It was thought by the project manager that it could be done in less than a semester. But through all the bureaucratic needs that the University wanted, budgeting, weather, and time it needed, the shed is still under construction two years later. In the fall of 2008 we primarily focused on the design and placement of the shed, keeping in mind of the needs of CCAT, the University, and the overall all goal of natural building. Blending the three together was an interesting task, primarily headed up by CCAT's engineering technician Nathan Chase. At the end of the semester we had plans and approval to move forward with the project. Spring of 2009 was when we broke ground constructing the foundation. This was more of a headache than expected because of the complexity of the project. Working with an existing slab, and really old retaining wall was a grueling task, but it got done. When we came back in the fall of 2009 we had the foundation completed and materials on order. This semester we completed all the timber framing construction. In the spring of 2010, CCAT set a deadline to have the sheds structural components in place and roofed by spring break. This deadline was needed because engineering students wanted to start building the walls when the weather cleared up after winter. This deadline was only missed by one week.
Pre Building Complications[edit | edit source]
The construction and implementation of the green shed was not as quick and easy as originally anticipated. The first timeline for the project was a mere 6 months, which was stalled due to a few unforeseen complications and ended up taking about 2 1/2 years to complete! The problems that arose were due to code and standards enforced by the University, Plant Operations, and Administrative Affairs.
CCAT has usually been exempt from the majority of campus building codes and standards because of the nature and scope of CCAT projects. CCAT most often does smaller scale student designed and implemented projects that do not pose a hazard to others. The "Green Shed" project, however, was a larger project that posed some serious potential safety hazards if not designed and built properly. Given this consideration, CCAT worked closely with the Universities Plant Operations and Administrative Affairs office to ensure that the building was built to safety code. In order to assure that this happened smoothly, CCAT established a team composed of the CCAT Co-Directors, Engineering Technician, Senior Maintenance Employee, and its advisor to meet with Administrative Affairs and Plant Ops members to develop a memorandum of understanding. In it, CCAT and HSU Administration and employees outlined and summarized the shared expectations and understating that would serve as a reference for such projects in the future.
The memorandum of understanding applied to:
- Large-scale structures that people walk under
- Have a roof
- Have electricity or plumbing
- Pose a danger to health or safety
- Require digging more than 12" below grade.
If a project at CCAT did meet some of the criteria listed above, it is understood that CCAT would contact and work with Plant Operations, and in some cases the Space and Facilities Committee, to develop structural plans. If plans were required, CCAT needs submit:
- Site plan (identifying location)
- A floor plan (with measurements)
- Additional illustrations and descriptions of the construction process.
It was also made clear and understood that new structures at CCAT need to be built to University standard and include the following:
- Red standing seamed roof
- Ochre colored exterior
After all of these guidelines were mapped out and agreed upon in the memorandum of understanding, CCAT developed detailed plans including blueprints, CAD drawings, and all other considerations which were submitted to Plant Operations. Both Plant Ops and Administrative Affairs were pleased with the document provided and approved the project, which allowed CCAT to move forward and break ground.
-
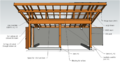
Front Angle CAD Drawing/ Blueprint
-

Side Angle CAD Drawing/ Blueprint
-
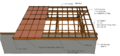
Roof CAD Drawing/ Blueprint


One other problem which set back the completion of the project was a lack of proper funding. Given the new guidelines CCAT needed to use a standing seamed metal roof, which was far out of the budget range. Given this new expense, CCAT went to Associated Students and applied for funds to help pay for the extra cost. Associated Students granted the proposal, which allowed for CCAT to build the structure.
Construction Process[edit | edit source]

Construction started on the shed with the preparations with the foundation. Three (3) 2'x2'x2'holes had to be dug out of the existing slab for the foundation of the three supporting 2x6 columns. These blocks of concrete are for the potential uplift created by the overhang of the roof. Three stem wall forms were built to provide a platform for the future alternatively built walls to be placed out of moisture. A stem wall was also built on top of the existing retaining wall to give the back side of the roof the desired height. Because the existing retaining wall dog legs down on the south side, bigger forms were built to raise the back wall up level all the way across for the span of 24.'

After the forms were all built, all of them were reinforces with #4 rebar. The stem walls laid on the existing slab were keyed in with rebar to prevent them from lateral movement. The concrete was donated from Eureka Ready Mix Concrete Co. Inc., and the pump truck was also donated from Powel Pumps. On poor day the whole retaining wall, which was made of cinder block, was filled all the way across up to the top of the forms. The stem wall and 2'x2' blocks were also filled on the slab. Before drying, 5/8 inch anchor bolts were placed 4' o/c for the sill plate on the back wall. For the three supporting 4x6 posts, Simpson Strong Tie CB46 were placed so the beams could be directly attached to the foundation. The whole project required 9 yards of concrete to complete.

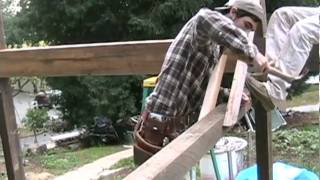
After the foundation was completed, construction began on the structural part of the Green Shed. Three Simpson girder hangers were installed over the back stem wall to fasten the 4x4 horizontal beams. A redwood sill plate was then placed over the girder hangers and anchored into the foundation by the bolts and concreted screws. The sill plate was treated with a natural preservative to prevent rot. This is an alternative to conventional construction where pressure treated lumber is used when wood touches concrete. This method is highly pollutant and was not an option for CCAT.

The three 4x6 posts were then placed in the column bases that were previously installed in the concrete. On two outside columns, three different cuts were made for joining the additional pieces. Starting on the top most cut, a 4x6 notch was cut so the roof ledger could be laid in. The middle cut was 2 deep and 10 high so the main beam could rest in it. And the bottom was a half lab cut for the connection of the horizontal 4x4 beam. The middle 4x6 column does not go all the way to the roof beam, so it only needed a mortis and tenon joint for the horizontal 4x4. This column was cut short so the main beam joint could rest at the top.

A Simpson post cap bracket was then placed on top of the central column for the joining of the main beam. The main beam was then installed between the two outer columns and on top of the central column. The center joint was reinforced with bolts, and the ends were reinforced with lag bolts. A cripple column was place over the center column and main post joint. It was reinforced with A35's and diagonal bracing going back to the horizontal 4x4. On top of the cripple column, another post cap was placed for the connection of the two 4x6 roof headers. The roof headers consisted of two 12', 4x6 beams connected at the center of the shed to make a 24' roof span.

The roof was then laid out with 2x6 rafter's 2' o/c, with two extra rafters flush with the outside walls of the shed. The rafters have bird mouth cuts on the bottom ends, and were connected to the sill plate and roof header with Simpson hurricane ties. A row of blocks was then placed flush with the front and back walls, with a third row in the middle of the span. Fascia boards finished the day on both ends of the rafter's. Then 11 rows of 1x4 perlon's 3' o/c went horizontally across the slope of the roof to support the installation of the roofing material.
A vapor barrier was placed over the perlon's, and then the roof installation began. The roof was a metal seamed roof that is laid out in vertical panels. The bottom flashing went on first. Then the panels were laid out one by one. They were connected to the roof on one side with metal fasteners, and the other side snapped on top of the previous rib all the way down roof. The side flashing and top flashing finished the job with a little bit of caulking on some exposed seams.
Materials and Alternative Design[edit | edit source]

The overall goal of the Green Shed was to have (as much as we were allowed) a low impact shed that was built with sustainability in mind. Starting with the building pad itself, we tried to implement as much of the existing slab and cinder block retaining wall was we could so we didn't have to use as much new material for the foundation. CCAT also already had the three column beams and horizontal support beams stored on sight for use on a project. These beams were old growth redwood that were salvaged from a previous CCAT project year's before. Those support and column beams were also a way to demonstrate different simple beam joinery. We used half laps, mortise and tenon, and notch cuts to join the beams together instead of using energy intensive and ugly Simpson Ties.
The main header beam was sourced from the Arcata Community Forest (ACF), only a few miles from the CCAT house. The ACF is a certified Forest Stewardship Council forest (FSC). The FSC only certifies sustainable timber harvest that have the long term sight management plans for the future. The actual tree the main beams came from was wind fell from a storm, a natural process. Almquest Lumber milled the beams for CCAT. So the whole process of growing, harvest, milling, and end use of the tree was within a five mile radius.
For the sill plate it was decided to use redwood because of its local availability, and because of its natural ability to prevent rot. This natural rot deterrent was backed up with an all natural wood preservative that extends the life of timber that is in contact with water. The product we used was Life Time Wood Treatment.
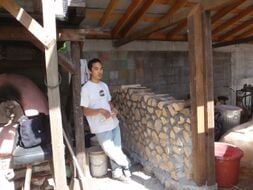
The design as a whole was also carefully planned out to meet CCAT's mission statement and goals. The open, timber frame design allowed many more options compared to conventional framing. The walls of the project allowed CCAT to demonstrate three different alternative ways to close in a house. As of spring 2010, the walls were decided to be a cord wood wall, slip straw, and a cob wall with inlaid recycled glass bottles to allow light in. The open space above the west wall allows there to be windows for the clear story. This lets in natural light as opposed to wiring the shed using electricity.
The roof of the shed has a three foot eve on every side except the back wall. Three feet was needed in order to protect the fragile walls from the harsh elements of Arcata's rainy weather. But the eves also caused problems with potential uplift. So the three columns were all designed from the foundation up to counter act the uplift. They are all sitting on a 2 foot cube of concrete with heavy Simpson ties for the column base. The columns extend all the way to the roof where they are connected with lag and machine bolts to the roof header. This balloon style of construction makes the shed stout to all the elements. The 24'x18' roof is also a source for a rainwater catching system that will provide water a future outdoor rinsing sink.
Instead of using conventional plywood for shear strength of the shed, we instead used diagonal bracing. On the west wall there is simply a 2x6 going diagonally from corner to corner. Supporting the tall columns, there are 2x4's going diagonally back to the horizontal supports. For the roof 1x4 perlons were used instead of sheathing. The manufacturer of the metal roof said sheathing wasn't necessary because the construction of the metal roof provided the entire shear needed. They only needed the perlons for the roof to lie on and fasten to the rafters.
Future Maintenance Requirements and Considerations[edit | edit source]
As of this writing in May 2010, the shed is a standing skeleton of timber and roof. The three walls are about half way built, and will hopefully be done before summer. Some projects that still need to be done are as follows:
Windows: There is a big open space above the west wall that needs windows and some framing.
Sliding Barn Door: The door is already built and was designed to be placed on the sheds main opening on the west wall. This door came from the original shed that CCAT originally had but was forced destroy.
Side Door: A side door was designed into the north wall that needs to be built and installed.
Top Walls: There is a triangle shaped space between the top of the end walls and roof that needs to be filled in to protect the interior from the elements.
Interior Design and Construction: Once the exterior of the Green Shed is finished, there needs to be serious thought into the interior space. Work benches, shelves, storage boxes, hangers, etc… This all needs to be thought of and built before the shed becomes functional. The worst thing that could happen is that the shed becomes a storage container. The space needs to be utilized to its fullest extent to have proper storage, but it also needs to be a functional work shop as well.
Rain water Catchment: A proper rainwater system needs to be designed and installed to capture the run off created by the roof. There is room behind the back stem wall that could store a few 55 gallon drums for storage.
THINGS TO MONITOR OVER TIME
Over the years, standard maintenance will need to be done to ensure the life of the Green shed. Most importantly are the alternatively built walls. The north wall is going to be a stout cord wood wall that will have very little maintenance needed. The other two walls might need to be rebuilt if they fail.
The roof will also need to checked every year for leaks. Metal seamed roofs tend to let water in where the screws are.
Over time the rubber gaskets on the screws will wear out and allow water to seep in.
The top and side flashing is where the most attention will be needed. The back sill plate, and three column post will also need to be checked periodically for rot. If rot is detected, try to stop the spreading right away before it causes more damage.
Hanging or putting dead weight on the horizontal beams might cause them to crack or brake. They are designed to hold west wall and columns in place horizontally; they are not designed as weight bearing loft joyce's.
If you are working at CCAT, or know of any updates on the shed, please update this site!
Related projects[edit | edit source]
This projects describe the construction and implementation of different parts of the green shed