
Bayside Park Farm (formerly known as the Arcata Educational Farm) has been in operation since 1993, and was Arcata's first CSA (community supported agriculture) farm. In order to allow for the preservation of the farm's excess crops, a solar dehydrator was implemented in 2009 by a previous Engr305 Appropriate Technology class. Dehydrating food is an especially important process for farms because it allows them to maintain their livelihood (food) for the long term. However, after problems with adequately drying produce, the dehydrator fell into disuse and was ultimately removed from the property. We were asked to build an effective, educational follow-up to the initial dehydrator.
Problem Statement[edit | edit source]
The objective of this project is twofold:
- To produce a durable and effective solar dehydrator to aid in the preservation of Bayside Park Farm's excess produce.
- To design the solar dehydrator simply and accessibly enough to foster adoption and replication of the solar dehydration process.
In summary, it is our ultimate goal to provide the Bayside Park Farm with a solar powered food dehydrator that will meet their produce needs, is easy to maintain, and will last much longer than the one before it.
Project Criteria[edit | edit source]
This criteria list represents what we feel are the most important considerations concerning the scope and objective of this project. The scale is weighted from "1" being of the least significance to "10" being of the most significance.
| Criteria | Constraints | Weight (1-10) |
|---|---|---|
| Functionality | Device working as intended | 10 |
| Maintainability | Has to be maintenance friendly to the user, little knowledge required for maintenance and repairs | 9 |
| Safety | Device must pose no outstanding operational dangers to user | 9 |
| Usability | Ease of regular operation is key, intuitive handling | 8 |
| Budget | Must not exceed budget | 10 |
| Reproducibility | Design can be easily reproduced by others | 7 |
| Aesthetics | Must look like a natural extension of the farm | 7 |
Timeline[edit | edit source]
This is a proposed timeline:
| Estimated
Completion Date |
Completion Date | Task |
|---|---|---|
| 2/02/14 | 2/02/14 | Began setting up Appropedia page. |
| 2/08/14 | 2/08/14 | Chose two designs to begin prototyping. |
| 2/14/14 | 2/14/14 | Met with client in order to determine specific requirements for dehydrator. |
| 2/20-2/22/14 | 2/20-2/22/14 | Constructed two prototypes from cardboard and cellophane wrap; conducted 1 day of testing. |
| 3/02/14 | 3/02/14 | Began accumulating materials for full-size construction and possible wood prototypes. |
| 3/14/14 | 3/09/14 | Finished prototype testing |
| 3/16-3/22/14 | N/A | Prototype testing in Southern California or Hawaii (spring break destinations) in order to determine effectiveness. Source materials for final design. |
| 3/23/14 | 3/24/14 | Determine dimensions and parts necessary for final design. |
| 3/26/14 | 3/28/14 | Finish sourcing materials for final design. Begin construction of final design. |
| 4/18/14 | 4/20/14 | Finish construction of final design. |
| 4/10-4/19/14 | 4/22-4/30/14 | Trial runs of design in order to determine flaws and necessary improvements |
| 4/20-4/30/14 | 5/05/14 | Fix flaws, final trial run. Record results. |
| 5/01/14 | 5/05/14 | Finish testing effectiveness of various solar absorbers |
| 5/11/14 | 5/11/14 | Deliver dehydrator to Bayside Park Farm. |
Budget and Costs[edit | edit source]
Below is a finalized budget for the Bayside Park Farm solar dehydrator.
| Materials | Source | Quantity | Cost($) | Total($) |
|---|---|---|---|---|
| 1 3/4" 12mm Wood Screws | McKenny's Do It Best Hardware | 60 | 0.13 | 7.80 |
| 1 1/2" 10mm Wood Screws | McKenny's Do It Best Hardware | 30 | .08 | 2.40 |
| 3/4" Machine Screws and Nuts | McKenny's Do It Best Hardware | 6 | 0.25 | 1.50 |
| Lumber: 2"x4'x20' | McKenny's Do It Best Hardware | 1 | 17.00 | 17.00 |
| Lumber: 16'x1'x3/4" Pine Plank | McKenny's Do It Best Hardware | 2 | 28.00 | 56.00 |
| Short Wood Tacks | McKenny's Do It Best Hardware | 30 | 1.50 | 1.50 |
| Plexiglass Sheet: 30"x60" | Ace Hardware | 1 | 35.00 | 35.00 |
| Stainless Steel Hinges | McKenny's Do It Best Hardware | 1 pack of 2 | 8.00 | 8.00 |
| Wire Racks | Dollar Tree | 4 | 1.00 | 4.00 |
| Heat Absorber: 30 Gallon Trash bag | Dollar Tree | 1 | 1.00 | 1.00 |
| Velcro Pads | Michael's Craft Supply | 1 | 2.50 | 2.50 |
| Metal L-braces | McKenny's Do It Best Hardware | 1 pack of 4 | 3.50 | 3.50 |
| Total Cost | $139.70 | |||
Literature Review[edit | edit source]
This is a review of the available literature pertinent to the proposed solar dehydrator at Bayside Park Farm.
Dehydration basics[edit | edit source]
The dehydration of food is the oldest method of preservation, dating back as far as 12,000 B.C., with proponents and users including the Roman empire, ancient Middle Eastern and Asian cultures, and the Europeans of the Middle Ages.[1] Solar dehydration was likely the first (and least resource intensive) method of food drying, and is very simple to do in a sunny, warm environment.[2] Food is placed in a container designed to trap heat, and the air is then heated to a temperature high enough to prevent microbial growth, but not high enough to actively cook the food (roughly 130 degrees Fahrenheit for produce and 150F for meat).[3] One of the most important aspects of a dehydrator is the airflow: the air should be able to flow in one side, heat up and absorb water from the food, and escape from the other side.[4]
Dehydration concerns[edit | edit source]
One of the biggest issues with solar dehydration, particularly in Humboldt County, is its reliance on the ambient climate. Arcata falls and winters are typically characterized by cool temperatures with intermittent sun.[5] Alongside the cool, cloudy days, an average relative daytime humidity of roughly 60% (with nighttime humidities commonly reaching 90%) will pose a challenge to achieving satisfactory food dehydration.[5]
Types of solar dehydrators[edit | edit source]
Three main types of solar dehydrators exist: natural-convection dryers (which do not require electricity or mechanical energy for operation), forced-convection dryers (which commonly use an electric fan to maintain a constant airflow), and solar-assisted dryers (which uses an auxiliary heating source as its primary dryer).[6] Because of the energy-intensive nature of solar-assisted dryers, we limited our literature review to two types:
1. Natural-convection dryers[edit | edit source]
Two main types of natural-convection dryers exist. The simplest, a box dryer, is essentially just that: a large box with one face angled to catch the maximum amount of sun. The box serves as both the solar collector and the drying chamber, with air intake holes drilled low on the box and exhaust holes drilled high to allow moisture-laden, warm air to escape. The box dryer's simplicity allows it to be easily reproduced, and the single-chamber design keeps the heat where it's needed, reducing heat loss via convection. However, the single-box design dramatically reduces the dehydrator's working capacity, and the solar angle cannot be adjusted to maximize seasonal sunlight.
The other type, called a tower dryer, relies on an attached solar collector to heat air, which then rises, is directed into a tall drying chamber, then is released from ventilation holes at the top of the tower. The tower dryer's design is more complicated than that of the box dryer, requiring fabrication of a secure, flexible duct to move air from the solar box to the dehydration chamber. This allows for increased heat loss; however, the increased shelf space in the dehydrator tower and the ability to change the angle of the solar collector make it a more adaptable design for certain climates.
2. Forced-convection dryers[edit | edit source]
Forced-convection dryers require external power to operate. Household power (120V AC in the United States) is commonly used to power fans, which provide a mechanical assist to pull in and expel air, facilitating a faster drying speed. Forced convection dryers are commonly tunnel-shaped, or constructed to maximize surface area and air contact with the material to be dehydrated, but any dehydrator can be turned into a forced-convection dryer with the addition of an electric fan.
Components of solar dehydrators[edit | edit source]
There are a multitude of designs, shapes, and plans for solar dehydrators. However, all of them share a few similar components: a heat chamber, a method of keeping it off the ground, and a removable tray that contains the food.[7]
Heat Chamber[edit | edit source]
The heat chamber is most often a solid-sided box with a clear polycarbonate top; this acts as a greenhouse and traps incoming solar heat in order to facilitate the drying process. It is almost always backed by a dark material in order to promote heat absorption. The heat chamber can either be used as a simple heat collector (which acts as a way to foster convective air currents in a system, as in a tower dryer) or as the drying chamber itself, as in a box dryer.[8][9]
Elevation[edit | edit source]
In order to prevent the intrusion of insects and foreign contaminants, the dehydrator is commonly placed on legs or elevated in some way. This prevents animals from approaching the dried goods from the ground, and keeps dirt from contaminating the food as well.[10]
Removable Tray[edit | edit source]
The trays must be permeable in order to allow for both good airflow and to allow any excess moisture to easily escape from the materials being dried. Some sources advocate the use of readymade plastic trays,[11] others suggest custom-building the trays in order to allow for optimal circulation and permeability.[8][12]
Development and Construction[edit | edit source]
Phase 1: Design[edit | edit source]

We started with a very general idea of what we wanted to do: we envisioned a simple, effective dryer that would be able to raise the internal temperature to roughly 130F under full sun; the accepted ideal temperature for drying produce. During our meeting with Jayme Buckley at Bayside Park, we were informed that the dryer would likely be used to dry herbs. In order to keep costs down and the design simple, we decided to pursue passive solar dryers only; that is, dehydrators that used only the sun's energy. We prototyped two types of solar dryer: a tower convection dryer and a simple box dryer.

Both prototypes were constructed from household materials: cardboard boxes formed the drying chambers and solar collectors, plastic food wrap served as the solar window, and our solar absorbers were black plastic garbage bags. During testing, it became apparent that the tower dryer couldn't raise the internal temperature to a significant degree over ambient, whereas our simple box dryer displayed an impressive temperature increase (over 120 degrees Fahrenheit in direct sunlight).
In light of this, we settled on using a box dryer, as the design was simpler, proven to heat to a higher temperature more quickly, and wouldn't lose as much heat in the transition from solar collector to drying tower. We used a design from instructables.com as a reference, but as our materials differed, we extensively modified the proportions and overall structure in order to optimize the dryer for our climate and make the most of the materials we had.
Phase 2: Materials Gathering[edit | edit source]
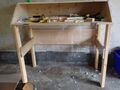
Initially, we wanted to use a combination of plywood and 2x4 lumber due to their inexpensiveness, durability, and ease of working with. However, concerns were raised about the possibility of formaldehyde offgassing from the plywood, as the chemical is present in the glues used to hold the thin sheets of wood together. After some deliberation and consulting with McKenny's Do It Best in Arcata, we decided to forego plywood and instead use multiple lengths of 1" thick x 12" wide pine planks for our walls, top, and base. 2x4s remained our choice for the legs in order to maximize the sturdiness of the structure while minimizing cost. Our solar collector would be lit via a large sheet of Plexiglass, which we chose for its light weight, durability, and ease of mounting due to its ability to be drilled. Stainless steel hinges were sourced due to its resistance to rust, as the dehydrator would be dealing with large quantities of moisture, both from the food and from the humid climate. Small metal L-braces were also procured in order to reinforce the legs.
-
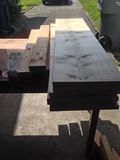
Pine boards and 2x4s used for the construction of the dehydrator.
-
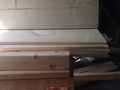
Another view of our materials, minus the plexiglass.
-
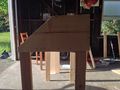
Side view of the work-in-progress box and legs.


Phase 3: Construction[edit | edit source]
Armed with 8 4-foot long pieces of 1" by 12" pine, 6 3-foot long sections of 2x4, 70 1 3/4" wood screws, two sets of bits and drives, sandpaper, and two power drills, we set to work. We built half of the bottom and the back wall first, sinking screws through the pine board into the tops of two 2x4s in order to form the back legs of the dehydrator. Another pine board was attached to the bottom of the base in order to provide the attachment for the front half of the dehydrator floor, which was then attached using six wood screws. 2x4s were attached to the bottom of the front half of the dehydrator floor in the same method as before.

In order to maximize solar insolation, we used an online solar angle calculator. After inputting Arcata's longitude and latitude, we found that a 40-degree angle would be ideal for Arcata, capturing the most sun (and thus providing the most heat) during the winter and early spring, which would be the tail end of our harvest season. Leaving a 1" lip on the bottom to account for where we would be joining the sides to the baseboard, we used a protractor to measure out the angle, then cut both side pieces using a circular saw. The side pieces were joined to the baseboard by putting several wood screws through the bottom and back edge of each side piece and into the baseboard and back wall.
The top piece of the dehydrator box was simple to attach: after some minor trimming in order to account for a small amount of warp in one of the side panels, we used one of our 4-foot pieces of pine and secured it at the top of the side and back pieces using wood screws. However, due to the necessary 40-degree angle of the side pieces, we had a small "lip" that jutted out past the sloped front face of our dehydrator, which needed to be eliminated if our Plexiglass were to lay flush with the box edges. We were able to borrow a hand planer from one of Justin's neighbors, and quickly managed to whittle the lip down to be flush with the sloped front edge.
With the box complete, we needed to attach our transparent medium. We'd decided on acrylic (Plexiglass) instead of pane glass because of its light weight and durability; it needed to be able to stand up to the occasional bump or over-eager closing without shattering. Additonally, using acrylic allowed us to mount hinges directly to the transparent surface: however, this opened the door to a lengthy debate over where and how the hinges should be mounted. After some time, we decided that in order to keep the window as close to the frame as possible to minimize gaps, we'd mount one side the hinge to the top of the dehydrator "floor", then wrap the hinge around the window and fasten the other side of the hinge to the outside of the pane. This can be seen here.
-
The back half of our dehydrator.
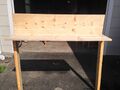
-
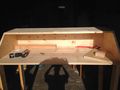
Completed wood "box" of the dehydrator.
-
Plexiglass and hinges attached.
-
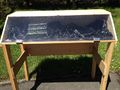
Our finished dehydrator, with garbage-bag absorber.


Operation[edit | edit source]
The dehydrator is simple to operate, and requires minimal human intervention in order to run:

Flatten solar absorber and arrange dehydrator shelves. Absorber can also be wrinkled/ fluffed to increase surface area if an increase in temperature is desired.

Clean any debris or moisture off Plexiglass screen.

Rotate dehydrator to face the sun. Simply rotate the dehydrator until its shadow is cast directly behind itself.

Place material to be dried on racks, ensuring that light can still get through to the heat absorber.
Occasionally change dehydrator's position to optimize heat intake, if needed.

Monitor materials until satisfactorily dried.
Maintenance[edit | edit source]
The box dehydrator design is low-maintenance by nature, as there is very little wear and tear associated with the operation of the device. With some very simple, easy routine tasks (each taking less than 5 minutes), the dehydrator should sustain many years of continuous usage.
Schedule[edit | edit source]
Daily[edit | edit source]
- Cover dehydrator at sundown to keep the wood as dry as possible. It is extremely necessary to keep the unfinished wood away from poor weather, as it will quickly deteriorate the device. Keeping the device dry and shaded when not in use will prevent rot, sun damage, and other weathering effects.
- Re-position dehydrator to take advantage of changing sun angles
Weekly[edit | edit source]
- Check wood joints for splitting
- Ensure that ventilation holes are clear
- It is highly recommended that the exterior of the device is covered in some type mineral oil (sold commonly at hardware stores as 'Lemon Oil') to keep the wood hydrated and protected. An application of this once a week or every other week is recommended. Alternatively, for a long term solution a permanent wood finish may be applied to increase the dehydrator's lifespan.
Monthly[edit | edit source]
- Examine Plexiglass for signs of yellowing or cracking
- Check wood joints for splitting
- Check screening to ensure it's intact
- Examine hinges for rust
Yearly[edit | edit source]
- When not in use, cover and store dehydrator on dry ground
Conclusion[edit | edit source]
Testing Results[edit | edit source]
During testing, our dehydrator consistently achieved temperatures between 40 and 55 degrees Fahrenheit above ambient:
| Run
Number |
Weather | External
Temperature (F) |
Internal
Temperature (F) |
Notes |
|---|---|---|---|---|
| 1 | Partly Cloudy | 64 | 115 | No load. Achieved this temperature after 1.5 hours in intermittent full sun. |
| 2 | Partly Cloudy | 60 | 102 | No load. Moderate winds blew open our hinged Plexiglass door. |
| 3 | Sunny | 60 | 120 | Ideal conditions, no load. |
| 4 | Sunny | 65 | 112 | Light breeze. No load. 2 dark aluminum pizza pans and a cookie sheet were present to act as thermal mass. |
| 5 | Sunny | 60 | 110 | Moderate wind, loaded with parsley. Temperature was enough to fully dry parsley in 40 minutes; to the point of disintegrating upon touch. |
| 6 | Sunny | 60 | 120 | Light to moderate wind, loaded with one slice of tomato cut to be thin on one end and thick on the other. Tomato was dried in under one hour. |
-

Dehydrator, thermal mass, and parsley.
-

Our sundried tomato.


Discussion[edit | edit source]
Overall, we were extremely happy with the results of the dehydrator: the humid climate was a large concern for us, so we concentrated first on raising the internal operating temperature of the dehydrator, then focused on airflow that would provide adequate moisture transport out of the drying chamber. Since the dehydrator will primarily be used for drying herbs, we believe our design will work well to dry moderate quantities of tobacco, leeks, basil, and most other leafy greens. As the moisture content of the material being dried increases, we expect the dehydrator to take longer, but still to be able to accomplish the task of drying small quantities of high-moisture foods such as tomatoes, as well as small quantities of moderate-moisture foods, such as thinly sliced bananas, apples, and whole berries.
Lessons Learned[edit | edit source]
Construction[edit | edit source]
- When cutting the lumber materials, avoid cutting through knots and other weak points in the lumber to avoid cracking and splitting.
- Plan ahead where each screw will go to avoid competition with space for other screws that will be placed in the future
- Avoid putting in any hardware where easily removable/ disposable hardware can go instead (wood tacks vs. construction staples). This allows easy replacement of components, for example the screening is held in place with a couple dozen wood tacks and replacing the screening would require the removal and replacement of each wood tack.
- Reinforcement of legs is a must, large metal braces for leg-body joints and a horizontal brace on the legs will prevent harmful torque on the body when being moved.
Solar Absorber[edit | edit source]
- Finding a correctly sized solar absorber was difficult because we were forced to search for specific dimensions. Using an amorphous absorber, such as a garbage bag, alleviated this problem, but may be aesthetically unpleasant to some.
Next Steps[edit | edit source]
We recommend that the exterior of the dehydrator be sealed, then treated with deck or siding stain in order to protect the wood from external moisture and preserve its structural integrity. Due to our limited budget, the dehydrator had to be constructed from pine; an excellent indoor wood, but due to its limited resistance to insects and decay, it does not perform well outdoors.
In future dehydrators, we recommend that a more durable wood be used, and that a better solar absorber be used. Ideally, the solar absorber will be black in color, will have a moderate thermal mass (in order to provide consistent, even heating while maintaining a rapid temperature increase in order to minimize the chances of spoilage), and will be easy to clean. A black sheet of metal would be ideal; however, we were unable to locate a suitable material within our limited budget and time.
Troubleshooting[edit | edit source]
| Problem | Possible Fix |
|---|---|
| Dehydrator is not drying produce | Make sure that there is as much surface area of the solar absorber being exposed to the sun as possible. Do not clump the produce or layer on top of each other as this will trap moisture. Make sure that all ventilation points are unobstructed. |
| Pests are entering drying chamber | Check to see that all screens are intact. Examine all points where the chamber walls or plexi meet to ensure there is no un-screened gap. If unprotected gaps are found apply screen immediately. |
| Dehydrator body/ legs are deteriorating | Apply mineral oil to exterior of dehydrator thoroughly and evenly (short term) or apply a stain or finish to protect the wood (long term protection). |
| Cracking and or splitting in wood components | Inject high strength epoxy wood glue or other wood adhesive to fill cracks. Take measures to ensure injection points are free of debris, dust, and other foreign matter so the adhesive can have full contact with the wood. |
| Scratches on Plexiglass | Avoid cleaning the plexi with any rough or coarse materials. Try to clean using only soft cloth or microfiber cleaning cloths and plexi-safe cleaning chemicals. |
| Yellowing or other discoloration, stiffness, warping of Plexiglass | Do not leave dehydrator in full sun when not in use, this will greatly reduce the amount of sun damage on the device. It is highly recommended to cover the device with a tarp to prevent such sun damage. |
Team[edit | edit source]
Project completed during Spring semester, 2014.
Update October 2014[edit | edit source]


Overall the dehydrator is doing its job. It dries different types of produce that the creators had planned on. For instance, they don't only use the dehydrator to dry JUST herbs, they use it for many other things. With a different intended produce the dehydrator has become prone to ants. Although it was not meant to dry anything else other than herbs, I think a silk screen instead of wire mesh is a necessary upgrade. As for the internal temperature it definitely would work if in direct sunlight but because we visited towards the end of their season the sun rarely comes out. Even with less sun, the dehydrator can still dry. It takes longer but it still gets the job done. One of the issues that our guide had told us was that the ventilation needed to be bigger so they would get more airflow but after watching the intended use it may not have been an option. Regardless having bigger ventilation holes was a concern. Also there still isn't a weather sealed finish so bad weather conditions are still a concern. Still it is not broken but it could be better. They did a great job though!
References[edit | edit source]
- ↑ "Historical Origins of Food Preservation." National Center for Home Food Preservation. http://nchfp.uga.edu/publications/nchfp/factsheets/food_pres_hist.html (accessed February 7, 2014).
- ↑ Torrey, M. Dehydration of Fruits and Vegetables. Park Ridge, N.J.: Noyes Data Corp, 1974.
- ↑ "Dehydration." Pickyourown.org. http://www.pickyourown.org/dryingfoods.htm (accessed February 9, 2014).
- ↑ "DIY Solar Dehydrator." TheHomesteadingBoards.com. http://thehomesteadingboards.com/2012/03/diy-solar-dehydrator/ (accessed February 9, 2014).
- ↑ 5.0 5.1 "WeatherSpark Beta." Average Weather For Arcata, California, USA. https://weatherspark.com/averages/29570/Arcata-California-United-States (accessed February 9, 2014).
- ↑ Hui, Y.H., Clary, C., Farid, M.M., et. al. Food Drying Science and Technology. Lancaster, Penn.: [DEStech Publishing], 2008
- ↑ Fodor, E. The Solar Food Dryer: How to Make and Use Your Own Low-Cost, High-Performance, Sun-Powered Food Dehydrator. Gabriola Island, Canada: [New Society Publishers], 2005.
- ↑ 8.0 8.1 "How To Build a Solar Food Dehydrator." Off The Grid News. http://www.offthegridnews.com/2012/04/16/how-to-build-a-solar-food-dehydrator/ (accessed February 9, 2014).
- ↑ Russon, Jonathan K., Michael L. Dunn, and Frost M. Steele. "Optimization of a Convective Air Flow Solar Food Dryer." International Journal of Food Engineering 5, no. 1 (2009). http://contentdm.lib.byu.edu/cdm/ref/collection/IR/id/67 (accessed February 9, 2014).
- ↑ Karla, S. K., and K. C. Bhardwaj. "Use of simple solar dehydrator for drying fruit and vegetable products." Journal of Food Science and Technology (1981). http://agris.fao.org/agris-search/search.do?f=2013/US/US2013019795410012440.xml;US201301979541
- ↑ https://www.appropedia.org/AEF_food_dehydrator
- ↑ Wheeler, E. Home Food Dehydration: The Hows, What and Why. Seattle, Wash.: [Wheeler Enterprises], 1974.